This article guides you through the process of setting up user authentication and access control for Amazon Transcribe or Amazon Kinesis Data Streams by using an Amazon Cognito user pool and an Amazon Cognito identity pool. Performing these steps enables you to get Pega™ Voice AI support for languages that Voice AI does not natively support, by using your Amazon Transcribe subscription. It can also enable you to acquire audio for Voice AI analysis through Kinesis Streams for Amazon Connect calls.
Amazon Cognito provides a fully managed user identity solution that makes it easy to add user sign-up, sign-in, and access control mechanisms to your web and mobile applications. It enables secure access and use of Amazon Transcribe on premises or from a different Amazon Web Services (AWS) account.
The process of granting access to your Pega Customer Service™ application to Amazon Transcribe or Amazon Kinesis Streams consists of five high-level steps that you perform in your AWS account, which are described in the sections that follow:
- Create a Cognito user pool.
- Configure the user pool app client.
- Create a user in the user pool.
- Create a Cognito identity pool.
- Provide Amazon Transcribe access to the authenticated user.
Kinesis Streams implementation requires an additional step - Provide Amazon Kinesis Video Streams access to the authenticated user.
Before you begin:
-
Create an AWS account with appropriate permissions to create a Cognito user pool, Cognito identity pool, Identity and Access Management (IAM) policies, and Amazon Transcribe resources.
-
Ensure that you have basic familiarity with AWS services and concepts.
-
Go through Accessing AWS services using an identity pool after sign-in in the Amazon Cognito Developer Guide.
Create a Cognito user pool
- In the AWS Management Console, navigate to the Cognito service.
Note: You can also go to the service directly at https://aws.amazon.com/cognito/. - Click User pools, and then click Create user pool.

- In Step 1 - Configure sign-in experience, select the following options:
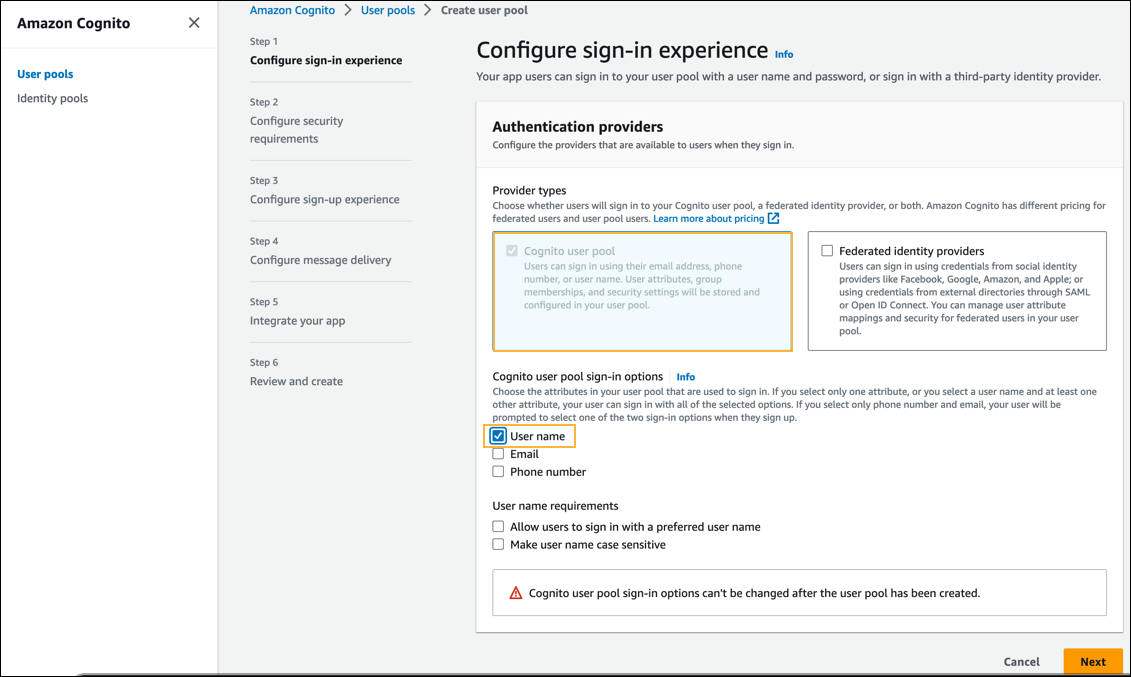
- In the Provider types section, select Cognito user pool.
- In the Cognito user pool sign-in options section, select the User name checkbox.
- Click Next.
- In Step 2 - Configure security requirements, do the following:
- In the Password policy section, retain the default selection, Cognito defaults.
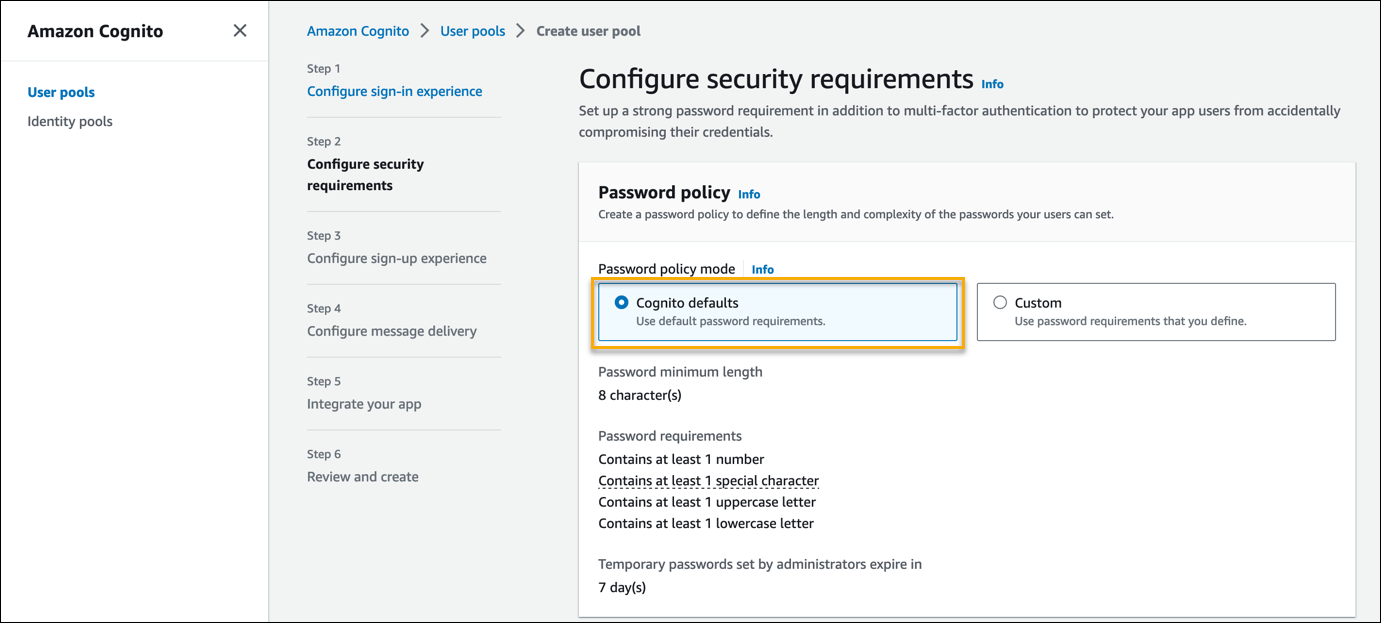
- In the Multi-factor authentication section, under MFA enforcement, select No MFA.
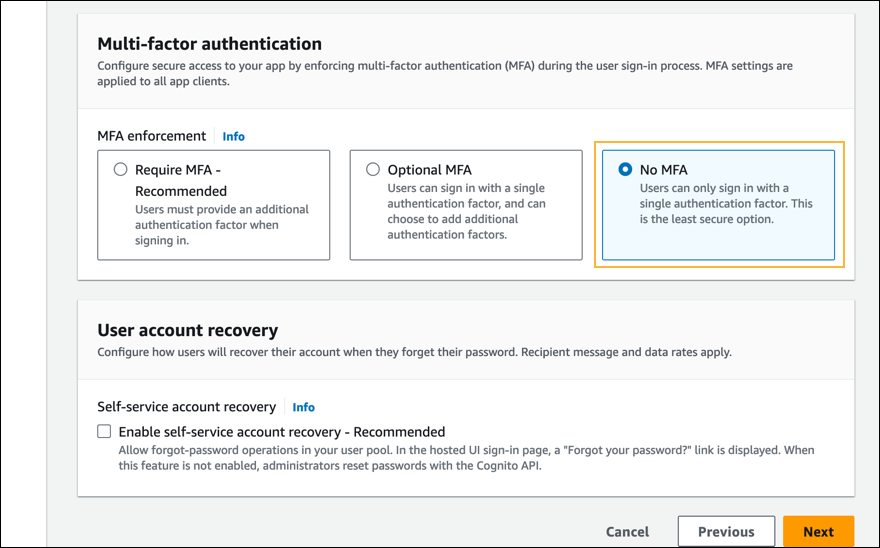
- In the Multi-factor authentication section, under Self-service account recovery, clear the Enable self-service account recovery – Recommended checkbox.
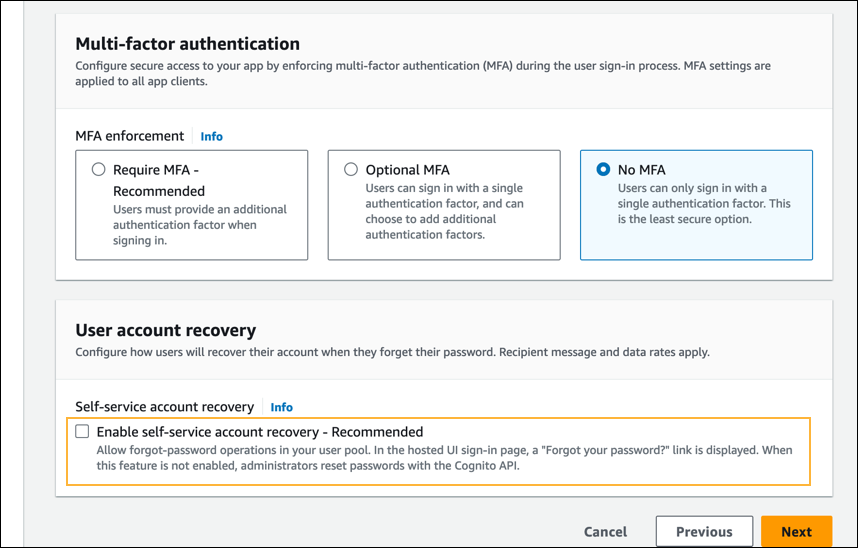
- In the Password policy section, retain the default selection, Cognito defaults.
- Click Next.In Step 3 - Configure sign-up experience, do the following:
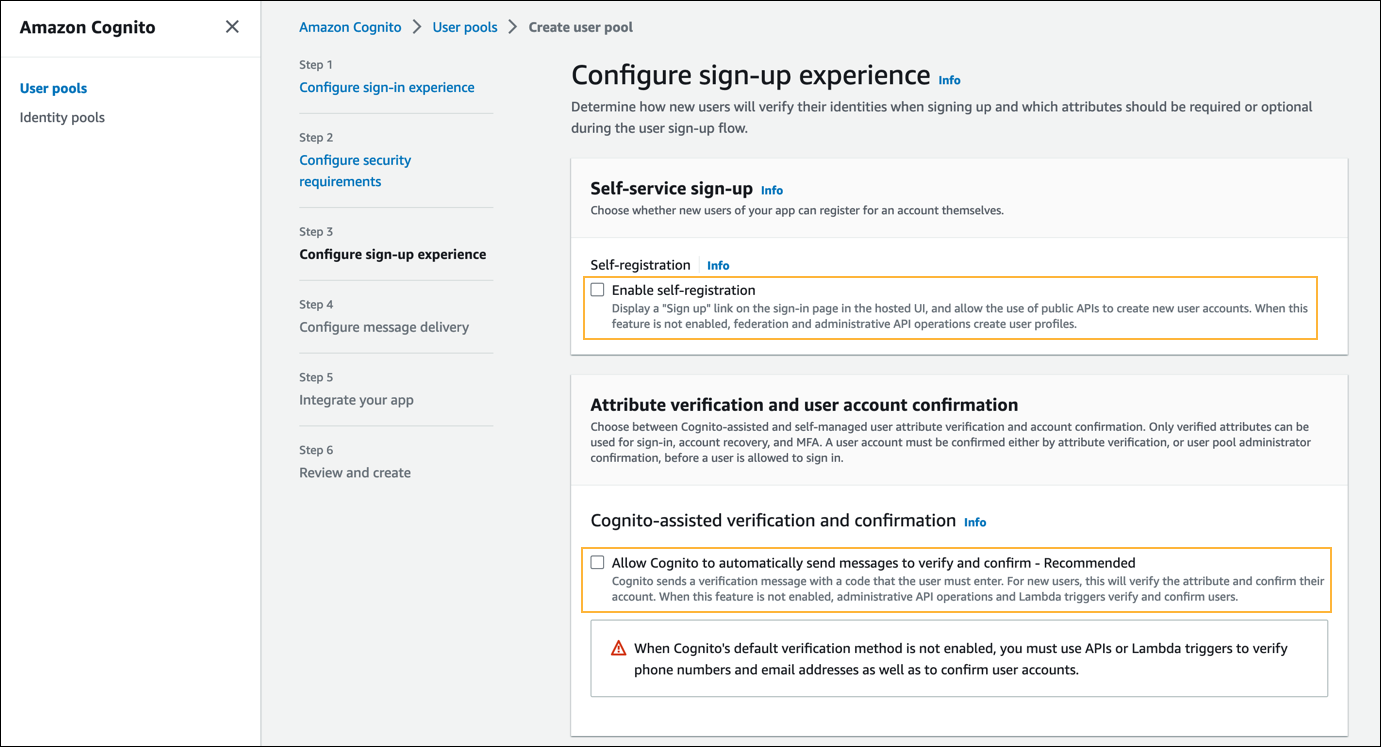
- In the Self-service sign-up section, clear the Enable self-registration checkbox.
- In the Attribute verification and user account confirmation section, clear the Allow Cognito to automatically send messages to verify and confirm – Recommended checkbox.
- Click Next.
- In Step 4 - Configure message delivery, in the Email section, select Send email with Cognito.
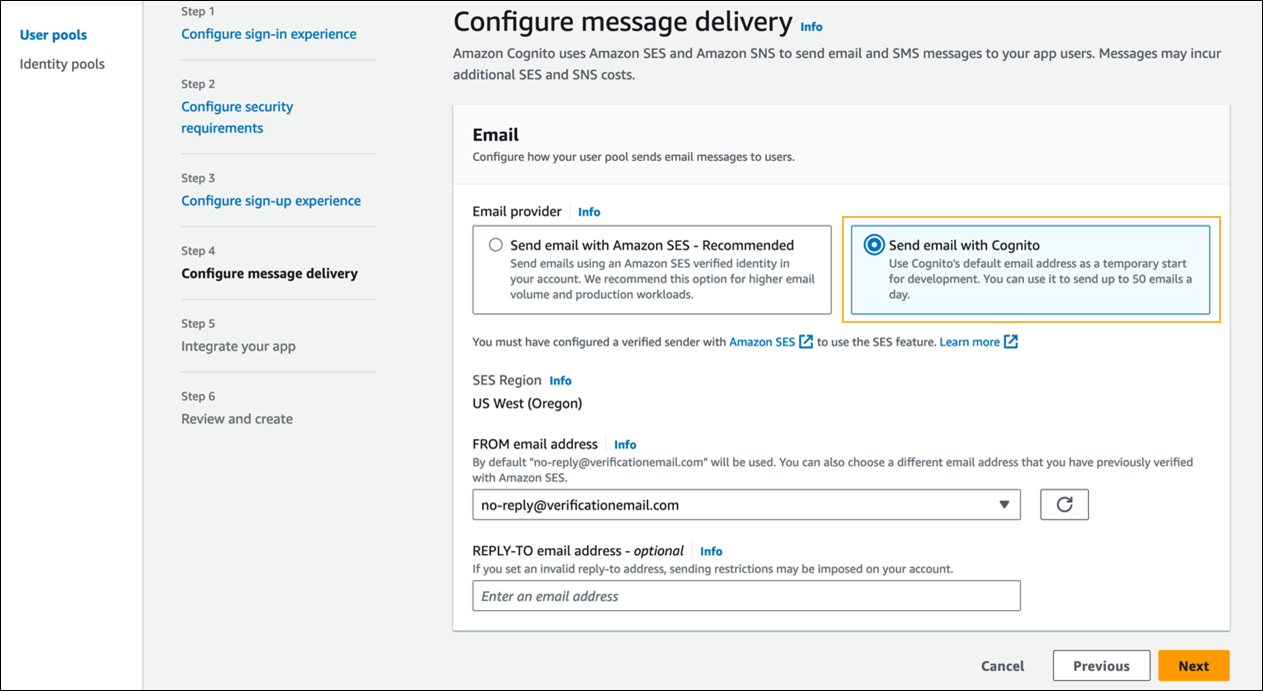
- Click Next.
- In Step 5 - Integrate your app, do the following:
- In the User pool name section > User pool name field, enter a name for your user pool.
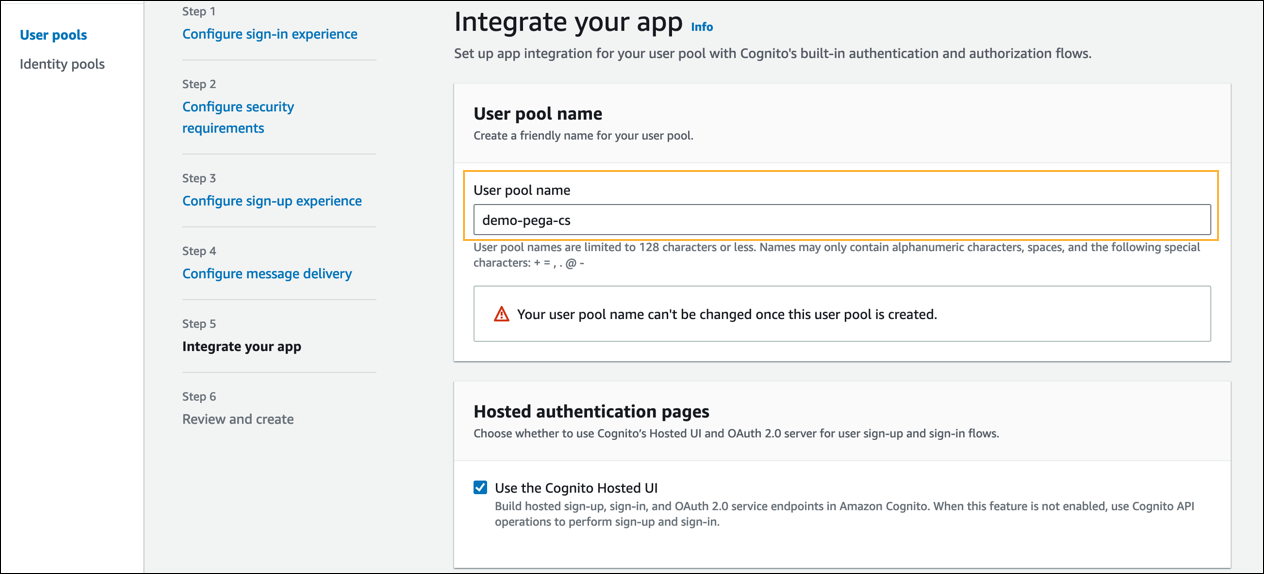
- In the Hosted authentication pages section, select the Use the Cognito Hosted UI checkbox.
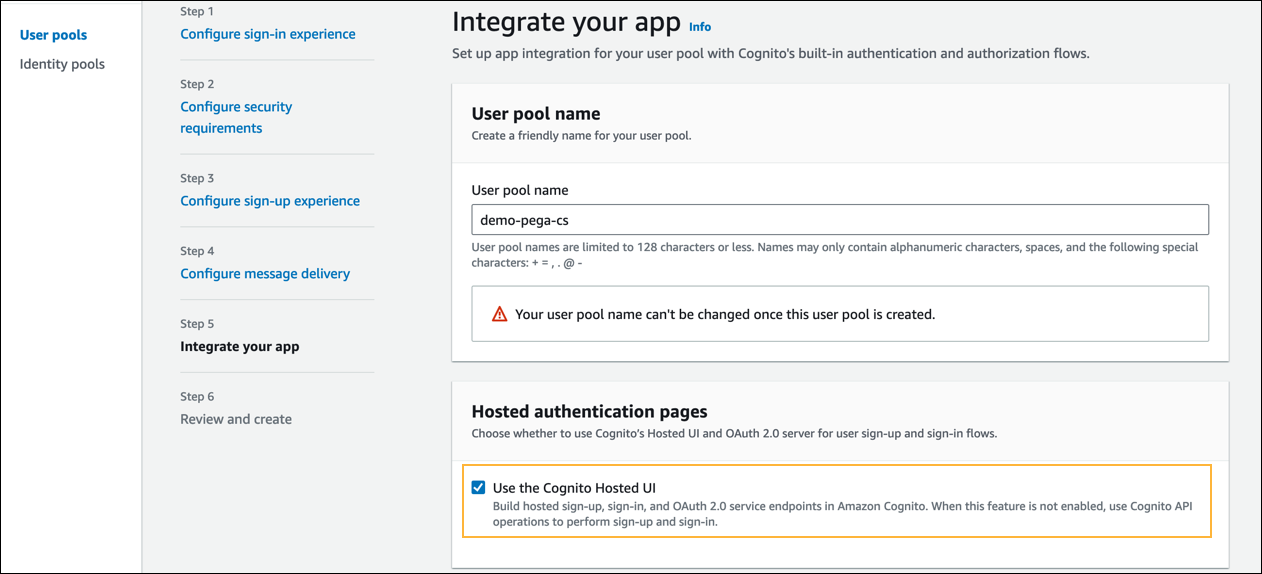
- In the Domain section > Domain type field, select the Use a Cognito domain radio button.
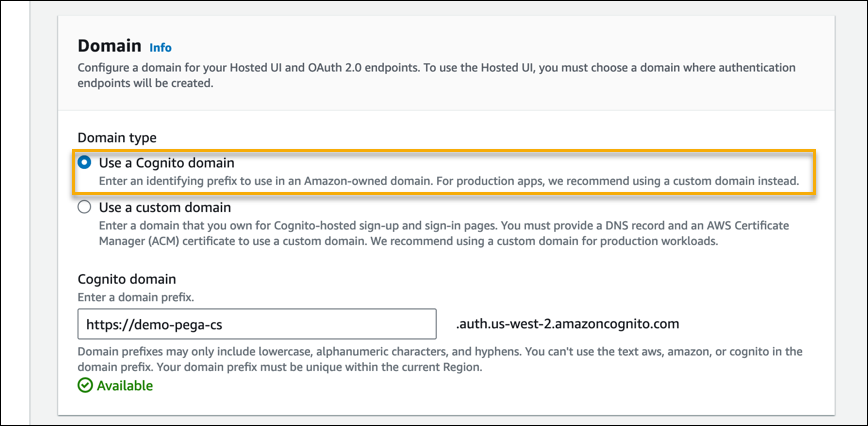
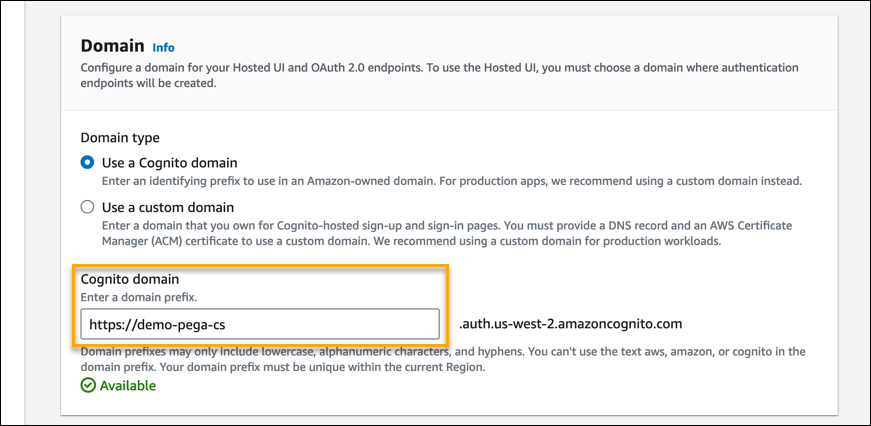
- In the Domain section > Cognito domain field, provide a prefix for the Cognito domain.
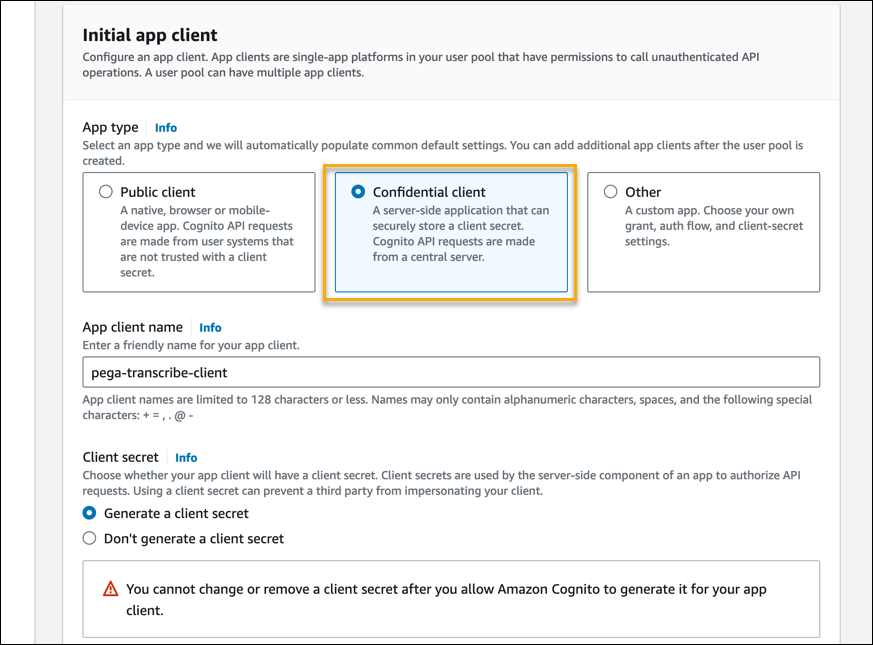
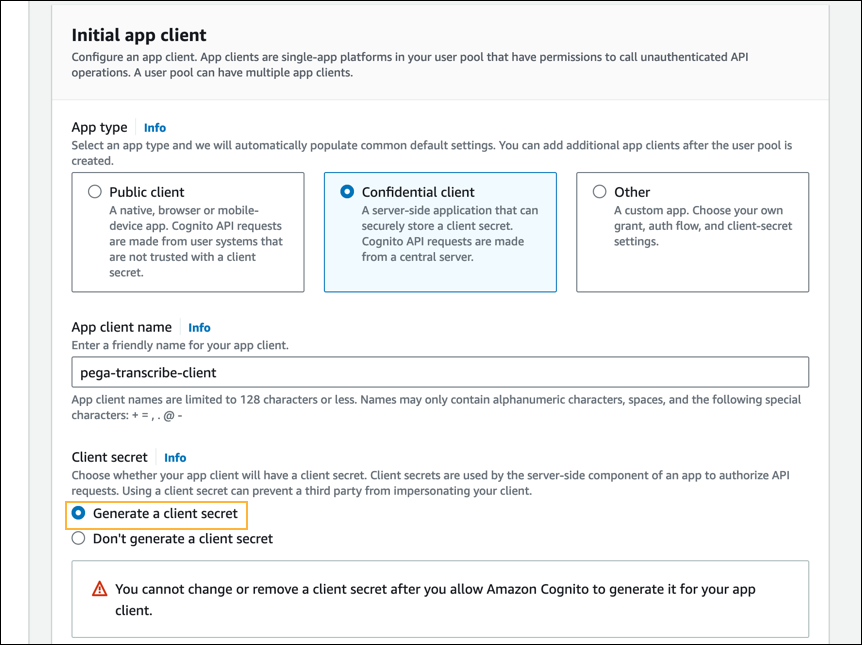
- In the Initial app client section > App type field, select Confidential client.
- In the Initial app client section > App client name field, enter a name for your app client, and make a note of this name for future use.
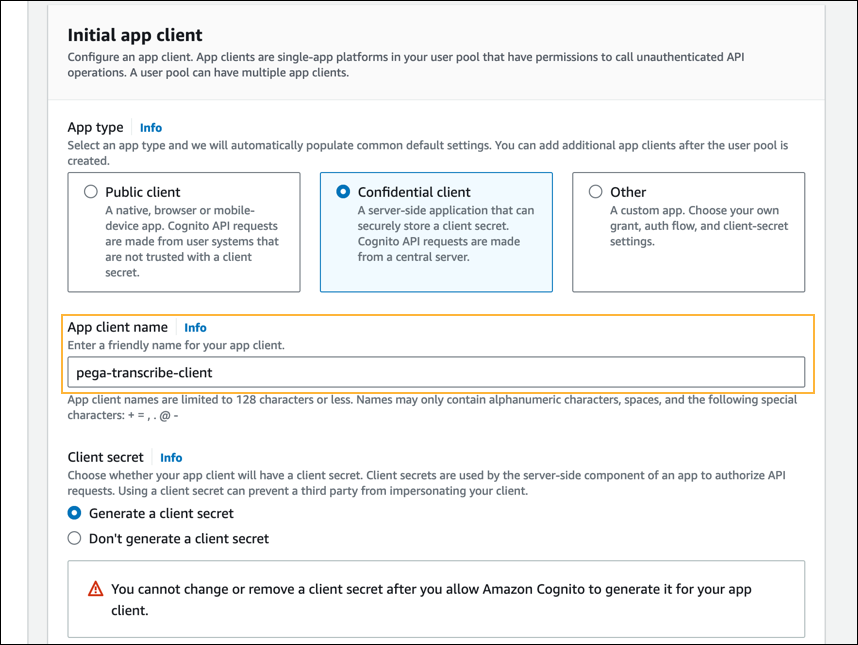
- In the Initial app client section > Client secret field, retain the default selection, Generate a client secret.
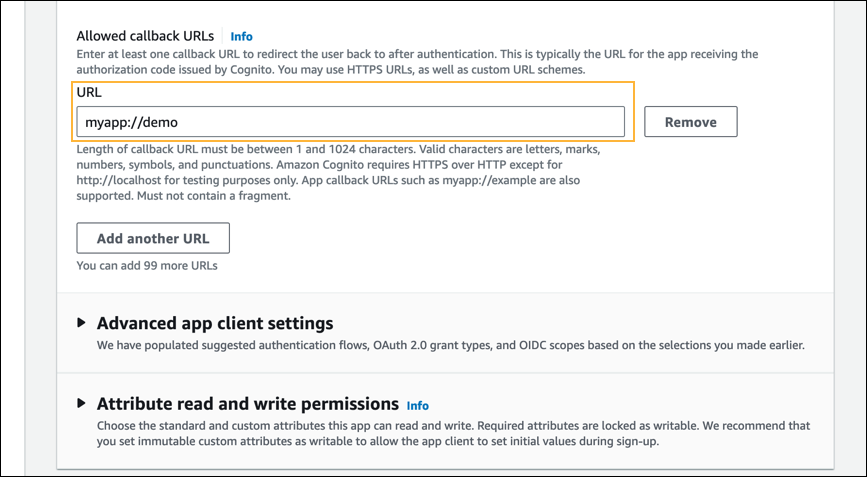
- In the Client secret section > Allowed callback URLs field, enter myapp://demo.
- In the User pool name section > User pool name field, enter a name for your user pool.
- Click Next.
- Review the settings, and then click Create pool.
- Open the user pool that you created, and make a note of the User pool name and User pool ID values for future use:

Configure the user pool app client
- In the AWS Management Console, open the user pool that you created in Create a Cognito user pool above.
-
In the App integration tab, do the following:
- In the App clients and analytics section, click your app client name. (See step 11.6 in Create a Cognito user pool above.)
The App client information page opens. - Click Edit.
- In the Authentication flows list, select the ALLOW_USER_PASSWORD_AUTH flow to add it to the list of authenticated flows.
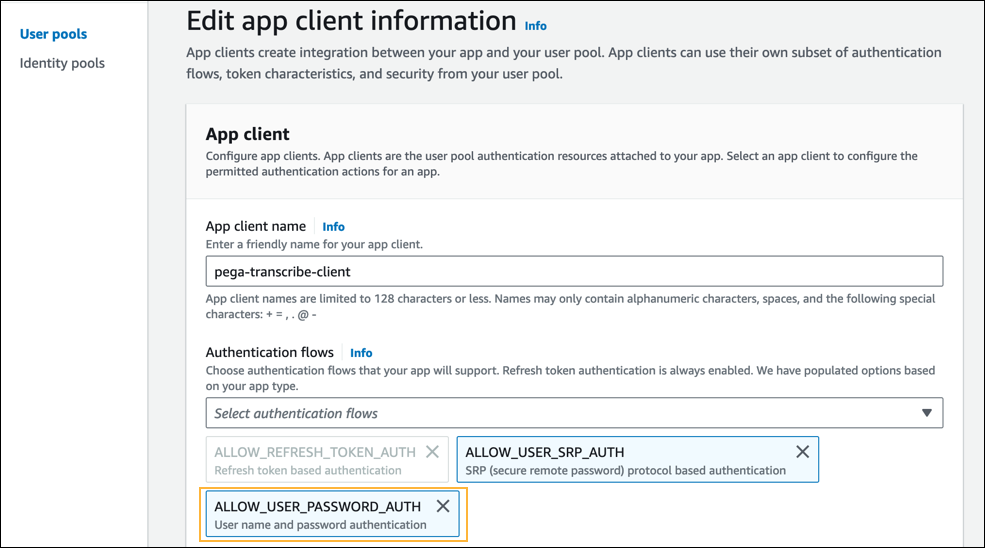
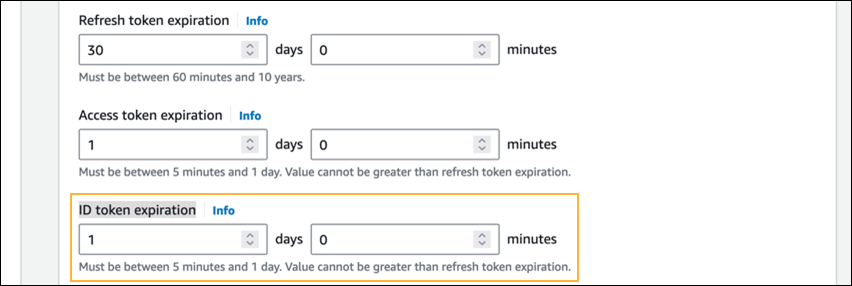
Note: Retain any other authentication flows that are selected by default. - In the Access token expiration field, set a value of
1day or less.

- In the ID token expiration field, set a value of
1day or less.
- For all the other fields, retain the default values and selections.
- In the App clients and analytics section, click your app client name. (See step 11.6 in Create a Cognito user pool above.)
- Click Save changes.
- Open the App client information page, and make a note of the system-generated Client ID and Client secret values.
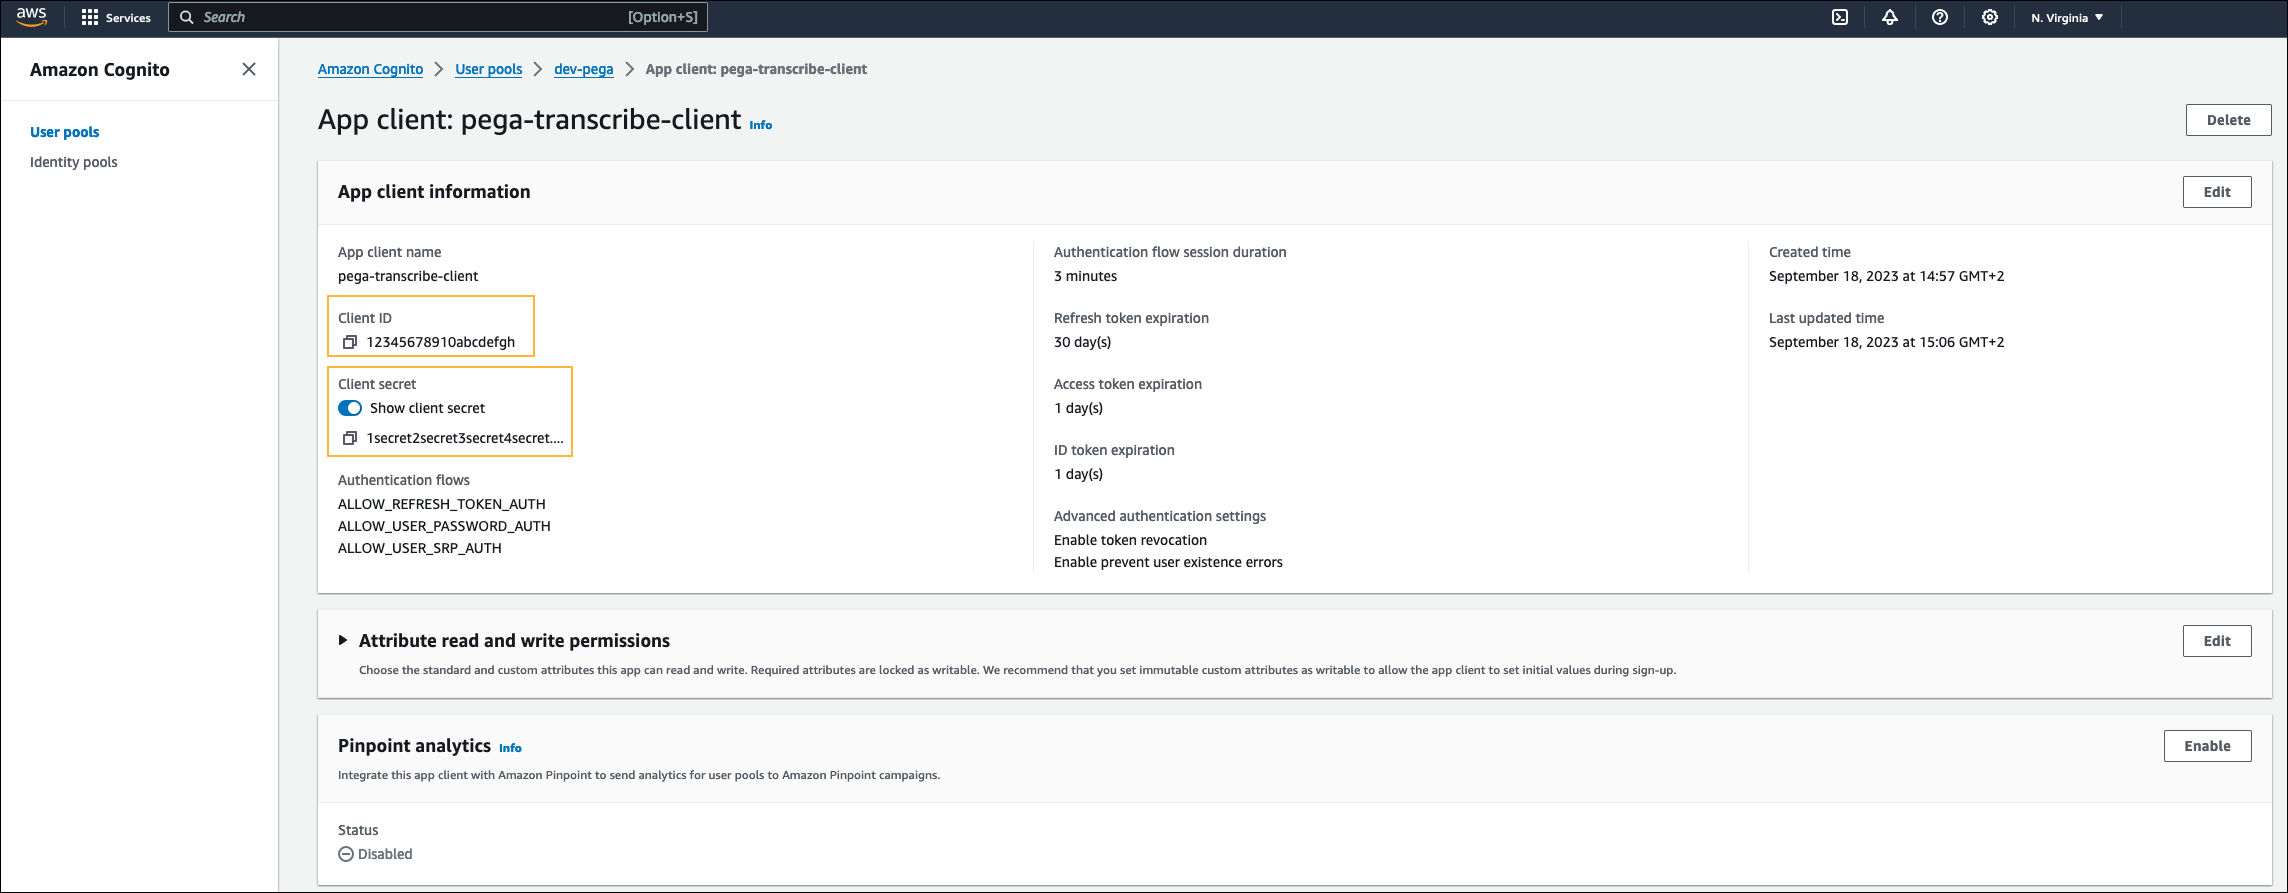
Create a user in the user pool
- In the AWS Management Console, open the user pool that you created in Create a Cognito user pool above.
- On the Users tab, click Create user.
- In the User information section, do the following:
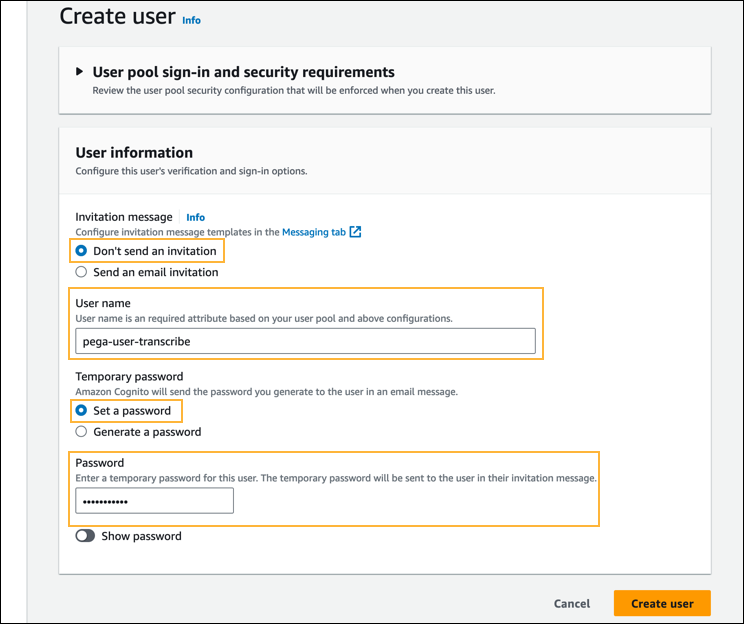
- In the Invitation message field, select Don't send an invitation.
- In the User name field, enter a username, and make a note of this username for future use.
- In the Temporary password field, select Set a password.
- In the Password field, set a temporary password.
-
Click Create user.
The Users tab of the user pool displays the new user's details, with the Confirmation status column displaying the textForce change password. -
Confirm the user account and set a permanent password through administrator verification, by using the following AWS CLI API command:
aws cognito-idp admin-set-user-password --user-pool-id <pool_ID> --username <username> --password <set permanent password> --permanent --region us-east-1
Note: For theusernamevalue, refer to step 3.2 of this section (Create a user in the user pool). For theuser_pool_IDvalue, refer to step 14 of the Create a Cognito user pool section. -
Make a note of the the permanent password that you set in step 5 for future use.
-
Verify that the Confirmation status has changed to
Confirmed.
Create a Cognito identity pool
- In the AWS Management Console, navigate to the Cognito service.
Note: You can also go to the service directly at https://aws.amazon.com/cognito/. - Click Identity pools, and then click Create new identity pool.
- In Step 1 - Configure identity pool trust, select the following options:
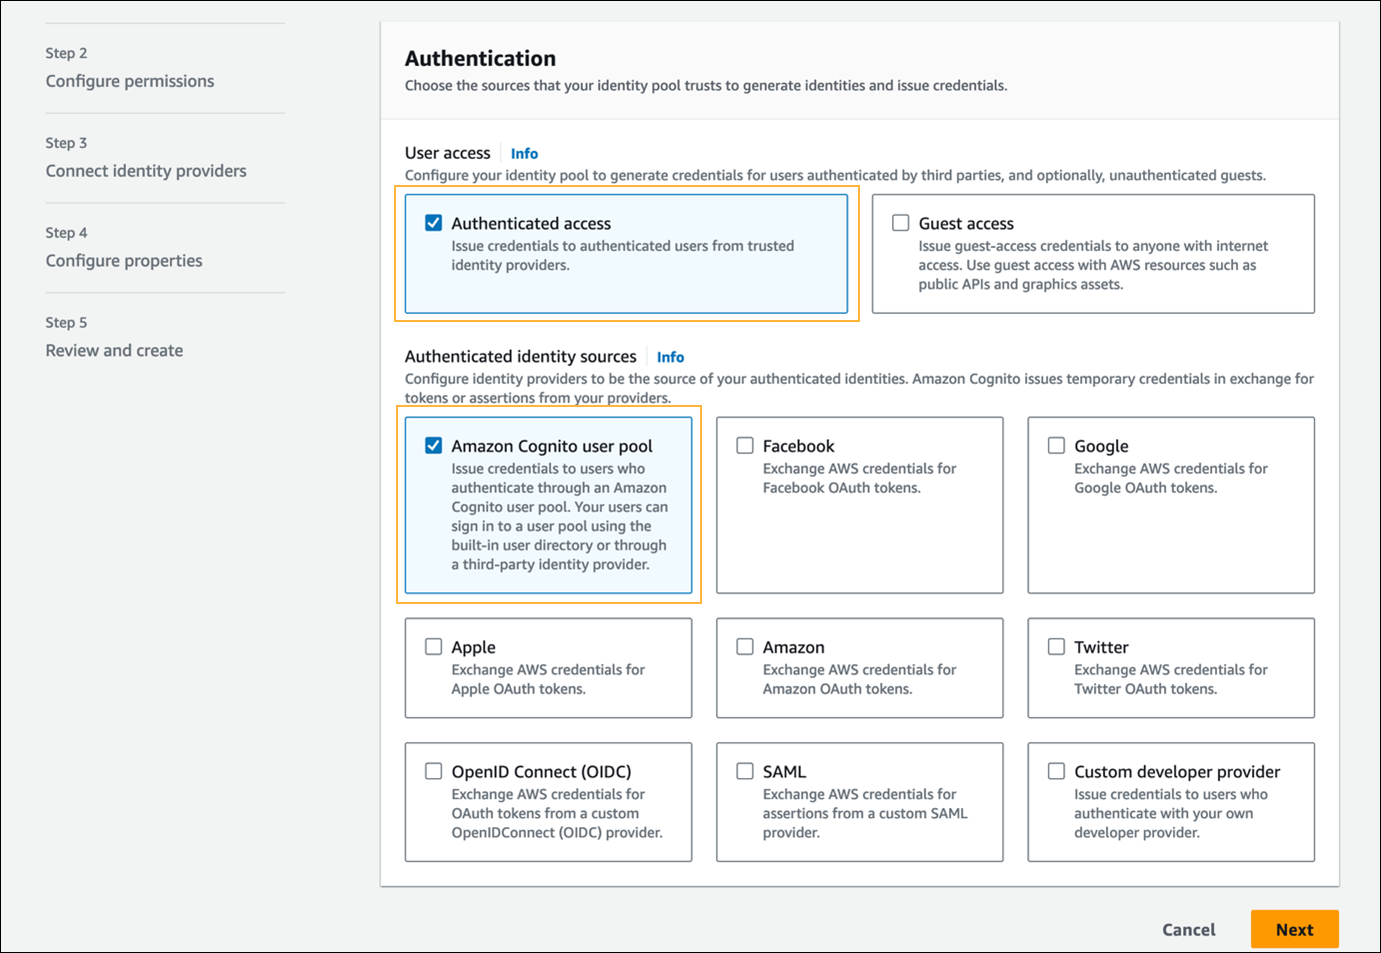
- In the Authentication section > User access field, select Cognito user pool.
- In the Authentication section > Authenticated identity sources field, select Amazon Cognito user pool.
- Click Next.
- In Step 2 - Configure permissions, do the following:
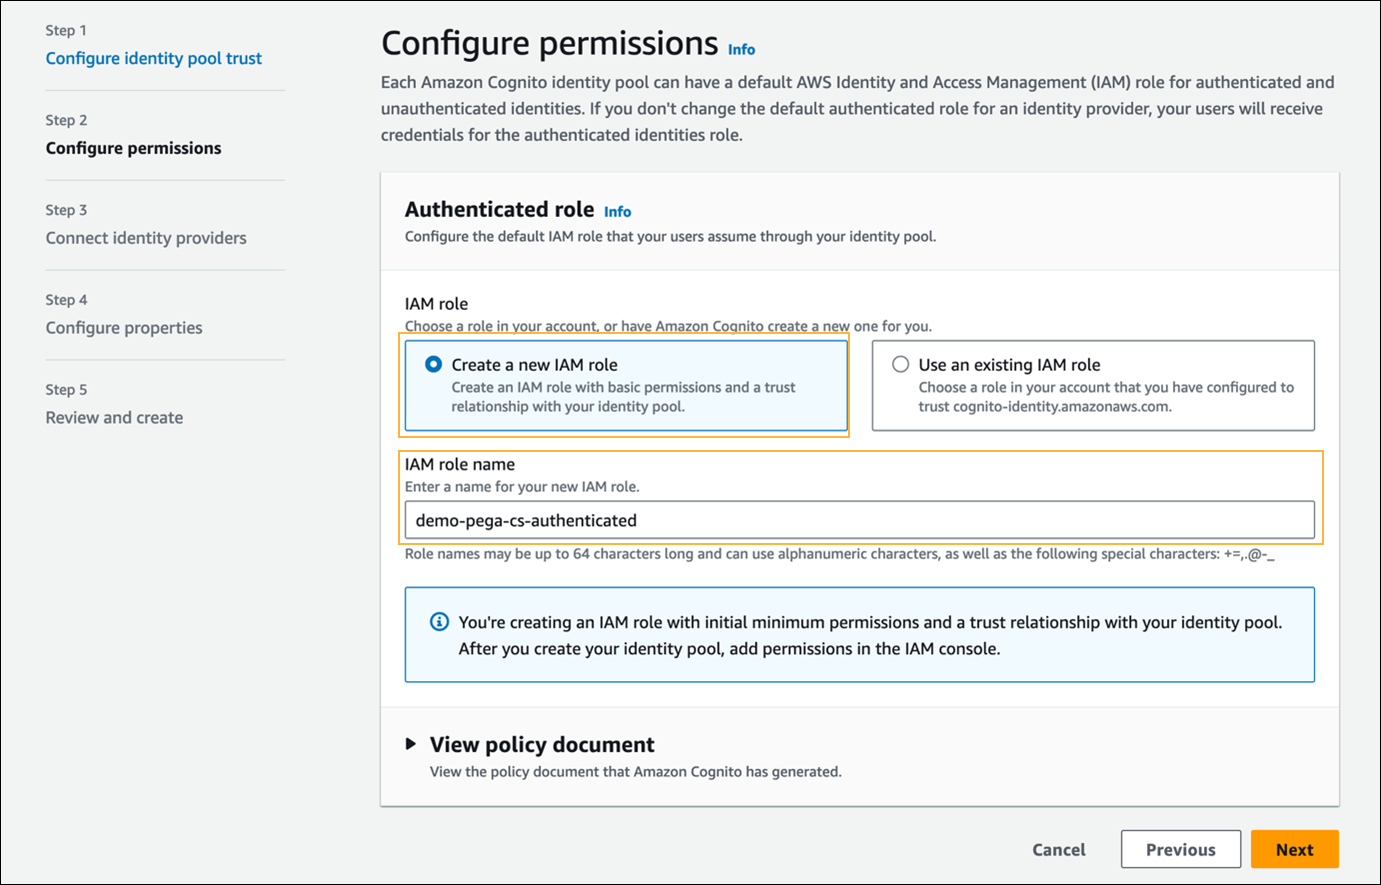
- In the Authenticated role section > IAM role field, select Create a new IAM role.
- In the IAM role name field, enter a role name.
- Click Next.
- In Step 3 - Connect identity providers, select the following options:
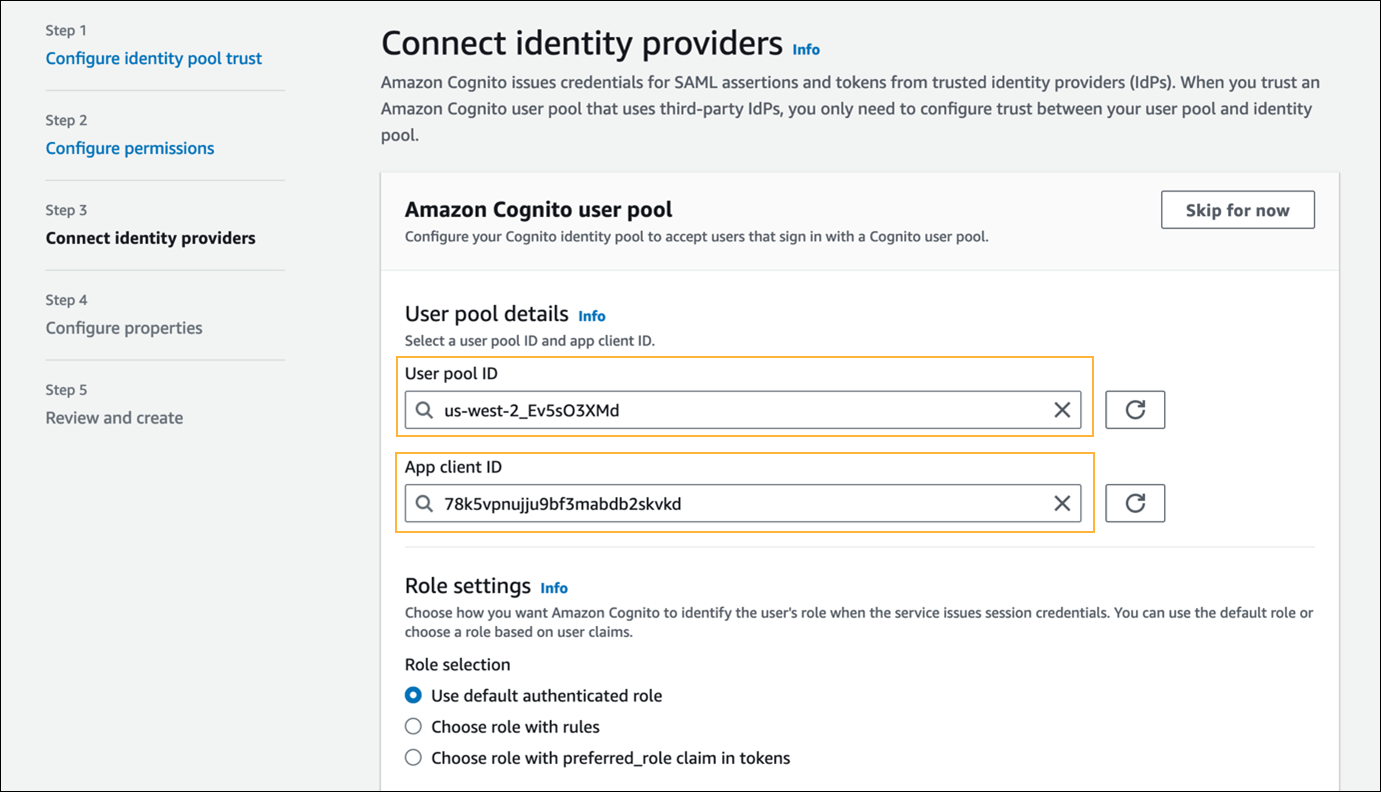
- In the Amazon Cognito user pool section, in the User pool ID and App client ID fields, enter the name of the user pool and the app client, respectively. (See Create a Cognito User Pool above.)
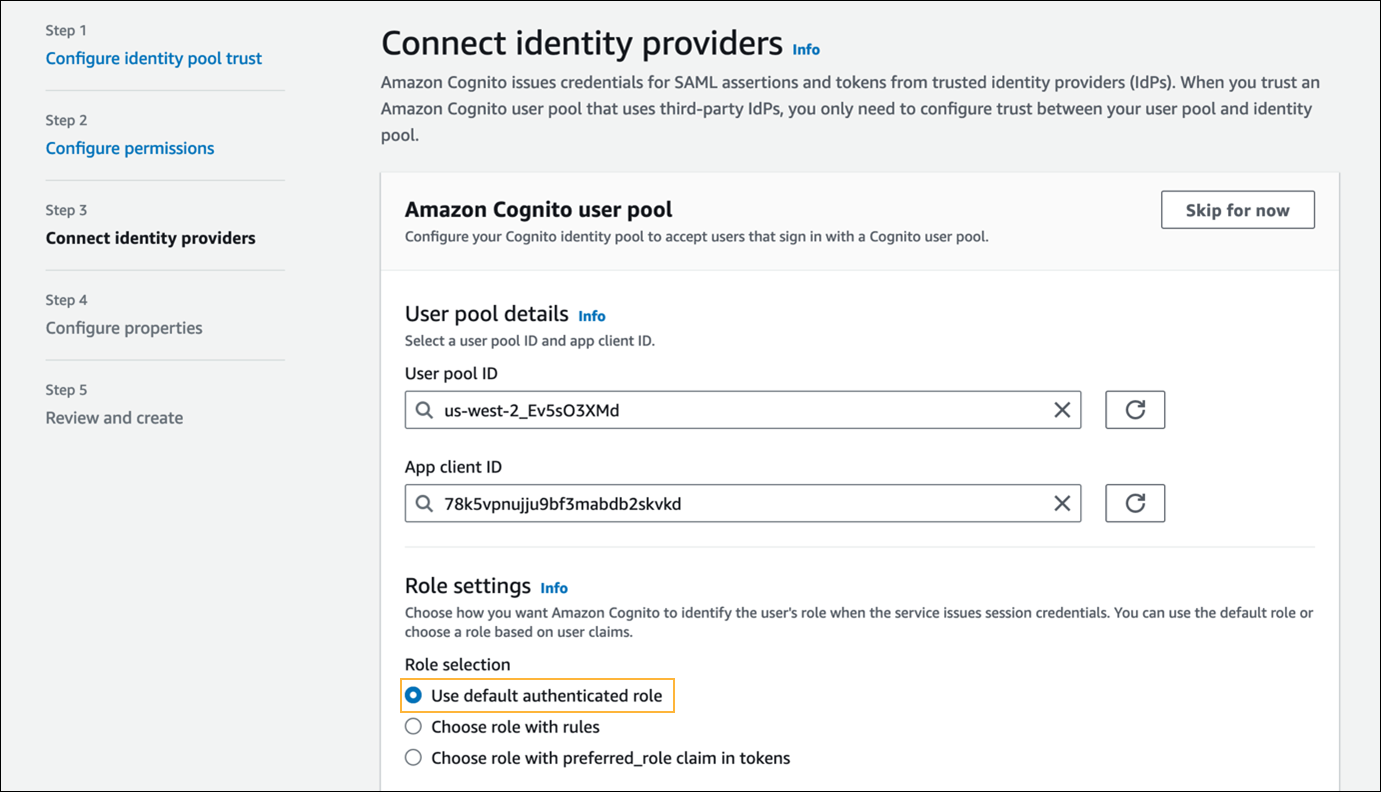
- In the Role settings section, in the Role field, select Use default authenticated rule.
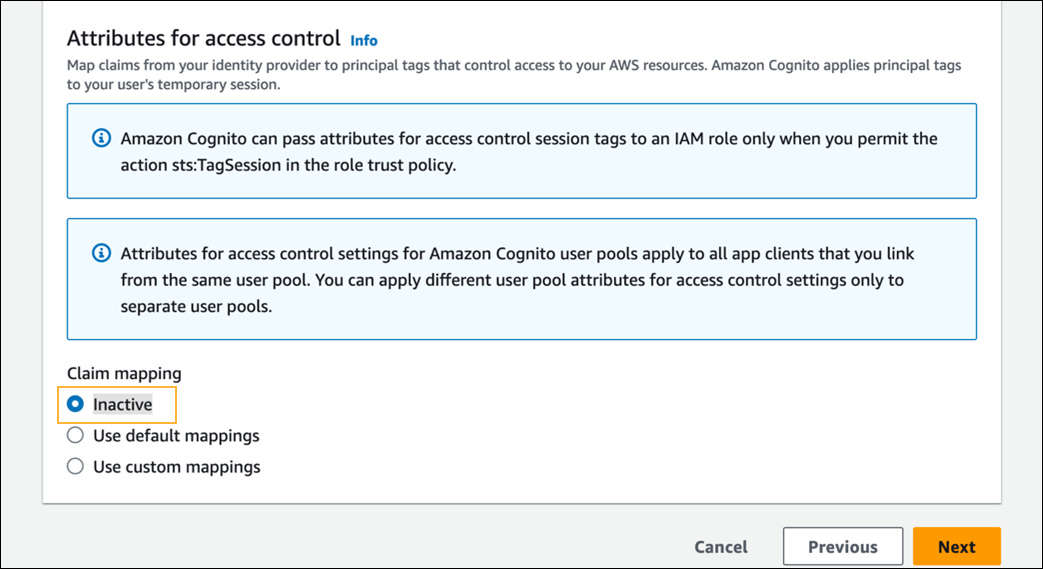
- In the Attributes for access control section, in the Claim mapping field, select Inactive.
- In the Amazon Cognito user pool section, in the User pool ID and App client ID fields, enter the name of the user pool and the app client, respectively. (See Create a Cognito User Pool above.)
- Click Next.
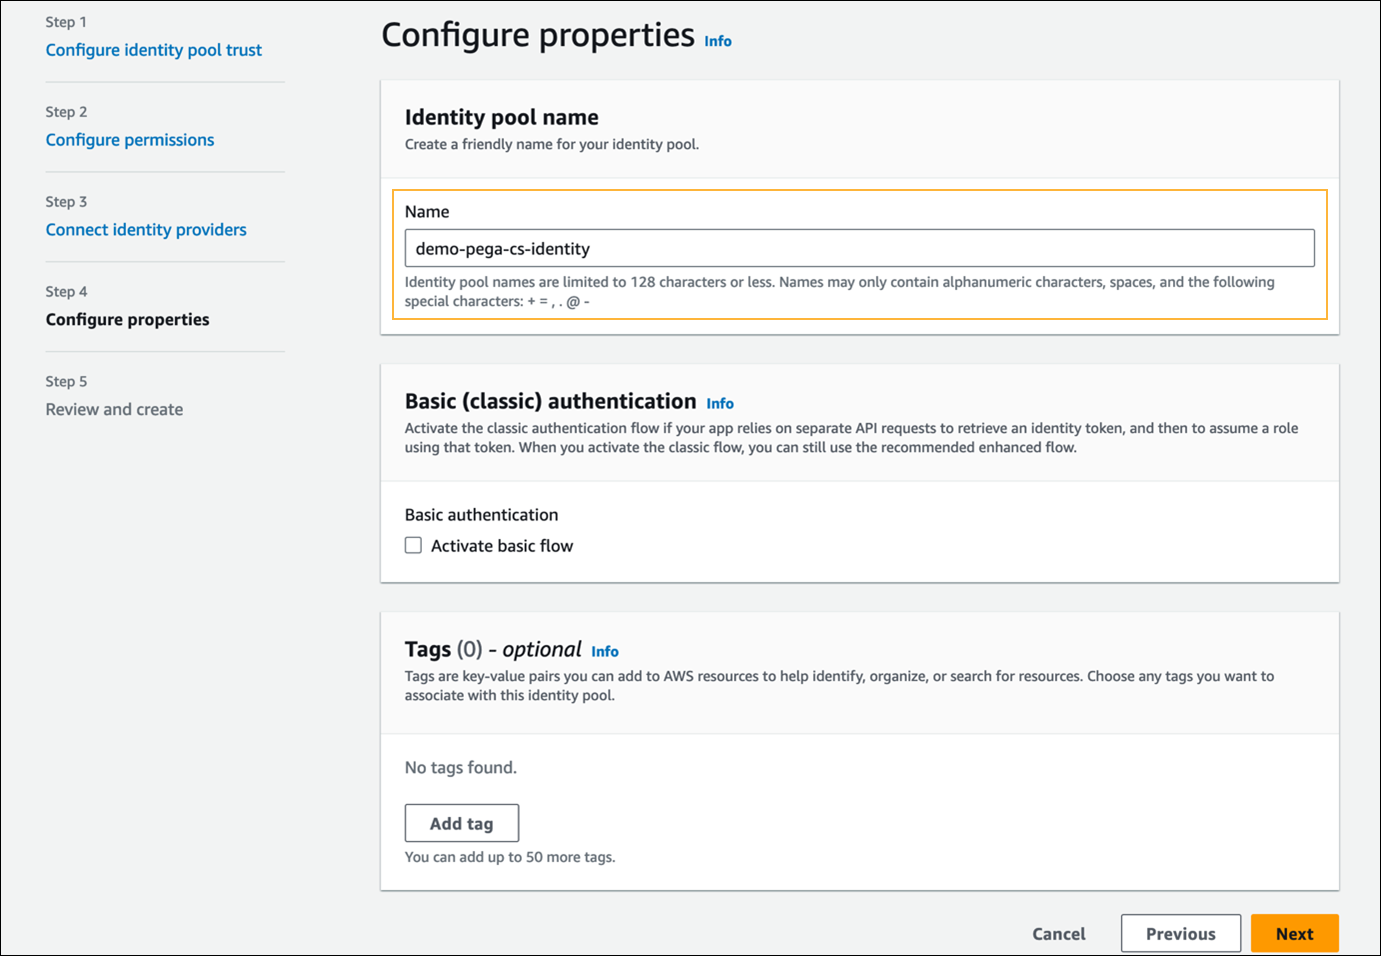
- In Step 4 - Configure properties, in the Identity pool name section, enter a name for the identity pool.
- Click Next.
- Review the settings, and then click Create identity pool.
- Open the created identity pool, and make a note of the Identity pool ID and Authenticated access role (IAM role) values for future use.
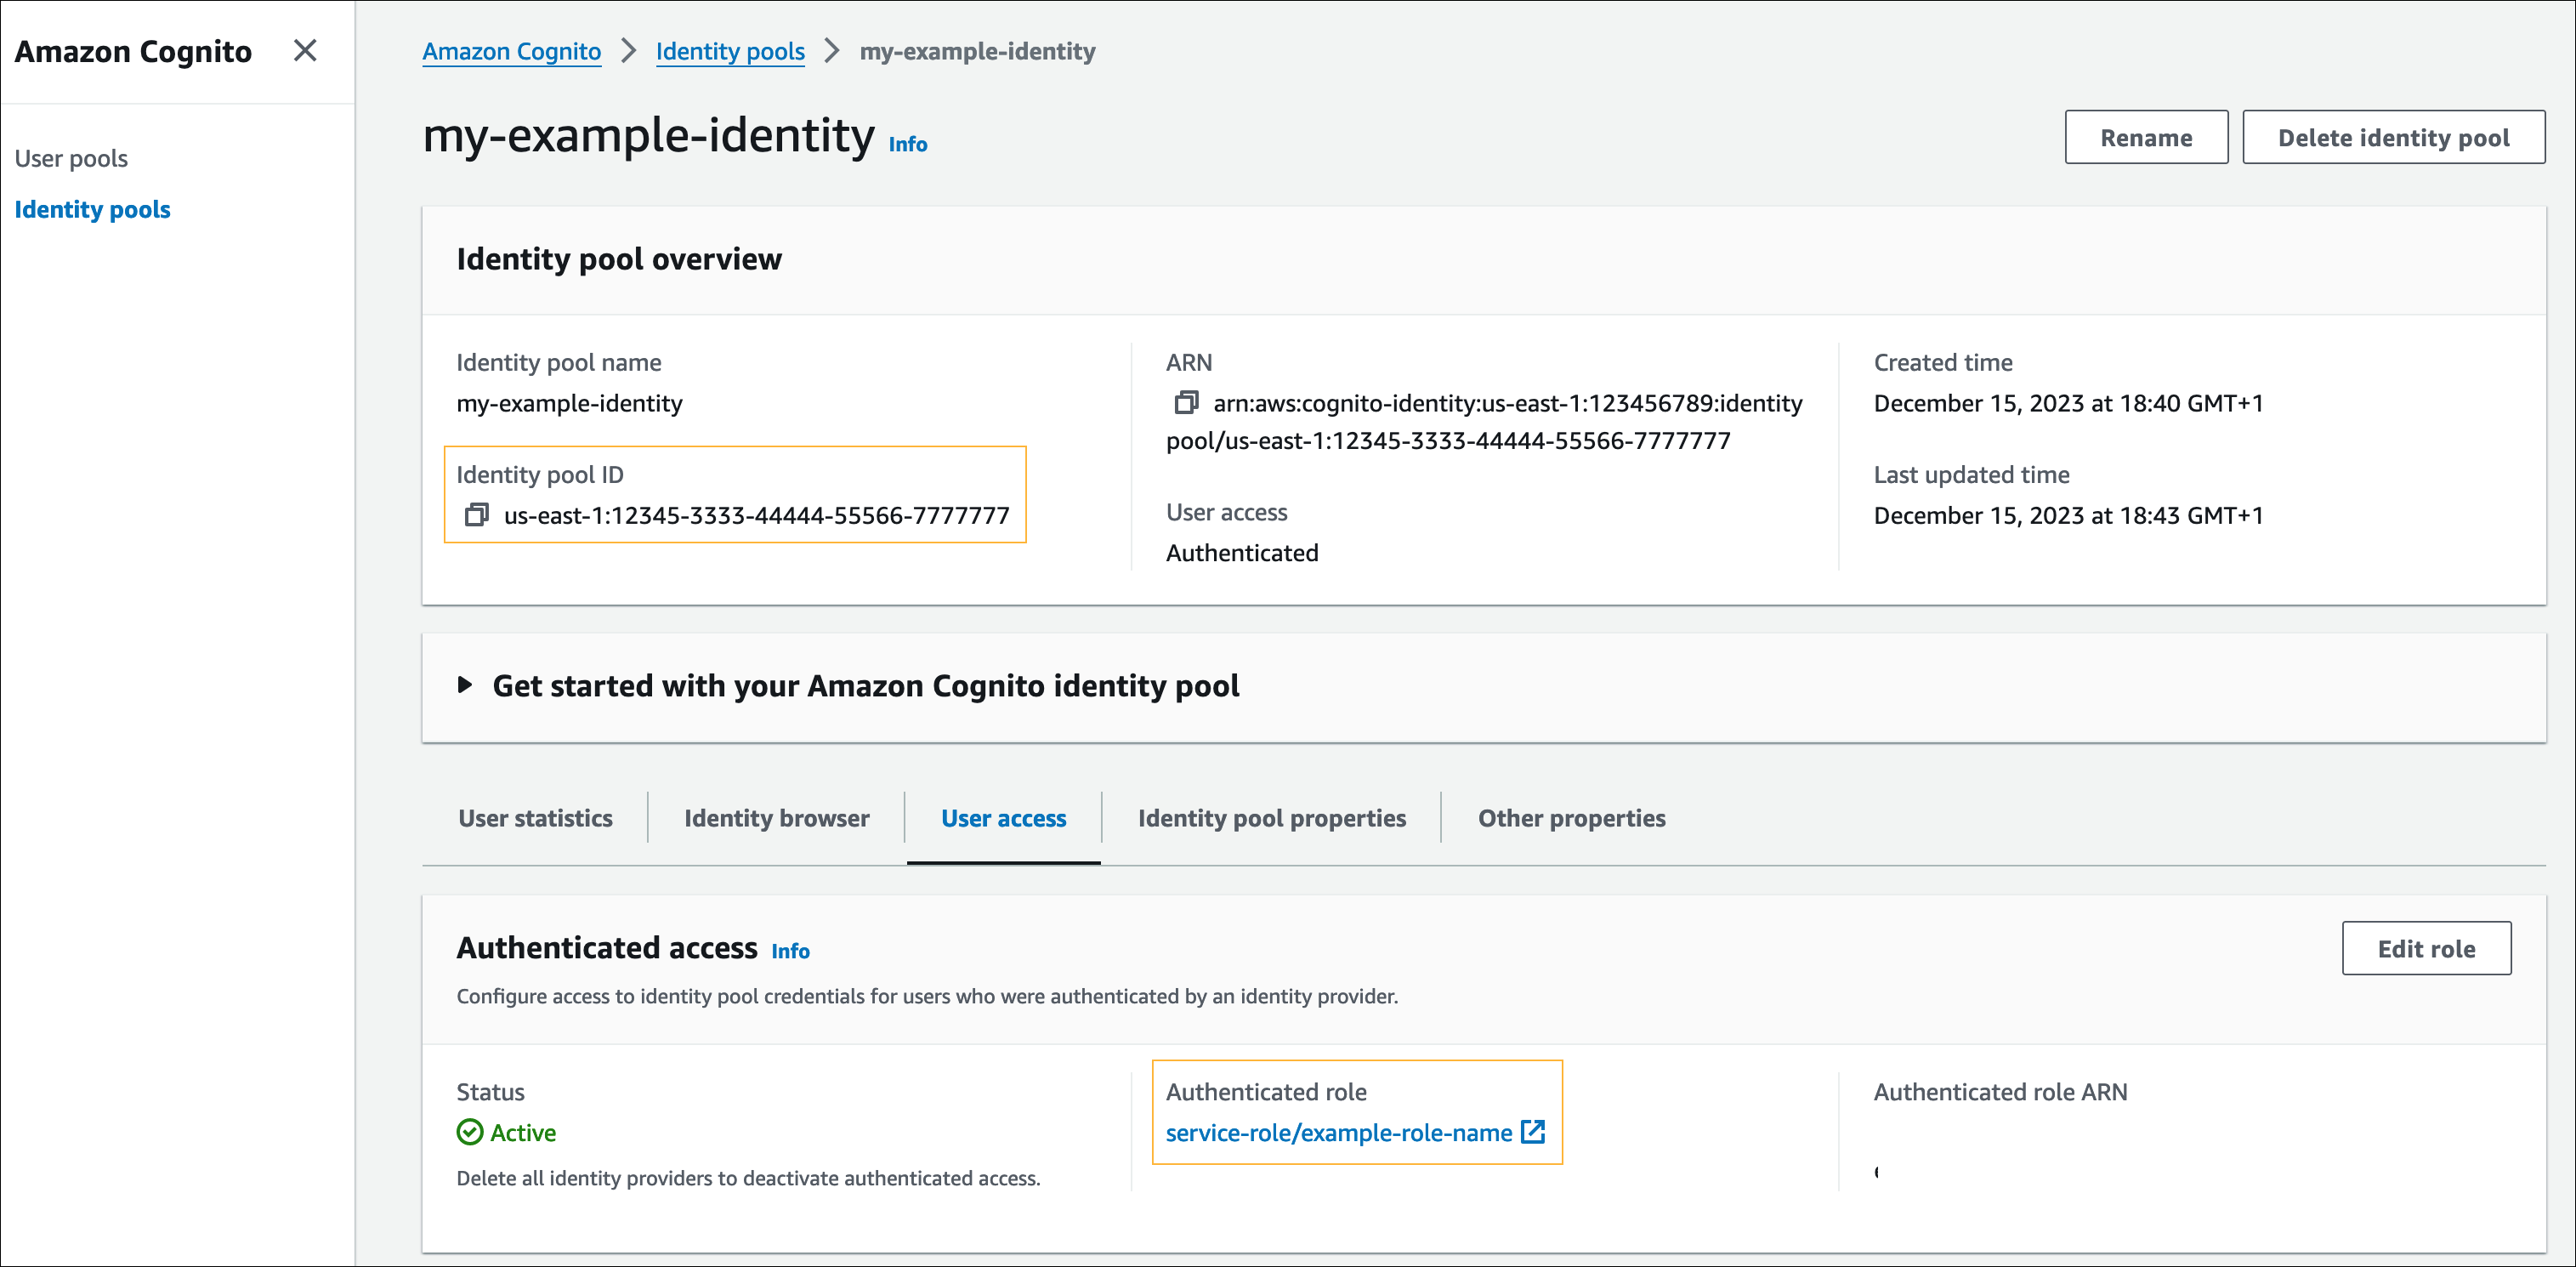
Provide Amazon Transcribe access to the authenticated user
- In the AWS Management Console, navigate to Identity and Access Management (IAM).
Note: You can also go to IAM directly at https://console.aws.amazon.com/iamv2. - Expand Access Management, and click Roles.
- Find and click the IAM role that you noted in Create a Cognito Identity Pool > Step 12.
The system displays the user information. - In the Permissions policies section, in the Add permissions list, select Attach policies, then select the AmazonTranscribeFullAccess AWS managed policy.

- Click Add permissions.
Next, configure the necessary settings in your Pega Customer Service application to complete the Amazon Transcribe setup. For more information, see Implementing multi-language support with Amazon Transcribe in the Pega Customer Service Implementation Guide for Constellation or the Pega Customer Service Implementation Guide for UI Kit.
Provide Amazon Kinesis Video Streams access to the authenticated user
- In the AWS Management Console, navigate to Identity and Access Management (IAM).
Note: You can also go to IAM directly at https://console.aws.amazon.com/iamv2. - Expand Access Management, and click Roles.
- Find and click the IAM role that you noted in Create a Cognito Identity Pool > Step 12.
The system displays the user information. - In the Permissions policies section, click Add permissions.
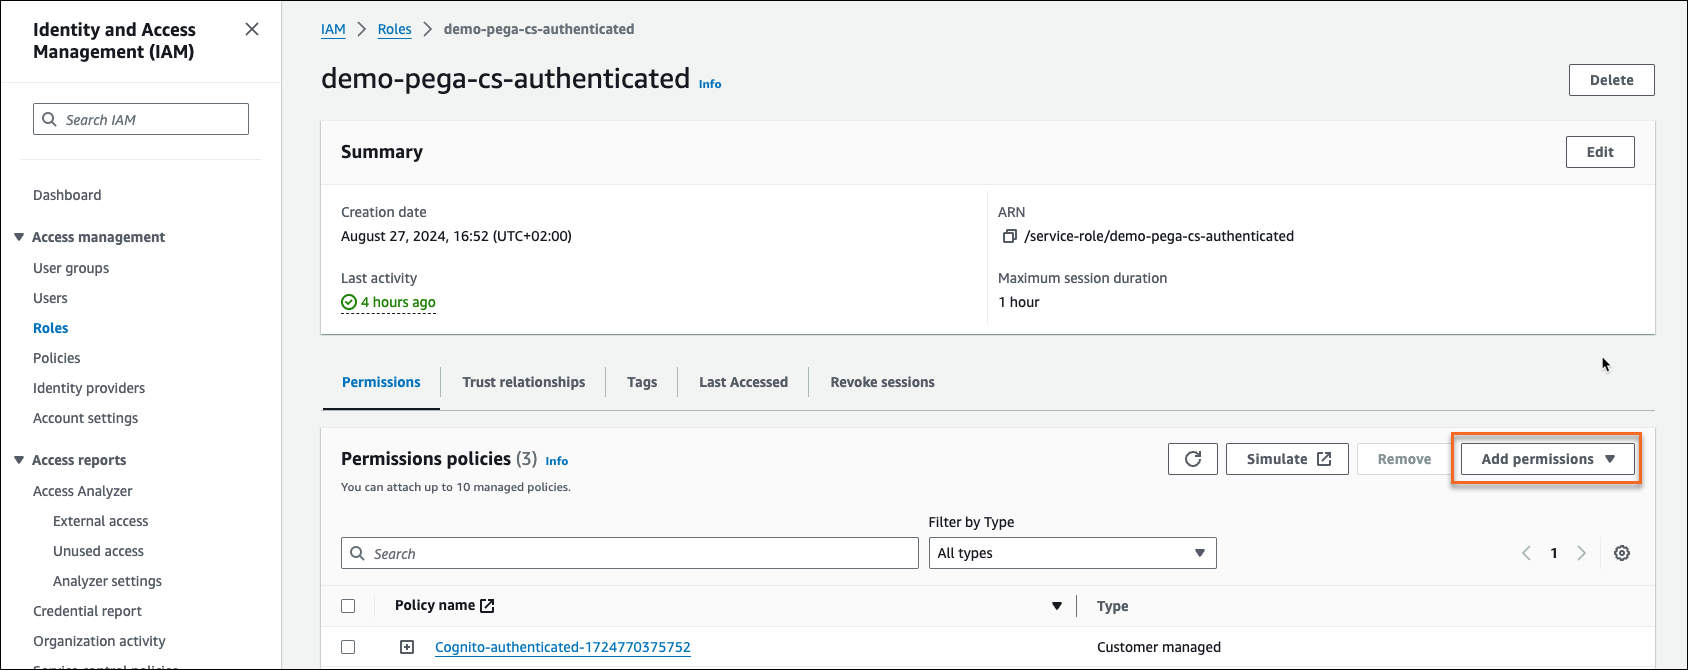
- In the Add permissions list, select Attach policies, then select the AmazonKinesisVideoStreamsFullAccess AWS managed policy.

- Click Add permissions.
Next, configure the necessary settings in your Pega Customer Service application to complete the Amazon Transcribe setup. For more information, see Implementing Kinesis Streams for Amazon Connect in the Pega Customer Service Implementation Guide for Constellation or the Pega Customer Service Implementation Guide for UI Kit.
