Managing external system of record through REST with CRUD actions in Pega Constellation
Why
Effective data management starts with easy CRUD actions regardless of system of record.
Pega Constellation makes it easy to perform Create, Read, Update and Delete through REST connectors. Article presents configuration steps, allowing for fast integration and management of external records, and all that can be done in App Studio by a Citizen Developer. You save time and resources while maintaining control over your data.
This article provides the necessary guidance on configuring Data Pages for CRUD operations, allowing to effectively map and synchronize data between Pega and external RESTful services.
See also Pega documentation journey at: Configuring CRUD operations in Pega Platform
Example use cases:
- Persist data updates from the case lifecycle to external systems - Using a data page within a process step to update Customer data directly in external source of record.
- Landing page with delegated configuration screen storing settings in an external system but managed from Pega.
- Arrange and structure complex data objects into a more digestible and manageable form and use various focused Views to update specific fields.
Article demonstrates how to properly configure Data Pages and HTTP methods to support all basic data operations while following best practices.
Overview
Article walks you through setting up a CRUD implementation across three main areas:
- Data model configuration
- REST API integration configuration.
- Save plan configuration.
- UI/UX configuration in Pega Constellation
- List view, data sorting, grouping, and filtering.
- Enable CRUD, Create and Edit forms.
- Customized user actions.
- Managing Customer Data Object from a landing page.
- Using Customer Data Object in Case flow.
Implementation Guide
In REST integration, CRUD operations are typically mapped to HTTP methods: POST (Create), GET (Read), PUT/PATCH (Update), and DELETE (Delete).
When a Data Page is configured to handle write operations (Create, Update, Delete), a "save plan" defines how these operations should be executed. This includes mapping Pega properties to the expected format of the external REST service and specifying the HTTP methods and endpoints to interact with.
Ensure that you correctly configure data object to interact with the external system.
Any misconfiguration might result in improper data retrieval or updates.
Verify that the integration is appropriately set up to handle authentication, authorization, and other necessary headers required by the external REST service.
Make sure that the connector configuration aligns with best practices, such as using Application Settings for endpoint URLs and authentication profile. This allows for easier maintenance and changes in the future.
-
Prerequisites - Data object and REST API as data source
In this article Customer data object is used with REST connector as a source – specifically, a mock API service ( mockAPI ) simulating a real-life example.
Since these are the prerequisites, detailed setup and configuration is skipped.
I already created read-only (D_Customer, D_CustomerList) and savable (D_CustomerSavable) Data Pages. The last one will be used to create a save plan.

-
Save plan configuration
Variant 1: App Studio
- Open Data Object in App Studio, then go to Data Pages tab and navigate to
“Configure save options” in kebab menu.
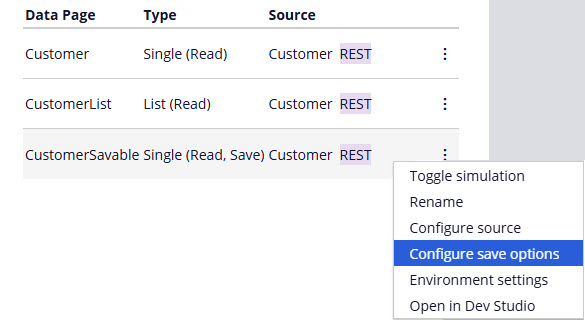
- Configure conditions and REST connectors for POST, PATCH/PUT, and DELETE methods.
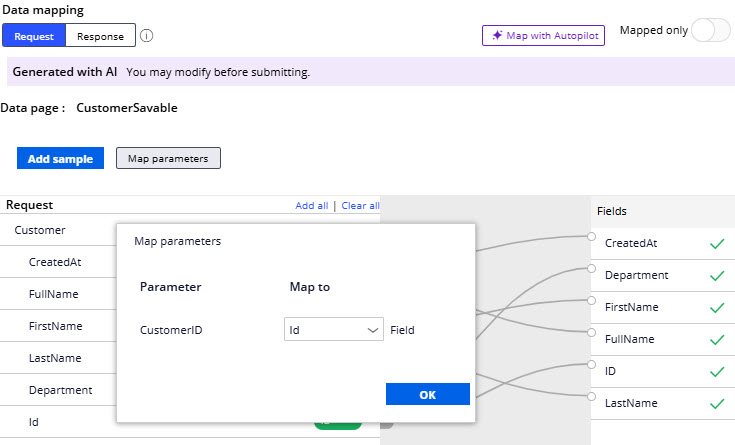
Make sure to map request, response and parameters properly.
Variant 2: Dev Studio
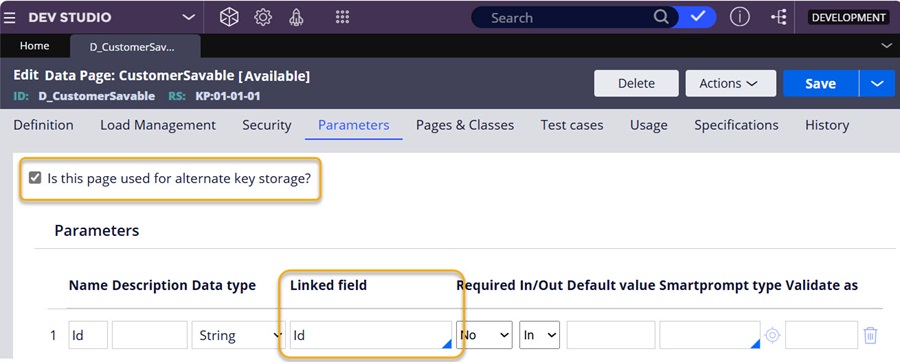
- Open savable Data Page (i.e. D_CustomerSavable) and go to Parameters tab. Since data is stored externally, I have checked the "Is this page used for alternate key storage?" flag and mapped ID parameter to corresponding ID field.
This flag should only be enabled if you have a specific alternate key use case, like external system of record. Incorrect usage might lead to unexpected behavior in data retrieval or updates.
- In Definition tab, click on +Add save option in data save section for each CRUD action you use.
You can use built-in When rules to identify corresponding CRUD actions:
- pyIsPost: For creating new records
- pyIsPatch / pyIsPut: For updating existing records
- pyIsDelete: For deleting records
For more information, see Configuring CRUD data endpoints with Constellation DX API
- Create and select mapping in request/response Data Transforms
- Ensure ID and other parameters are properly mapped in Connectors and Data Transforms
- Create and select validation rules if applicable

-
UI/UX configuration in Pega Constellation
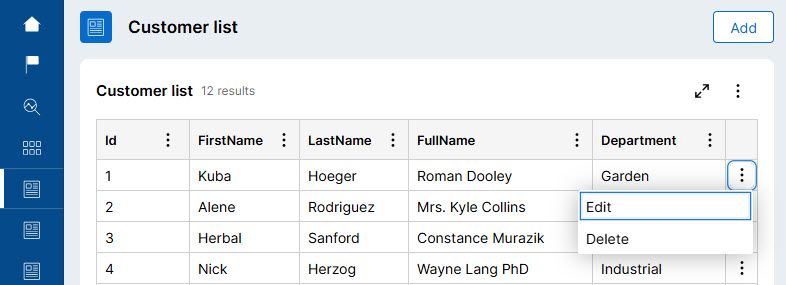
Now when edit, delete and create actions are mapped to corresponding HTTP methods, it is time to focus on views.
-
List view, data sorting, grouping and filtering
Pega Constellation offers a set of features common for tabular data, that can be used regardless of the data source. This gives a possibility to display complex data objects in an intuitive and efficient way.
While this is effective for datasets retrievable in a single GET query, larger datasets may face limitations in functionalities such as filtering, sorting, pagination, or aggregations, which could be constrained by the API itself or require additional implementation efforts.
For more information, see advanced query options in Creating a Connect REST rule

Navigate to App Studio > Data > Customer > UX
On the side panel in Other Views tab, create a List view.
Configure visible fields, optionally also grouping, filtering and sorting - the same way as if Pega database was the system of record.
-
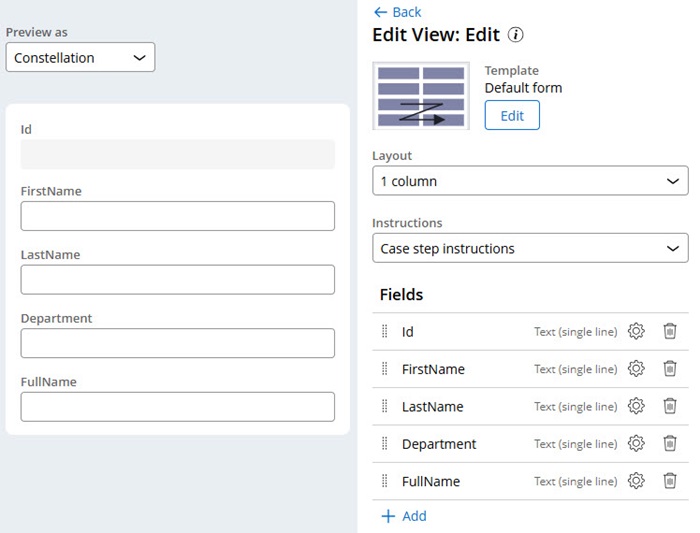
Enable CRUD, Create and Edit forms
With Data Page configuration in place, enabling CRUD actions is straightforward. On the side panel in Editing section enable Edit, Delete, Create and add to list checkboxes.
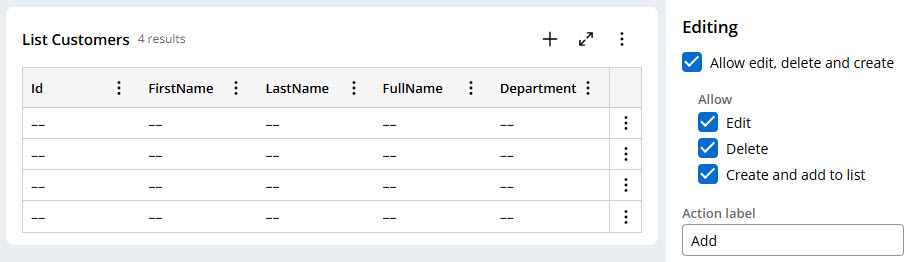
In App Studio > Data > Customer > UX > Other Views tab, you still need to define Create and Edit forms – these are the default views that are displayed to users through the out of the box Create and Edit actions. Configure field visibility and edit options here.
-
Customized user actions
If you need an additional view to display extra details or edit specific part of an object, navigate to App Studio > Data > Customer > Actions
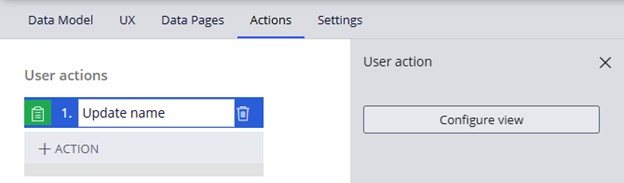
For the article, an Update name action was created. Based on action name, Autopilot predicted FirstName, LastName and FullName fields to be displayed and editable.

-
Managing Customer Data Object from a landing page
In the world of Pega Constellation, providing business users with the ability to update application logic without needing IT involvement is a valuable practice. While Theme Cosmos often employs delegated rules screens for this purpose, Constellation offers an alternative through the use of landing pages. If you've already created a list view, it can serve as a great starting point for your landing page. Here's a step-by-step guide on how to create and integrate a new landing page:
- Access the Landing Pages Section:
- Navigate to Channels > Work Portal > Landing Pages in your Pega Constellation environment.
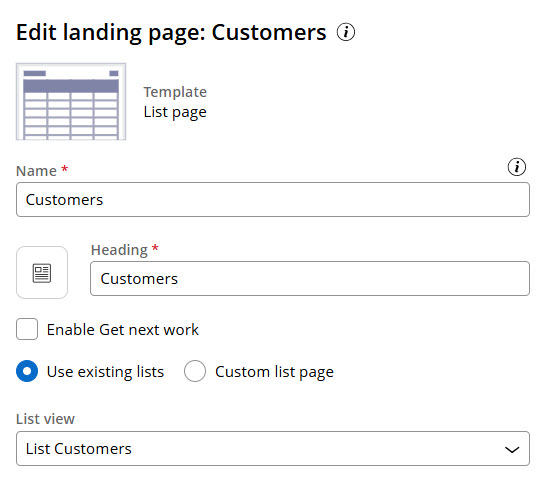
- Create a New Landing Page:
- Within the landing pages section, initiate the creation of a new landing page.
- Choose the list page template to structure your landing page.
- Select the List View:
- Select the previously created List Customers view to incorporate into your new landing page.
- Add the Landing Page to Main Navigation:
- Head over to Channels > Work Portal > Main Navigation.
- Add the newly created landing page to ensure it is easily accessible for users.
- Using Customer Data Object in Case flow
Incorporating the Customer data object into your case lifecycle can enhance your application's functionality by allowing users to create or edit customer records directly within the case flow. This guide will walk you through the steps of integrating a data object with a focus on leveraging a proper save plan. We will also cover using Data Transforms for additional data processing or mapping.
Add Customer Data Object to Case Type:
Begin by adding Customer data object reference into your case lifecycle. Presented flow will enable users to create a new Customer record or edit an existing one selected in the data reference field.
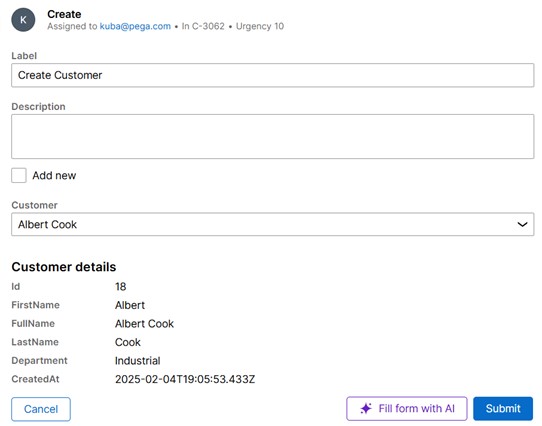
Customize Save Options:
Reference fields do not support CRUD operations directly, so when using these from a case flow, you may need to extend the save plan further, adapt business logic or When conditions in Dev Studio.
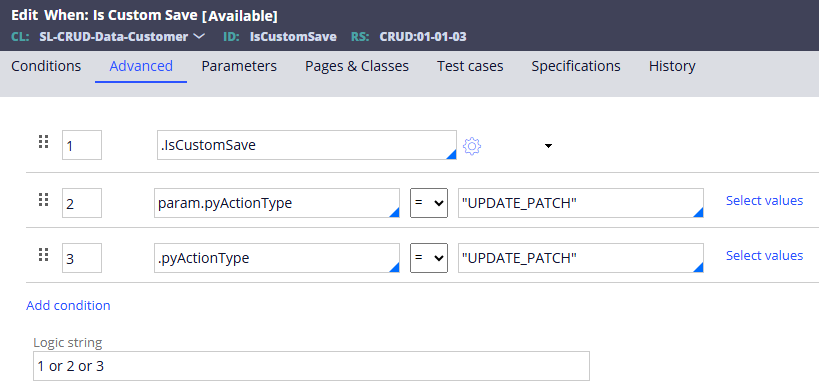
In this use case to pick the right save plan option for updating record (using the PATCH method),
the default pyIsPatch When rule was replaced to take in consideration "IsCustomSave" flag (.IsCustomSave true/false property added to data class).
Marking a custom When rule as relevant record in Actions menu in Dev Studio makes it available for Citizen Developers in App Studio.
Use Data Transforms and Activities for additional processing:
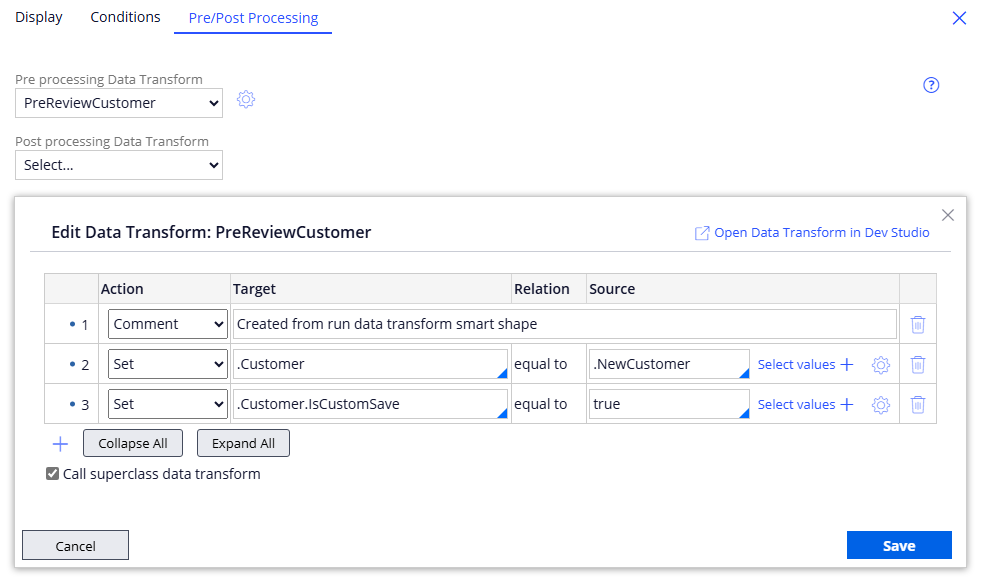
To manage additional data processing or mapping between case fields and the Customer data object, utilize Data Transforms. This way the When rule condition in save plan is satisfied and the right save option is triggered.
To ensure seamless data integration and transformation, you can set these in Configure view > Pre/Post Processing tab.
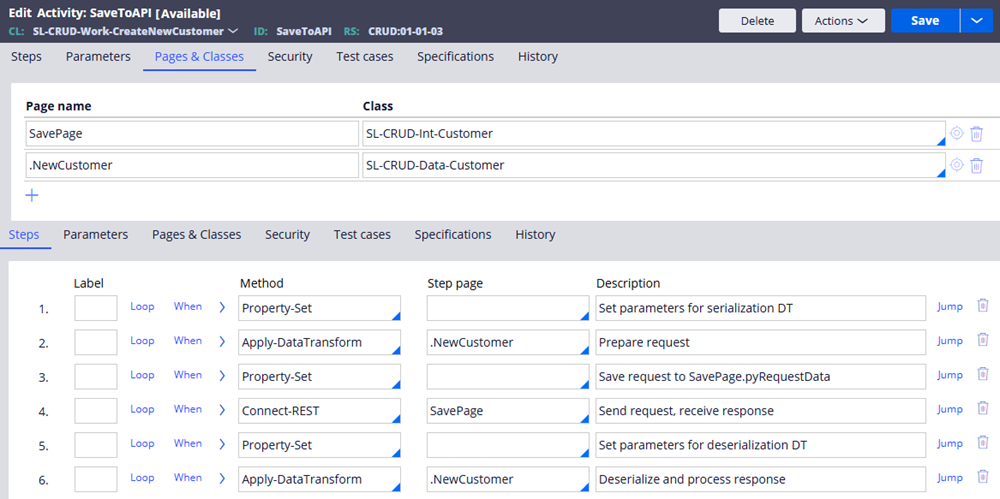
If you encounter a scenario that cannot be achieved through using save options and mapping data transforms, use Activities. These can be applied in data page configuration as the save type in save option, post-processing action in flow action rule or stand-alone utility in case workflow.
Note that creating and using custom Activities should be avoided whenever possible, because they can introduce maintainability issues and complexity into the application. Remember to implement input data validation, error handling and response processing logic.
For more information, see: Connect-REST method, Connect REST calling activity
Conclusions
By following these instructions, you can successfully integrate and manage a Customer data object through a landing page with straightforward CRUD configuration, as well as in a case flow, providing users with enhanced capabilities for managing customer information - All this in Pega Constellation with minimal customization in Dev Studio to satisfy more advanced scenarios.
Constellation 101 Series
Enjoyed this article? See more similar articles in Constellation 101 series.
Novitates
IN
@KubaP Indeed its a very informative article. Tried the same in 24.2.2 Constellation Community edition. However, only to fetch records though from mockapi.
I have noticed that the structure is built and records are fetched from integration but when its comes to table display, i am seeing an issue where the data is not displayed properly.
The table in the records manager shows a "No records found" block and when scrolled i can see the actual rows/records shown/populated. Its kind of strange. But this is only for the tabs created for each data object in Records Manager.
When i create another tab and populated the list views created OOTB, then i can see the data properly without any issue. However, here there is one more concern that export to excel option is missing in the default actions of the table. Not sure if this is expected. But would be good if we have one.
Attached are the snapshots of what i see.
Also i have the below URL where you can see the video of the whole execution for your reference.
https://drive.google.com/file/d/13cyBKo79WCNzW1vLY01jmHV0ixUEWR-r/view?…
Kindly have a look at it and let me know if i am missing something.
The attached snapshots or the video url does not have any confidential information
Thanks
Jayachandra
Pegasystems Inc.
PL
@JayachandraSiddipetathat's unusual, looks like a bug to me. Please consider submitting a ticket through the support portal.
Novitates
IN
@KubaP I have posted a separate questions as well below by tagging Siddu
https://support.pega.com/question/generate-insights-using-data-page-sou…
and siddu has provided valuable information and also acknowledged the bug for which team is internally going to have a look at.
Thanks
Jayachandra
Swift
US
@KubaP This is very nice article. I liked the way the concepts are presented. I have a small observation. For saving the customer data object through workflow we are using activity and calling Connect-REST directly in the activity. IMO this is deviation of Pega's Center-out architecture where it says the case layer should be abstracted form the external integrations through Data Pages. Correct me if I am missing anything.
Pegasystems Inc.
PL
Hey @ManoharT17256397,
Yes, good point, that's correct.
The other general rule is to avoid activities whenever possible, especially when those could be replaced with Data Transform or as in this situation, a savable Data Page.
Note that for complex scenarios you could still go for an Activity with Connect-REST method, but used as a save type (see Fig. 6) - This way you can combine benefits of logic and integration separation, and flexibility.