Discussion
Pegasystems Inc.
NL
Last activity: 13 Jan 2026 10:57 EST
Bulk actions in Constellation
Bulk actions in Constellation
Why:
Bulk Actions allows you to run configured optional action to be run on multiple case instances at the same time. A user can use bulk actions in an application to save time, ensure consistency, and reduce errors across various business functions, especially for repetitive tasks and large case volumes.
Business Use Cases :
Businesses across various sectors utilize bulk actions to enhance efficiency. Below are a few sample use cases:
- In financial services benefit from batch approval of expense reports, handling 30 reports at once.
- Customer support teams manage support tickets by efficiently assigning 100 new tickets to team members.
- Human resources departments streamline onboarding by assigning tasks to 10 new hires simultaneously.
- Inventory management involves updating product information, such as adjusting prices for 500 products in a single action.
Benefits:
Bulk actions save time and boosts productivity, making them an essential feature for users managing multiple items or tasks within an application. It is especially useful for simple and repetitive tasks.
Prerequisites:
- Ensure your application includes a Case Type set up.
- You have a landing page configured using List View that list Case instances.
Configuring Post Processing in Bulk Actions
Please refer to documentation to learn how to configure Bulk actions in constellation.
Here are key configuration points:
Step 1: Add an optional action to your case via App Studio: Case Designer -> Optional actions -> case wide / stage-only.
Note: Flow-wide and Assignment actions are unsupported for bulk actions. Only flow actions which are configured for bulk processing are supported by Bulk Actions. Many of the OOTB flow actions are not configured for bulk actions.
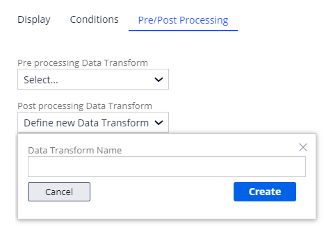
Step 2: From Optional actions, select the action and in the right pane click on Configure view -> Select Pre/Post Processing tab, in the Post processing Data Transform picklist -> Select Define new Data Transform.

Step 3: Enter the name of the new data transform and click Create. (Note: This DT will run for each case selected in bulk actions)
Step 4: Click on the icon to the right of the Post processing Data Transform picklist.

Step 5: In the data transform editor, implement the post-processing logic and click Save.
Step 6: Optional step - If the data transform requires parameters, click the link Open Data Transform in Dev Studio, and add the parameters in Dev Studio.
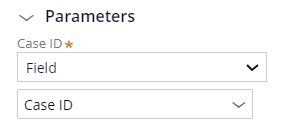
Step 7: Now, in the Pre/Post Processing tab, the parameters added will result in a prompt for values to be defined, either Constant or Field. (Note: A logout and login are required after saving the parameter before the prompt for values appear).

Note: Alternatively, an activity can be used for post-processing, configured in Dev Studio.
Step 8: In the Display tab -> Configure the view with desired fields/views -> Hover on the view information icon and locate the ID -> Switch to the Dev Studio and search for the ID to locate the flow action.
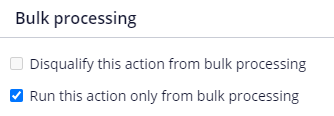
Step 9: Select the Action tab of flow action -> Go to Bulk Processing configuration -> Clear the ‘Disqualify this action from bulk processing’ checkbox and Select the ‘Run this action only from bulk processing’.

Step 10: Configure a landing page referring to the instructions and test the feature.
Best practices:
Configure the optional actions from App studio.
Provide meaning full info to the user on View that will be displayed.
Points to consider:
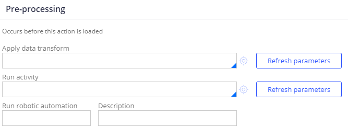
All flow actions allow the optional configuration of a pre-processing data transform and an activity. If both are specified, the data transform is executed first, and then the activity. For bulk processing, the pre-processing is executed in the context of each case selected. The pre-processing is in the context of a transaction, so can be used in the same way as post-processing. For bulk processing, it is at the discretion of the architect whether to use pre-processing, post-processing, or both to perform the bulk processing objective.

Flow actions with Bulk processing enabled allow the optional configuration of an additional pre-processing data transform. This pre-processing is executed prior to the display view defined for flow action and would typically be used to set defaults on the view.

The sequence for bulk processing is:
- Sequential execution of the pre-processing data transform configured for Bulk processing.
- Display of the view for the flow action 1
- For each selected case:
- Acquisition of a lock 2
- Execution of the flow action pre-processing then post-processing 3
1 For bulk processing, the flow action view can capture the values of fields in the data model of the case type, but it is not in the context of any specific case. The values captured are copied into each case select for bulk processing prior to executing the bulk processing.
2 If a lock cannot be acquired for any selected case, processing is skipped for that case and progresses to the next selected case. No error message is displayed.
3 If pre-processing or post-processing produces an exception, any updates are skipped for that case and processing progresses to the next selected case. In this event an error message is displayed at the end of the bulk processing to indicate how many updated failed.
In the configuration of a landing page that enables Bulk actions, a data page is specified to source the cases to be listed. The data page provides a page list, in which each page only requires the Case ID (pyID). The values for any other columns configured for the landing page are case data sourced from each listed case.
By default, the bulk actions feature supports cases only, but it can be extended to handle assignments, if necessary, although some limitations need to be considered.
In case types where there is the possibility that multiple assignments may exist in parallel, there is the possibility that the landing page can have more than one row for the same case. This potentially presents usability issues for the landing page as it will not be possible to differentiate between rows representing the same case.
In the Action buttons part of the flow action configuration, checking the “Hide the default action section buttons” checkbox has no effect in Constellation (for any flow action).
In the Action buttons part of the flow action configuration, “Customize the action section button labels” allows the captions of flow action buttons (Cancel, Submit) to be modified.
Bulk action will be displayed only when all selected cases are eligible – meaning all are in the same stage or step.
A bulk action will be displayed in the dropdown only If the selected cases are in a state such that they all support that bulk action. For example, If a bulk action is configured for a particular stage and not all of the selected cases are in that stage, the bulk action will not be available in the list of bulk actions dropdown.
References:
Bulk actions in constellation, Data pages in constellation,
Video:
This video demonstrates the application to implement a Manage Expenses case type that allows a user to capture the name of an employee and a list of expense items, each having a type (Flight, Hotel, Taxi, Train, Meal) and an amount. The case is then routed to an approval step in a workbasket.
The requirement is for a view to be provided of the list of cases with the assignment step in the approval work queue, with a means of selecting multiple cases from the list and bulk transferring the assignments to a specified user.
Constellation 101 Series
Enjoyed this article? See more similar articles in Constellation 101 series.
