Import Excel data to case (and show them in Constellation UI)
This knowledge sharing article shows step-by-step configurations of how to upload an Excel file, parse the Excel data, and display them in a table using Constellation UI.
Pega platform version used: 24.2.2
Configurations
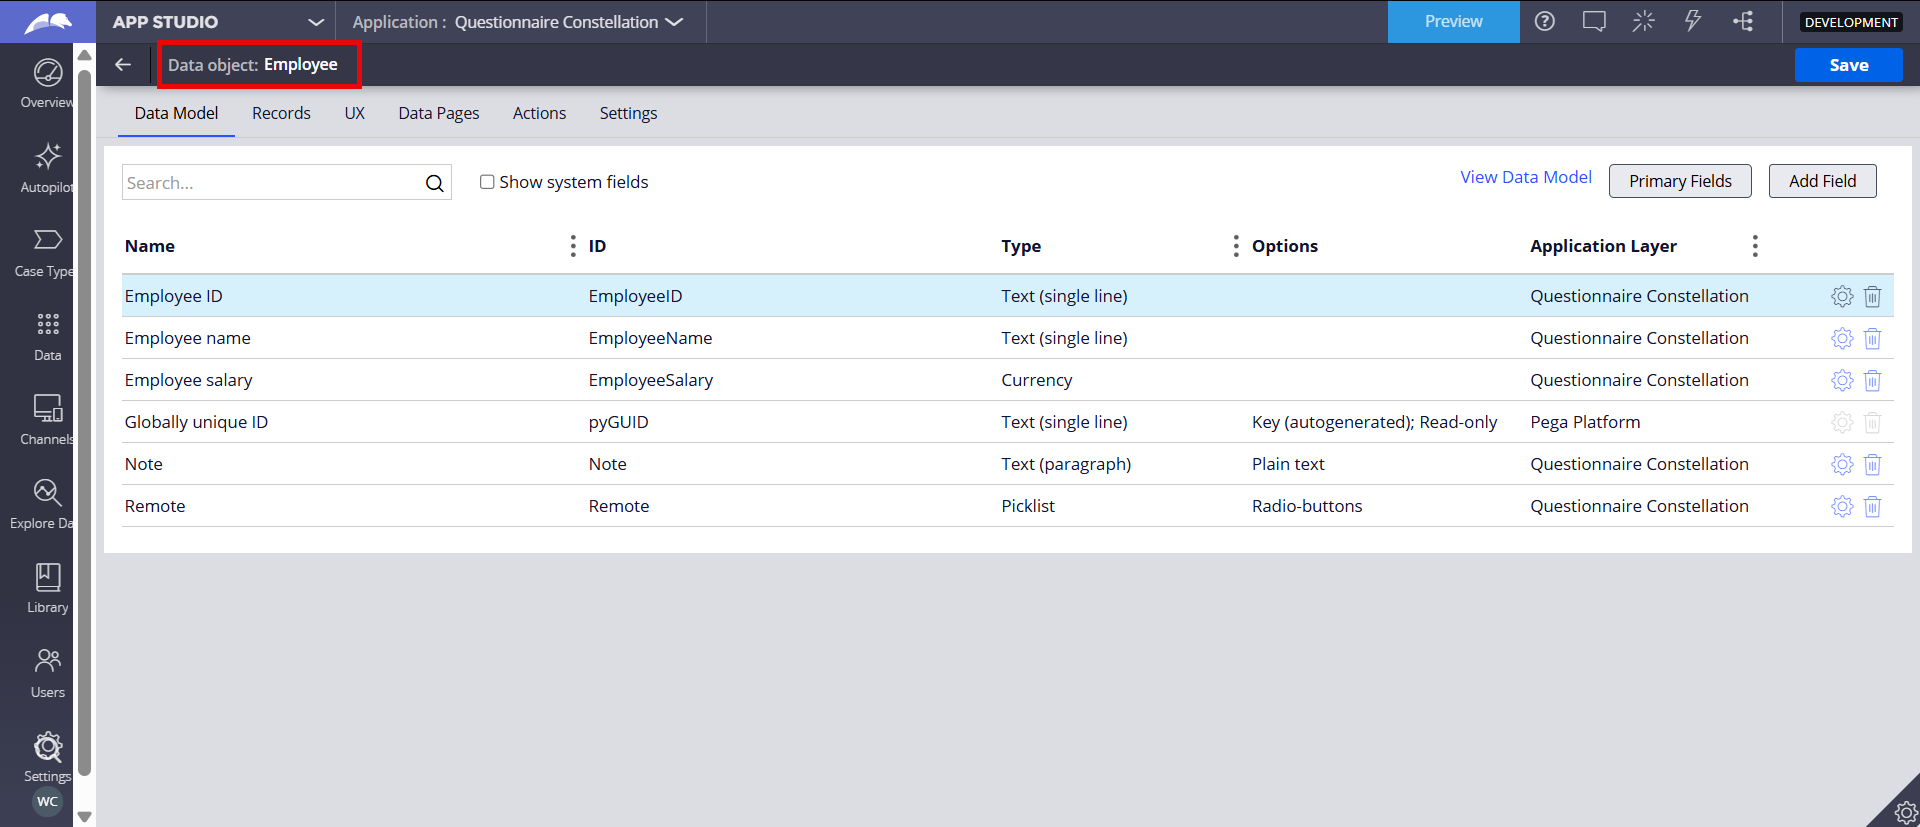
Step 1 - Create a data model.
We created an Employee data object and the related fields.
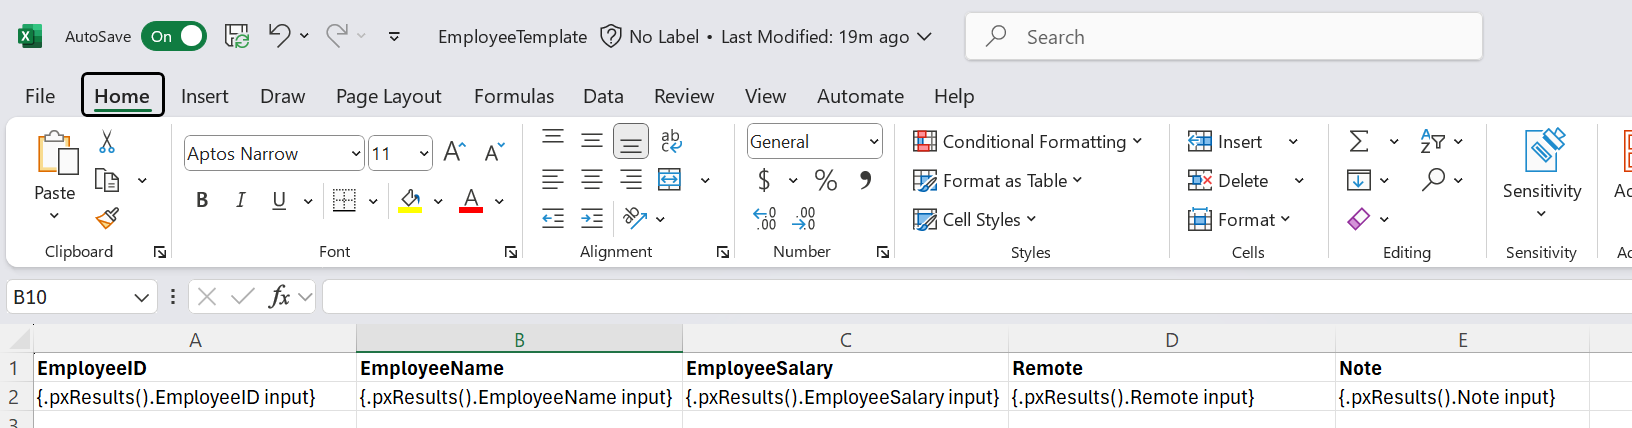
Step 2 - Create an Excel template file (.xlsx) and the corresponding Binary File rule.
Notice the .pxResults() notation to import more than one record and the keyword "input" at the end of each cell.
Create a Binary File rule and upload the Excel file.

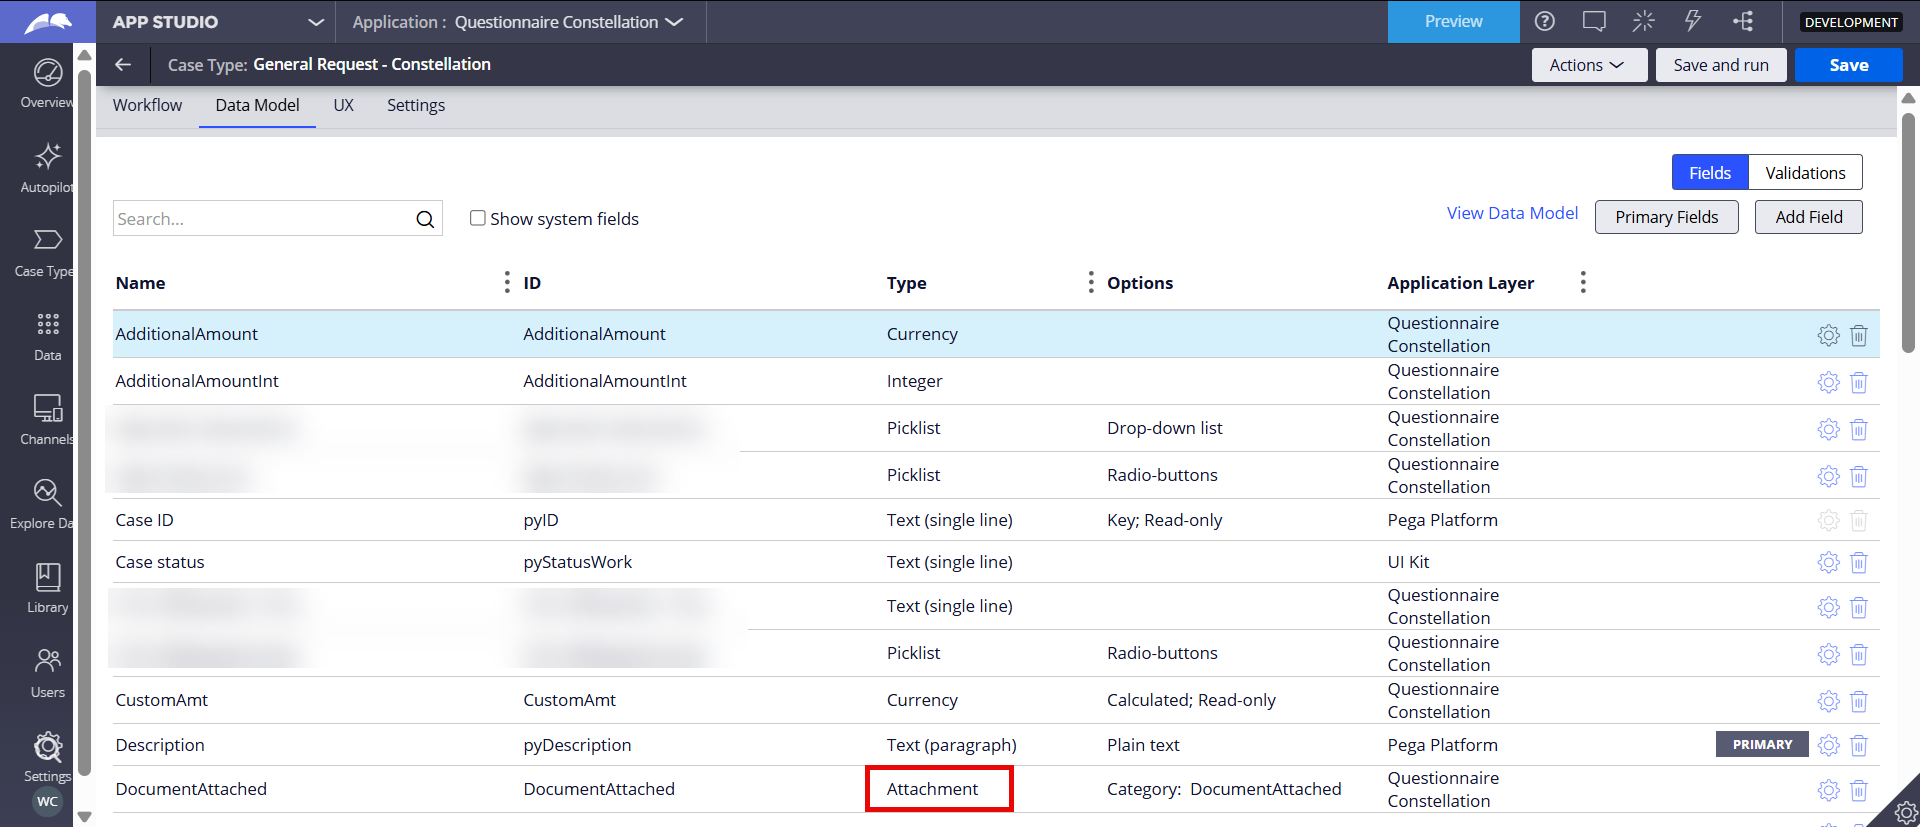
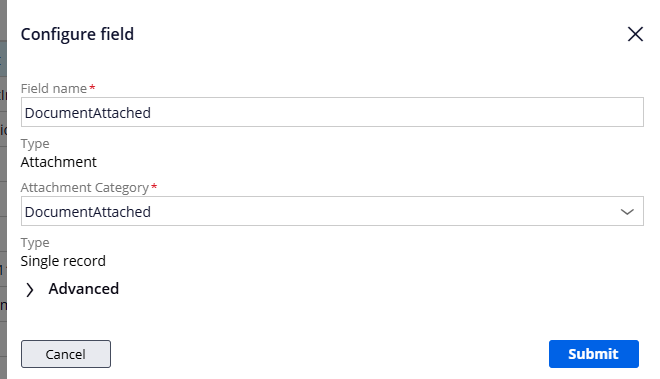
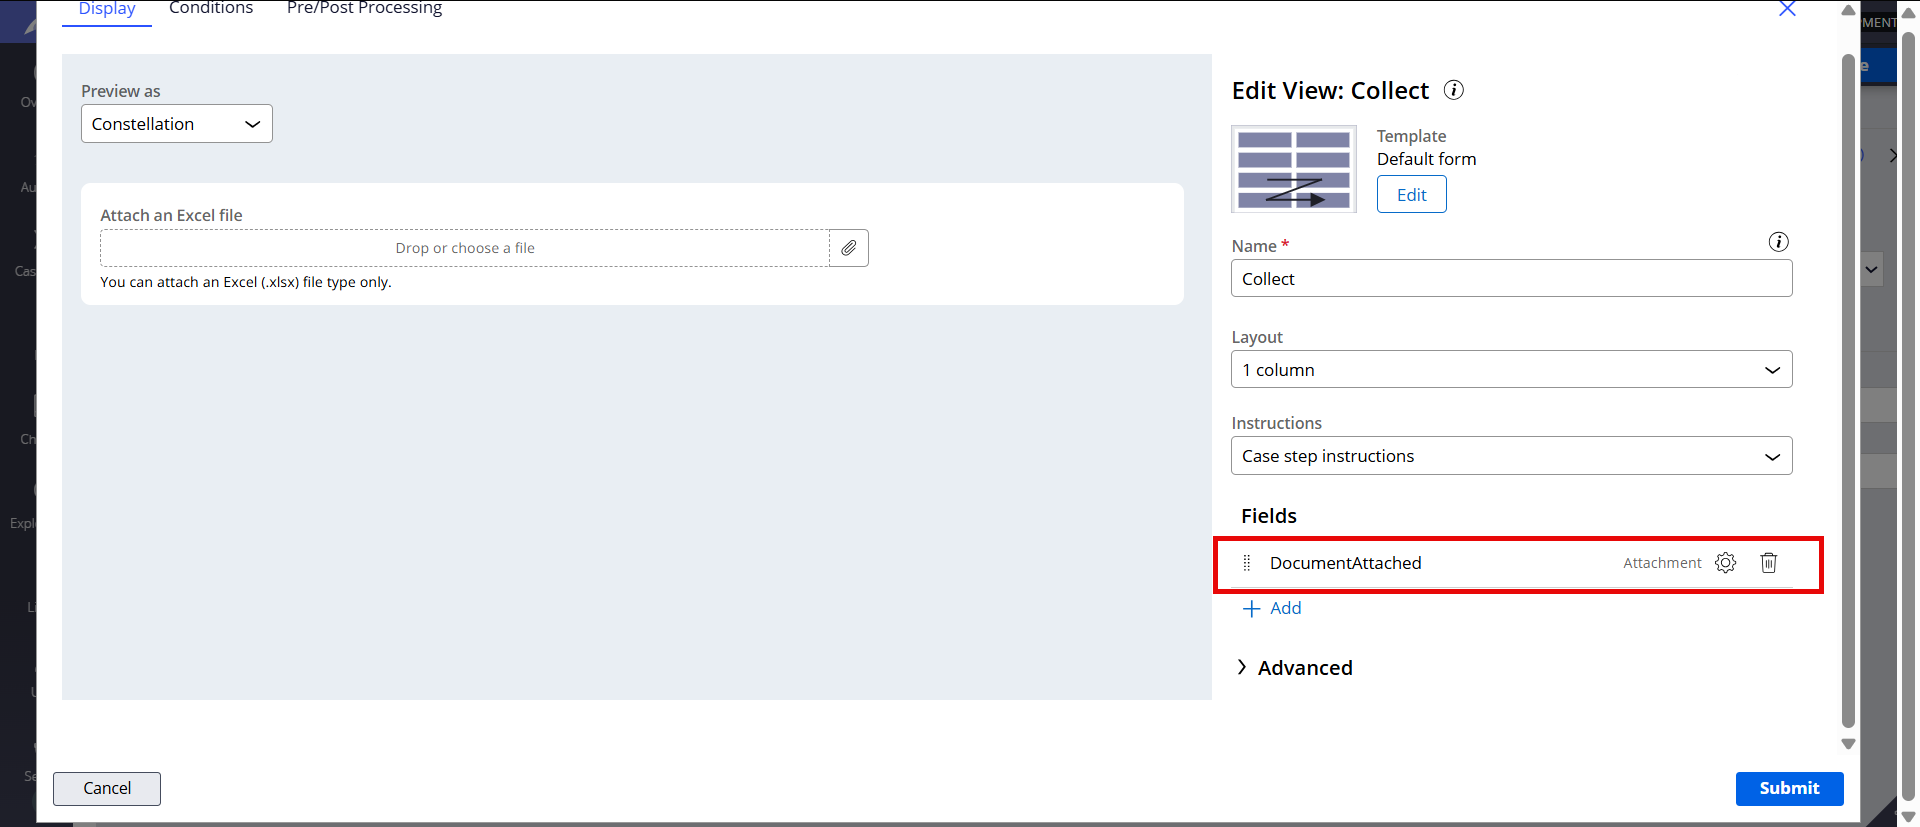
Step 3 - Create a new DocumentAttached field (type=Attachment) in the case type.
Step 4 - Add the new DocumentAttached field to the view in the case type.
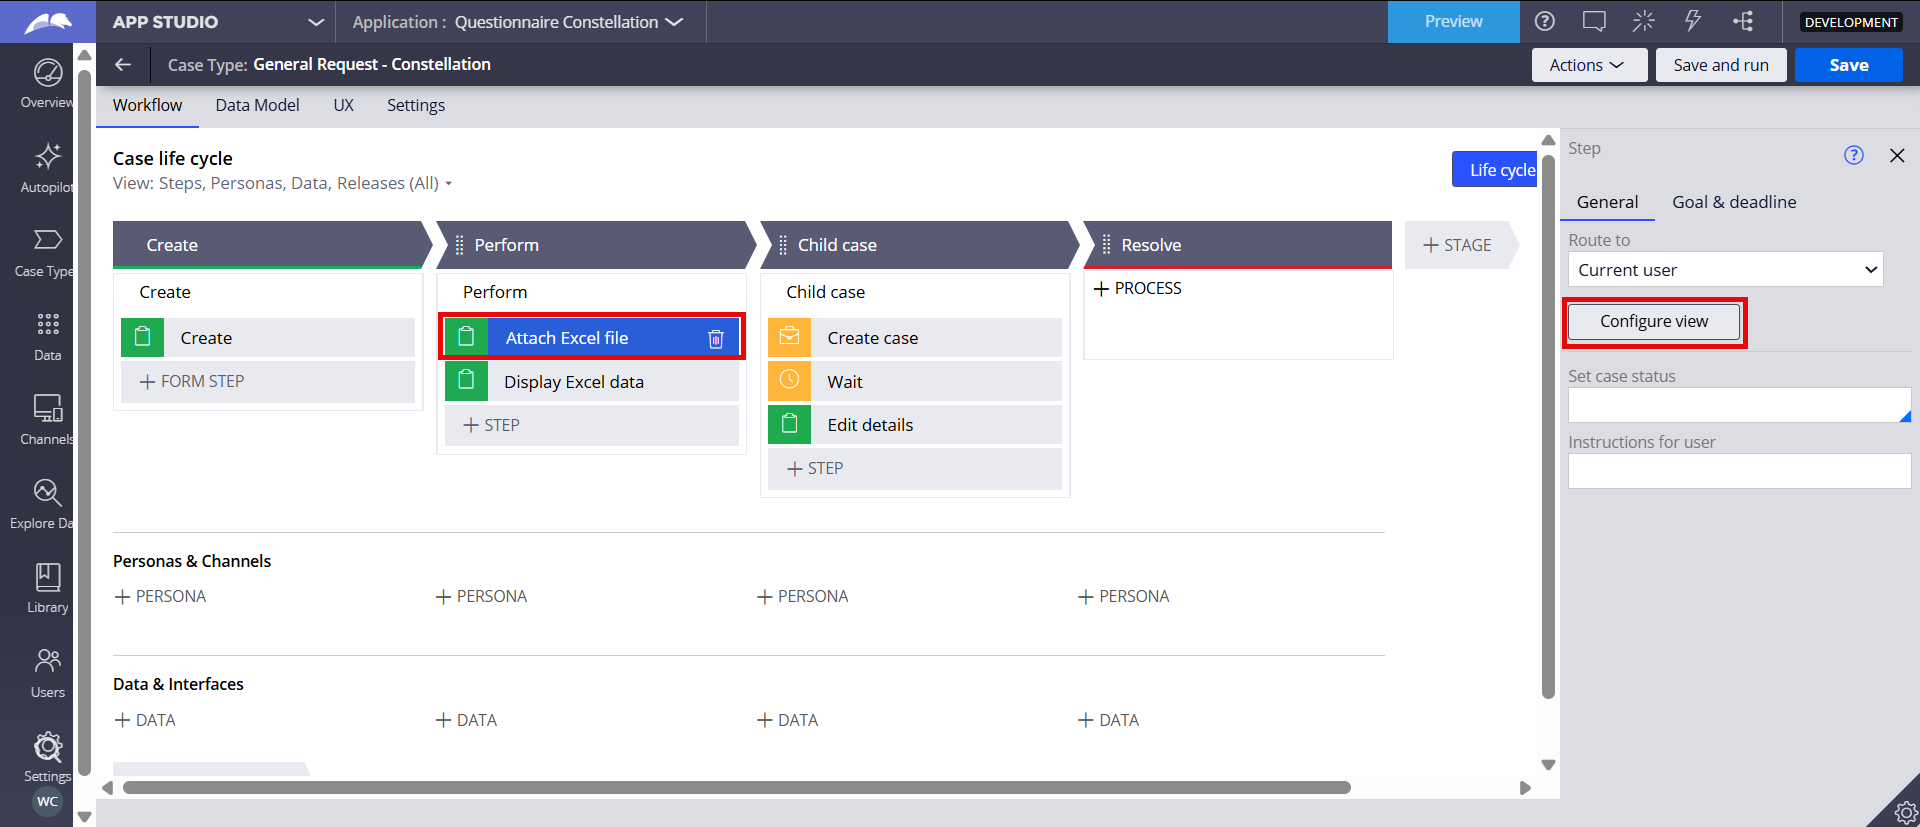
This will allow users to upload an Excel file to the case.
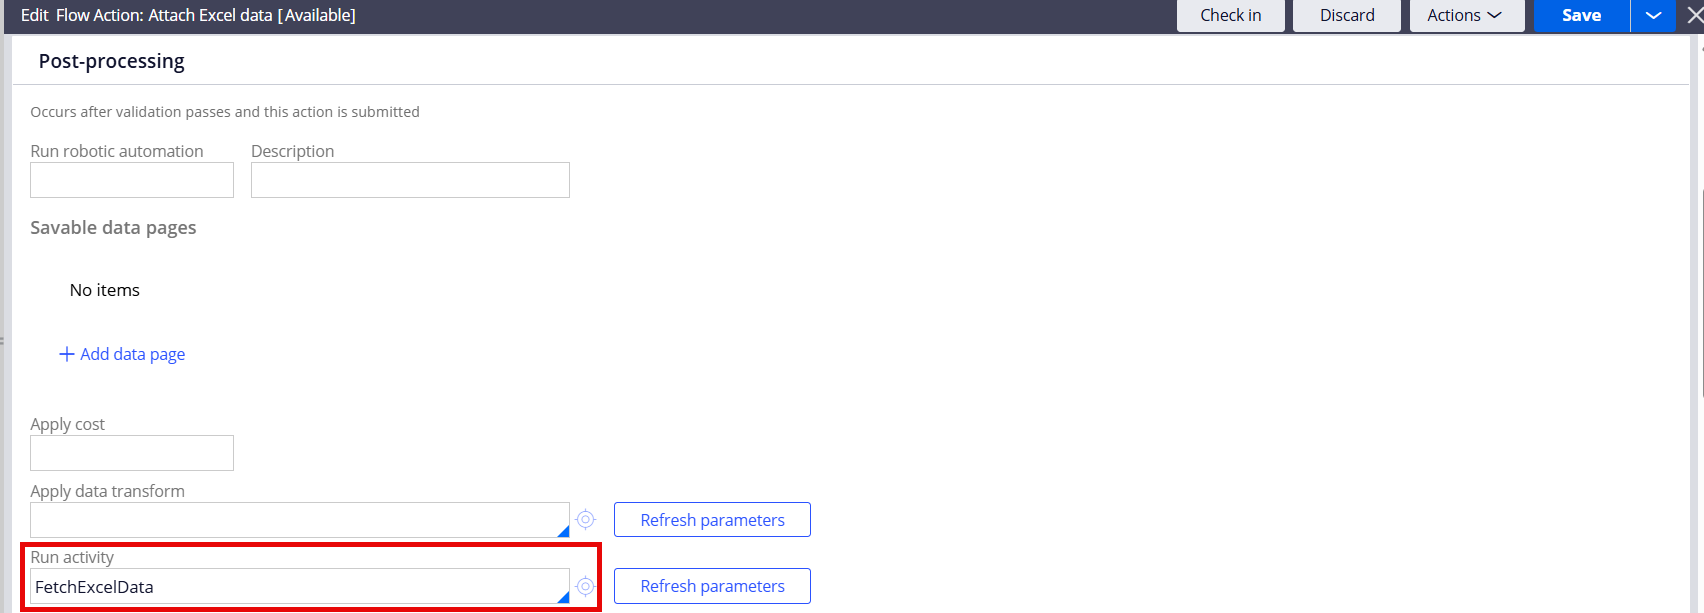
Step 5 - In the post processing of the 'Attach Excel file' flow action, call an activity to fetch the Excel data.
This will be executed when user submits after uploading an Excel file.
Activity steps:
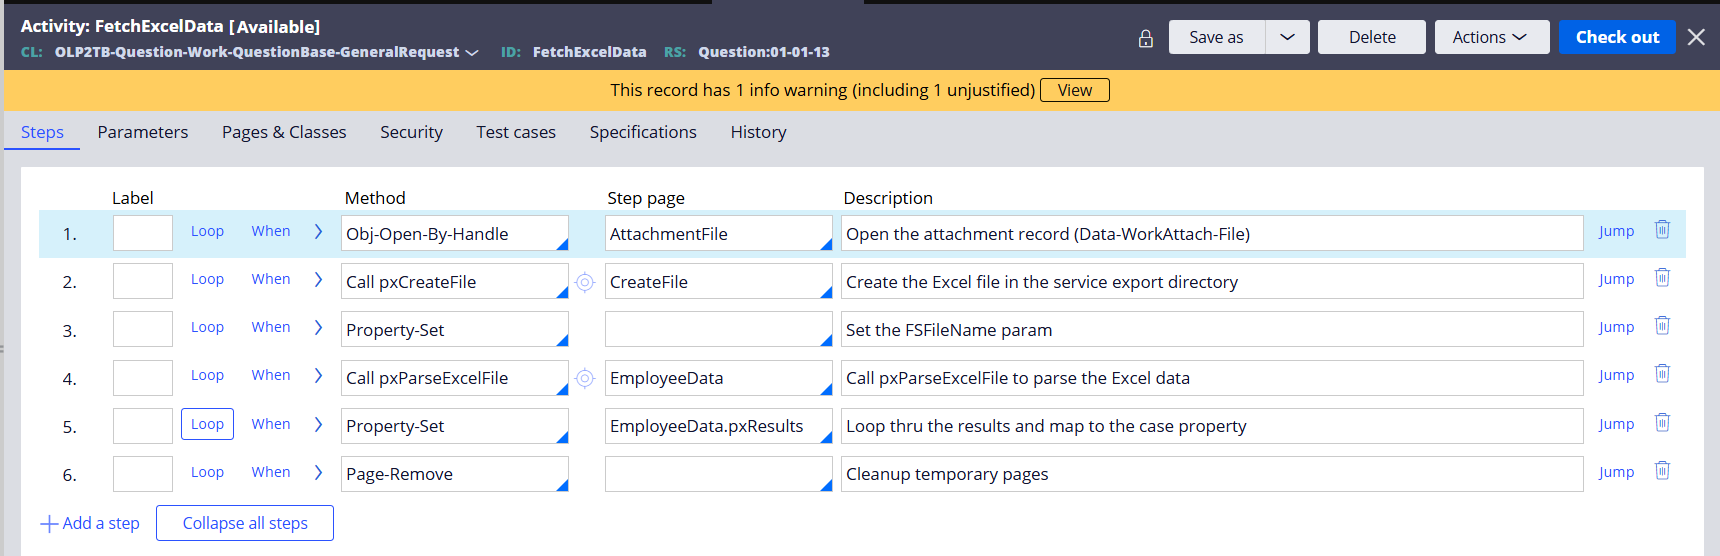
Pages & Classes:
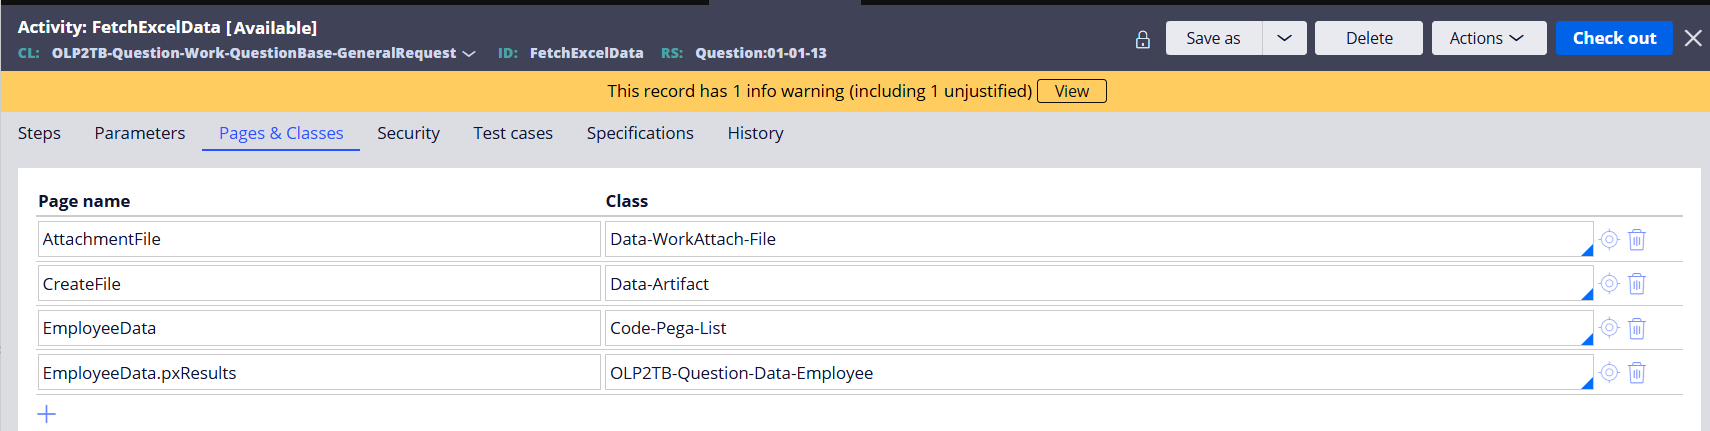
In Step 1, we open the case attachment object (Data-WorkAttach-File). This is the Excel file uploaded by the user to the case.
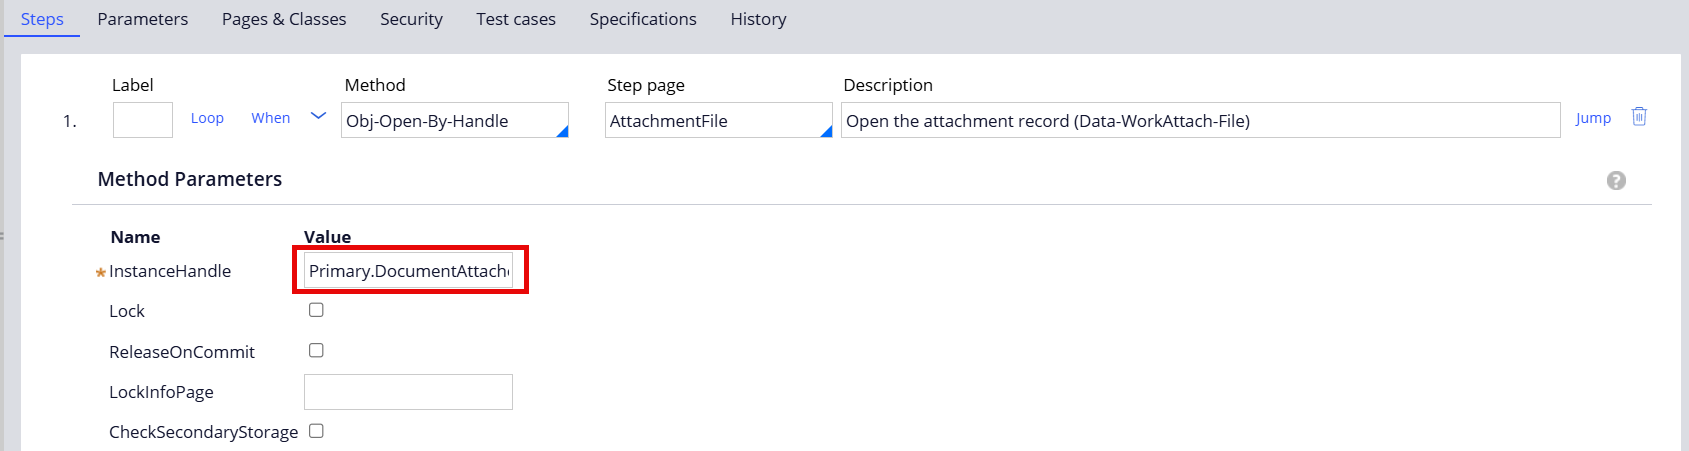
Parameter
Primary.DocumentAttached.pzInsKey
In Step 2, pxCreateFile activity creates a file in the service export directory. In my example, the location is "file://web:/StaticContent/global/ServiceExport/".

Parameter
AttachmentFile.pyAttachStream
AttachmentFile.pxAttachName
AttachmentFile.pyStyle
In Step 3, we are setting the FSFileName parameter, and in Step 4, we are calling OOTB pxParseExcelFile activity to parse the Excel data.
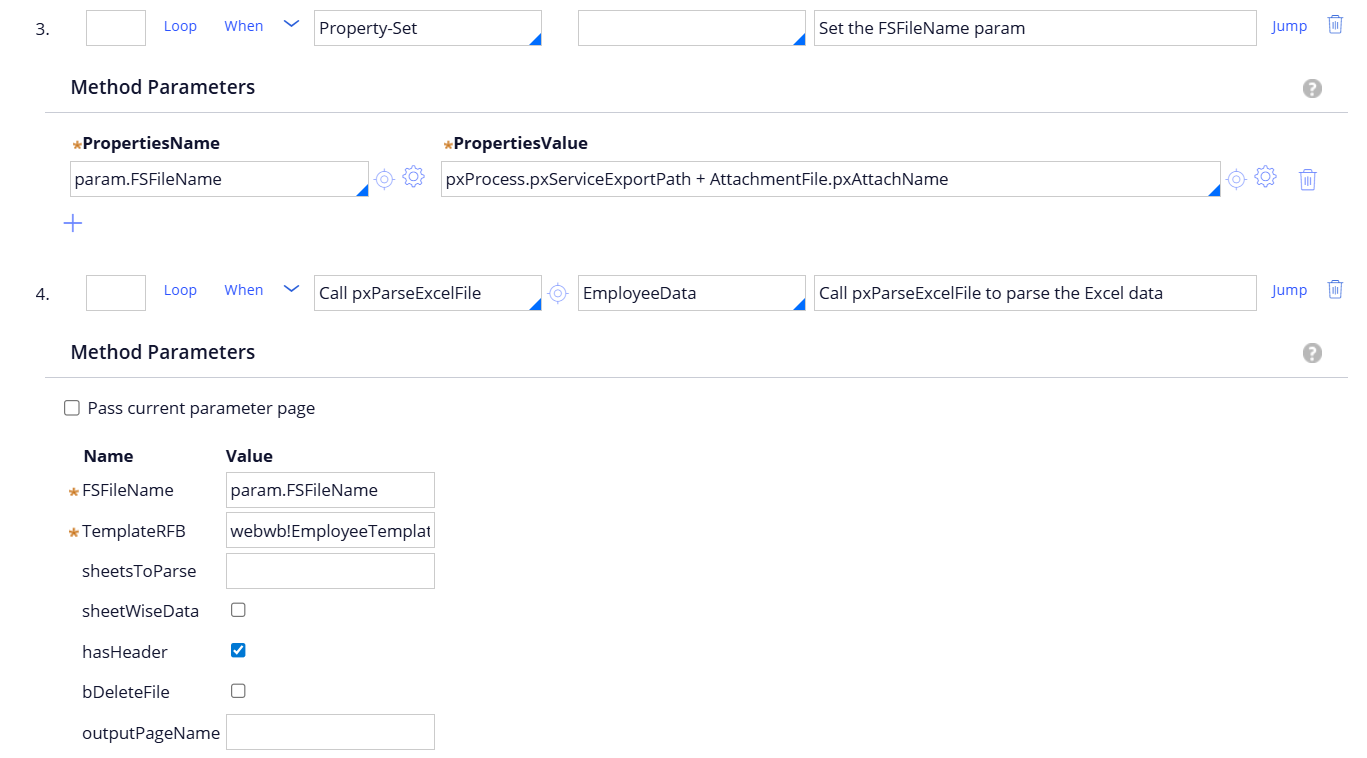
Parameter set (Step 3)
param.FSFileName = pxProcess.pxServiceExportPath + AttachmentFile.pxAttachName

Parameter (Step 4)
param.FSFileName
webwb!EmployeeTemplate!xlsx
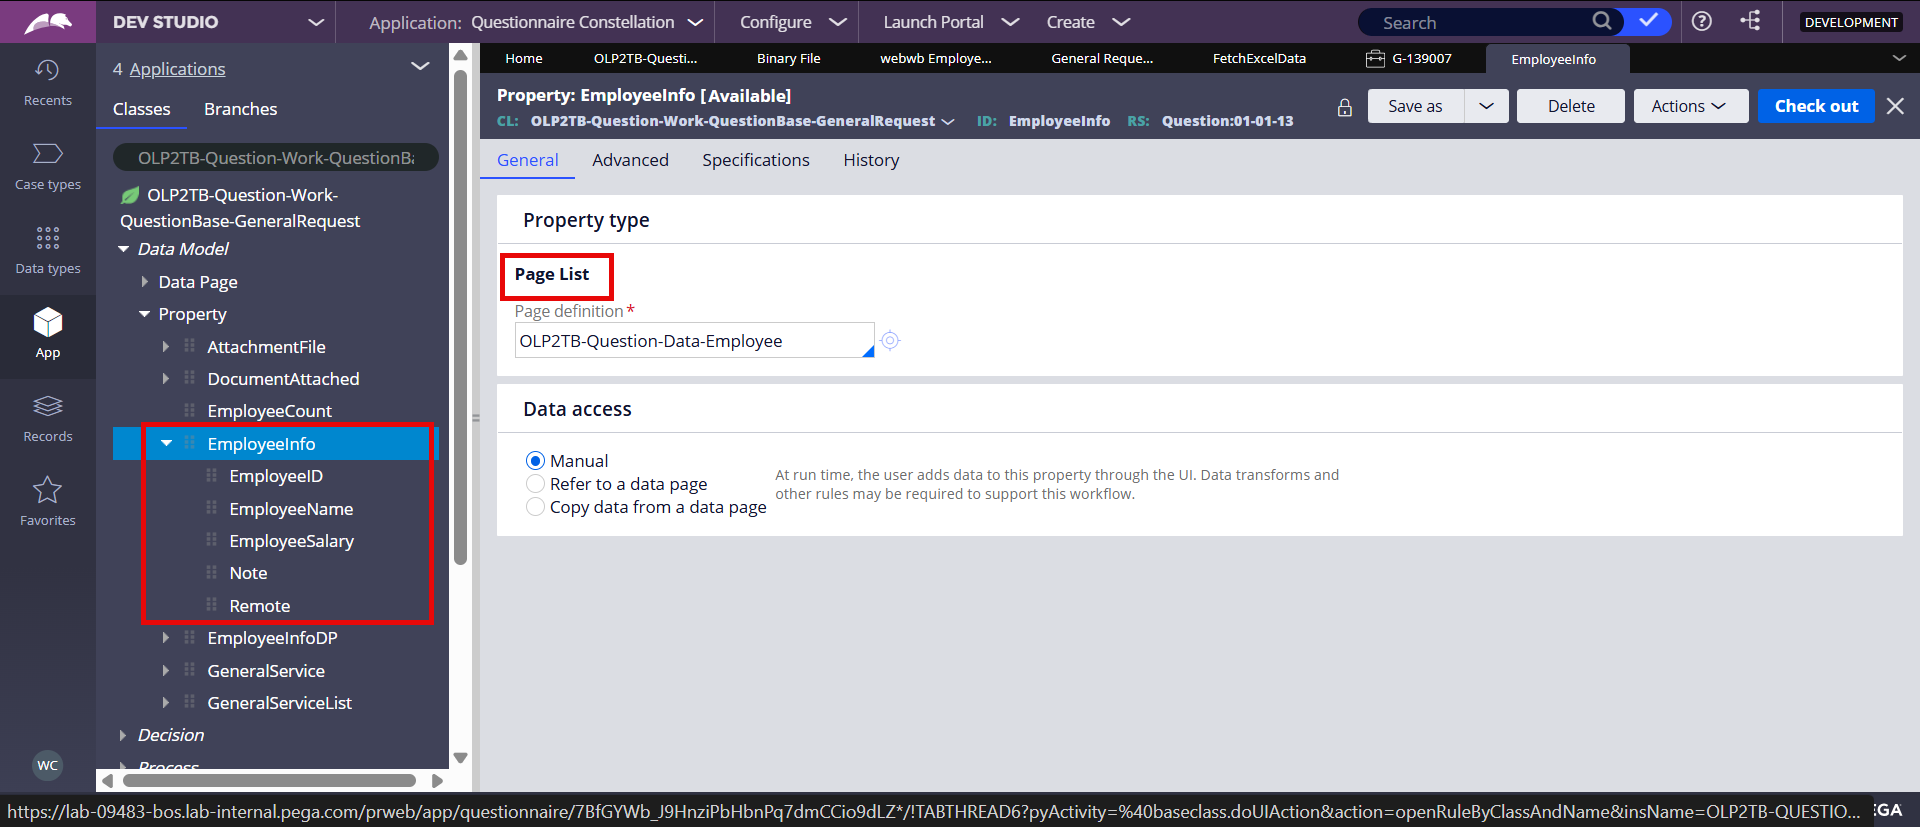
In Step 5, we're looping thru the parsed Excel data and mapping to the EmployeeInfo case property (PageList).

Here is the EmployeeInfo property (type=PageList) defined under the work class.
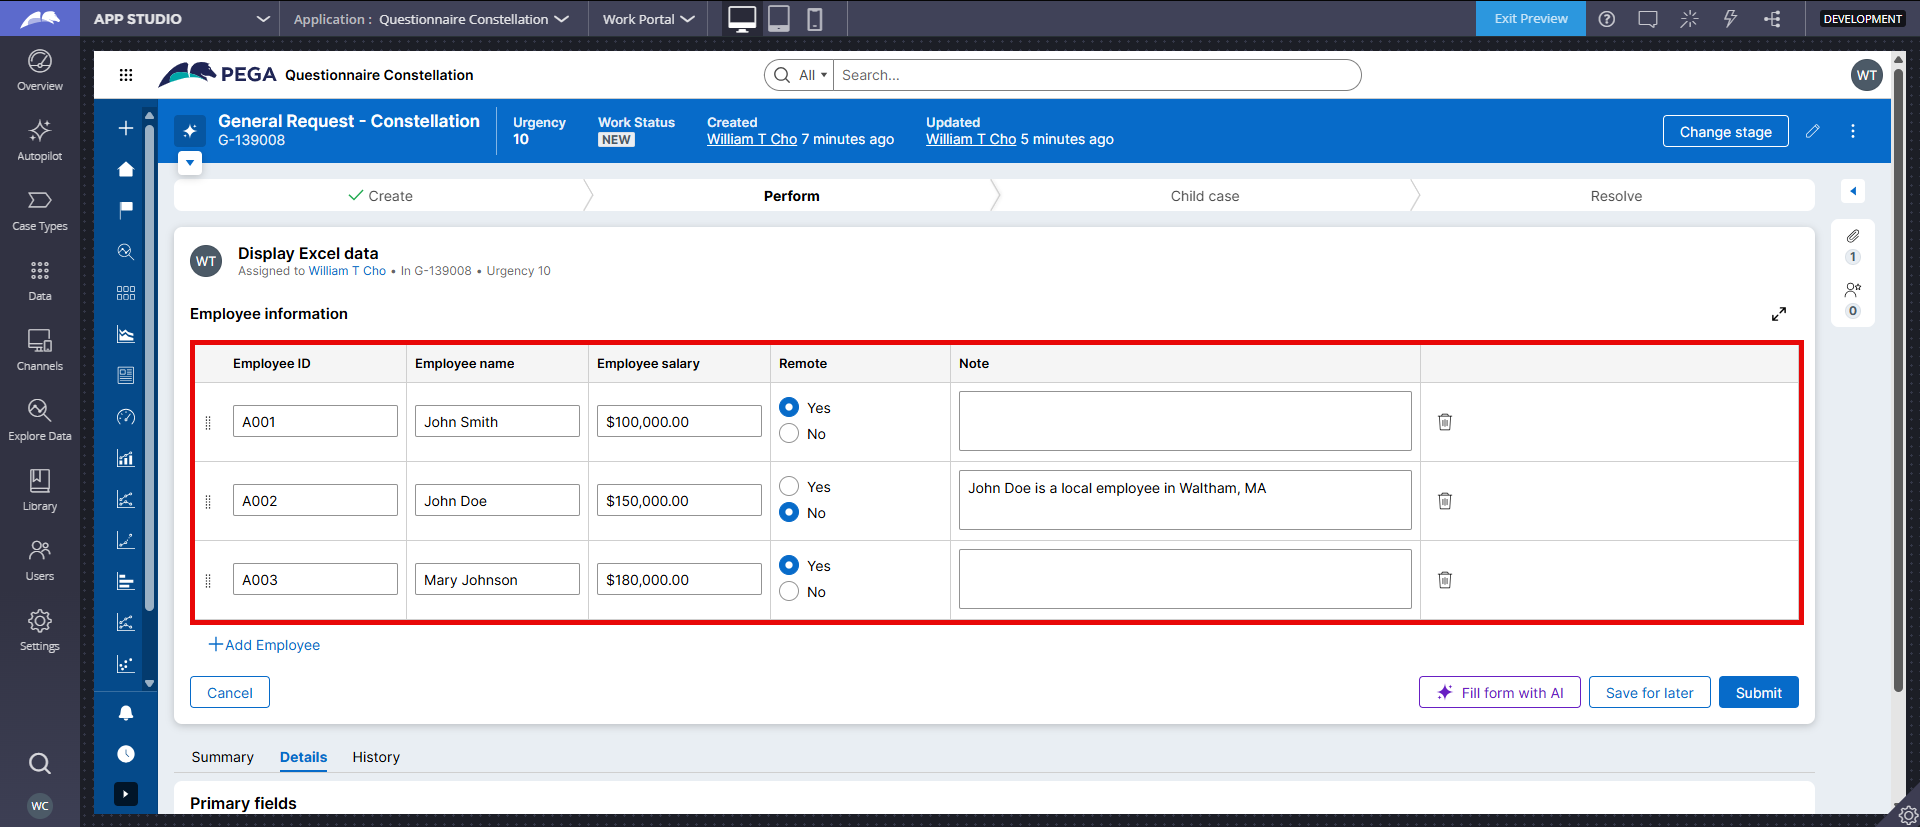
Step 6 - Configure a view to display the parsed Excel data in a table.
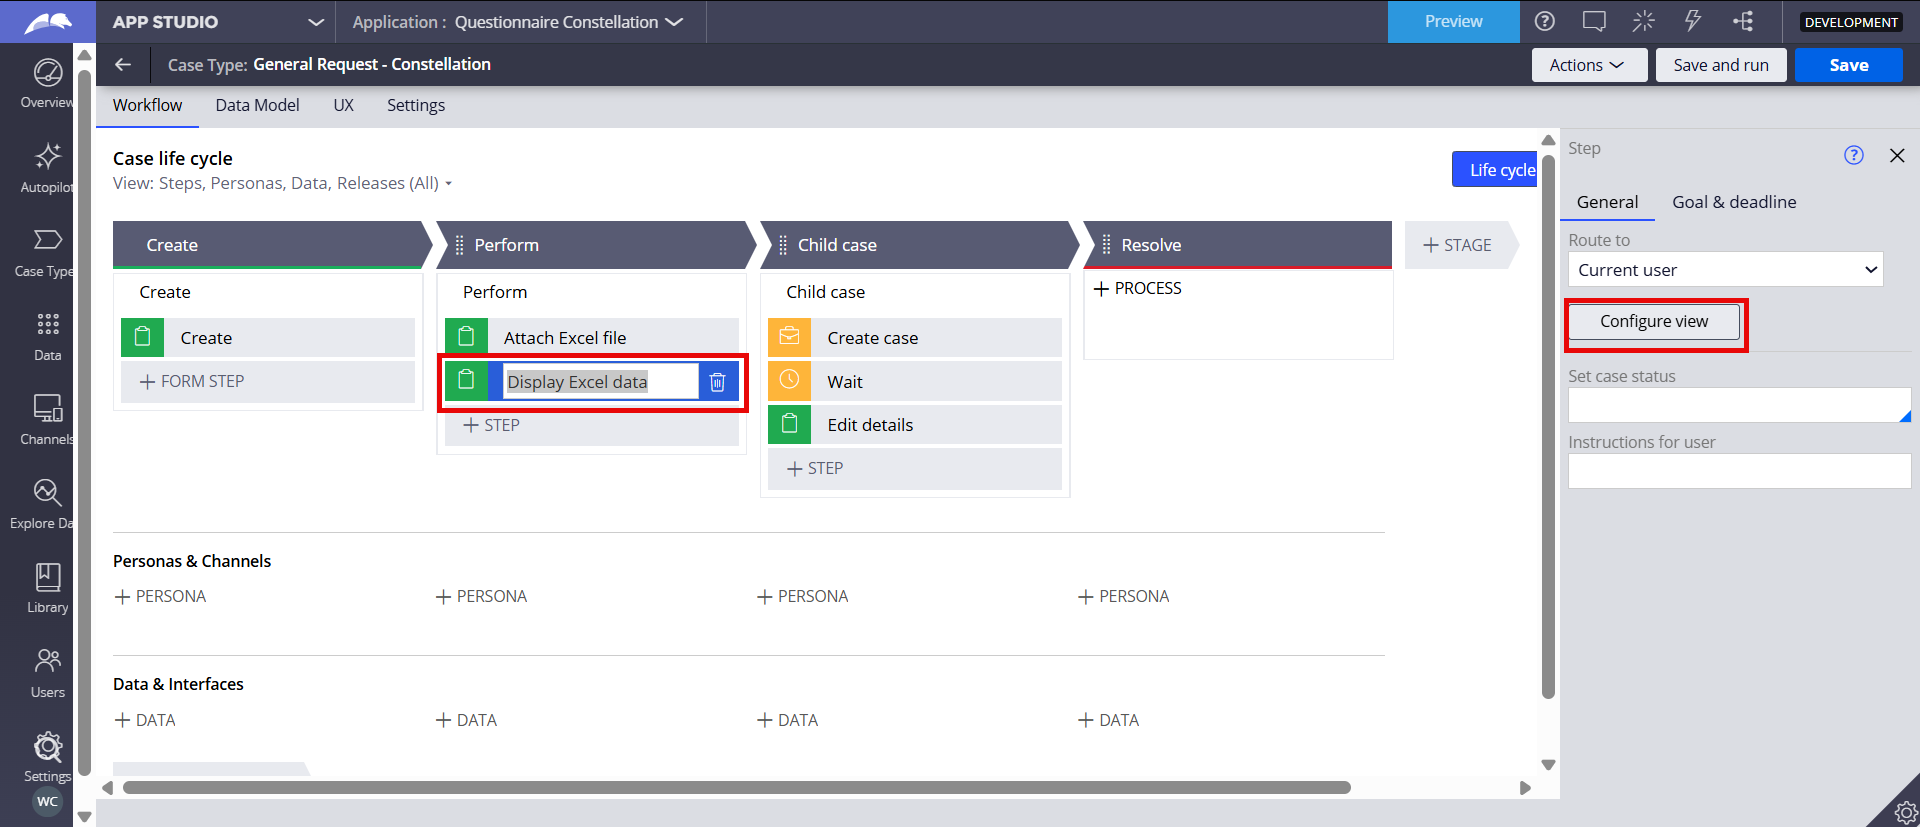
Add the EmployeeInfo field (Embedded Data).
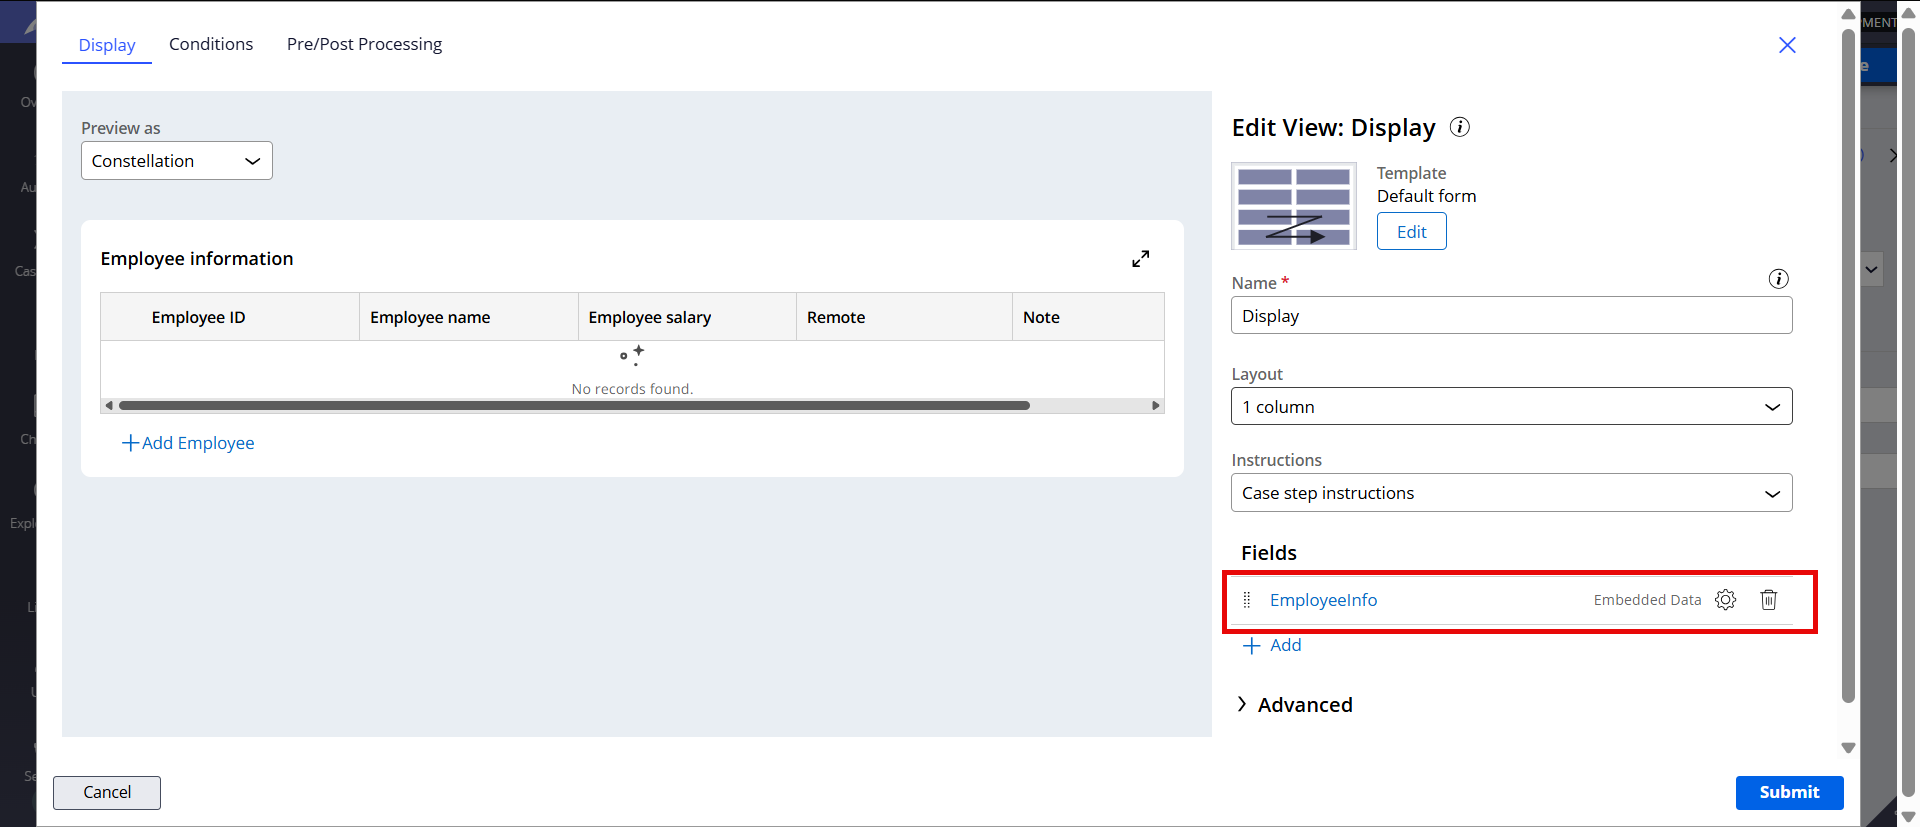
Drill down to edit the EmployeeInfo field and add the columns.
Testing
Step 1 - Create a new case and attach an Excel file.
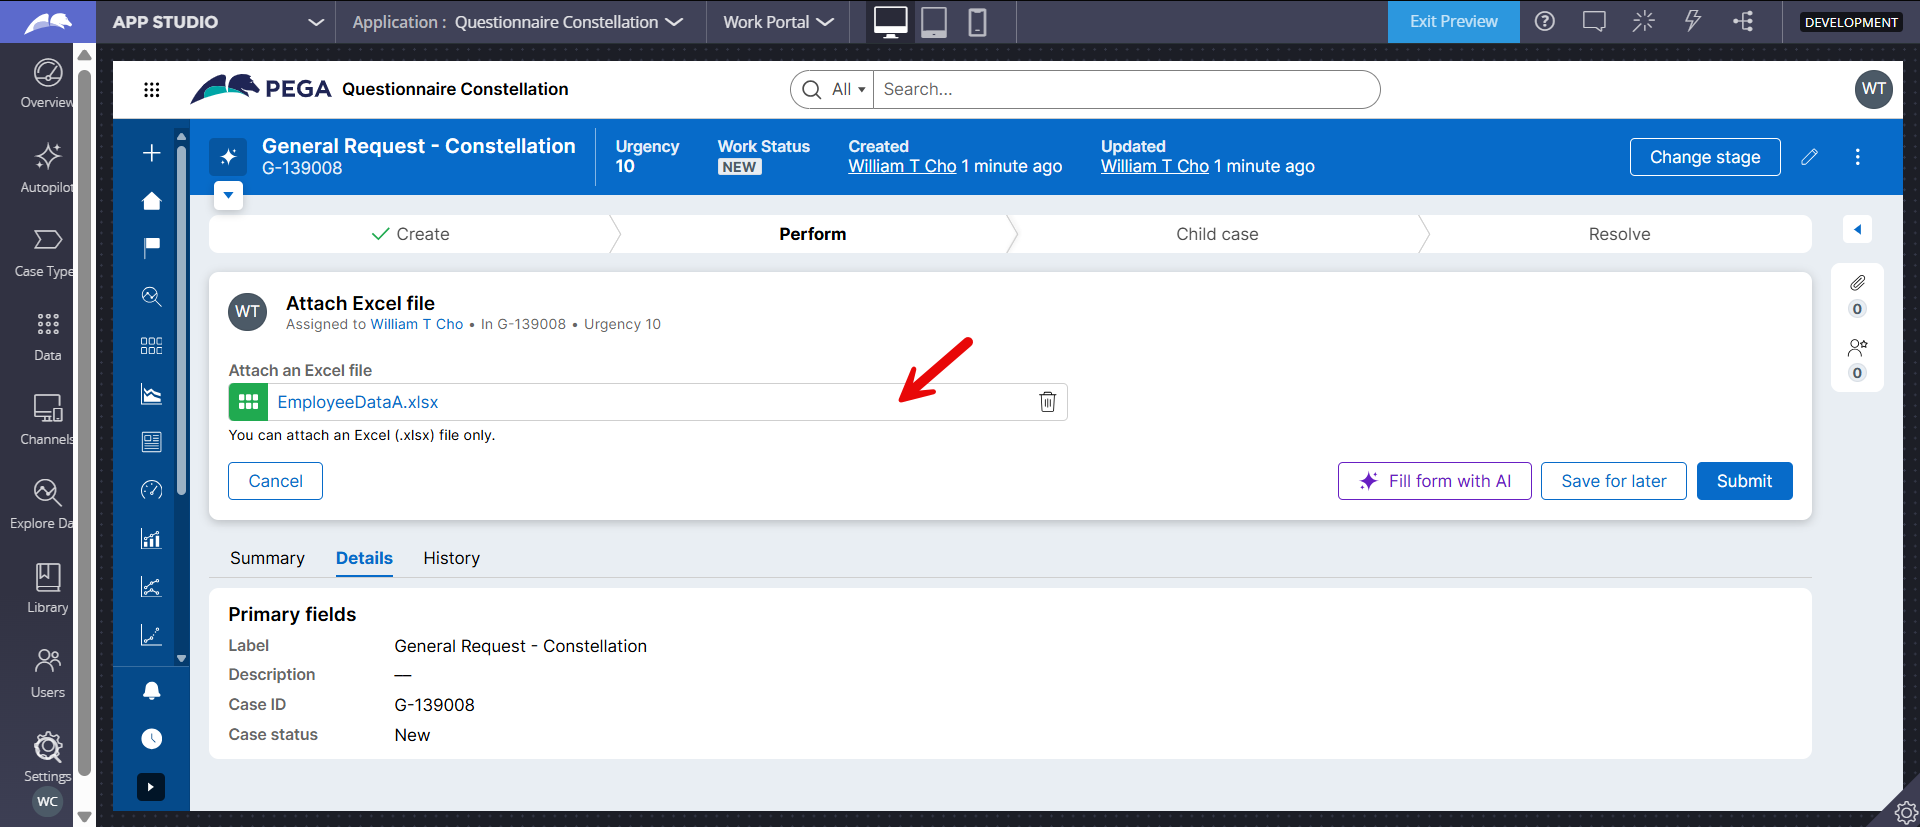
Here is the sample Excel file used.

Upon submitting, system will execute the FetchExcelData activity (in the flow action post processing) to parse the Excel data and map to the EmployeeInfo case property.
Step 2 - The Excel data is shown in the table.
Additional information
- In order to further ensure the data quality entered in the Excel, we can leverage the validation logics in the Data > Data Validation feature in Excel itself. This can minimize user from importing 'bad data' into Pega.
- Refer to this article about step-by-step configurations of exporting data to an Excel file.
- Refer to this article about step-by-step configurations of attaching an Excel file to email.
Please leave any feedback or question.
Constellation 101 Series:
Enjoyed this article? See more similar articles in Constellation 101 series.
adept view
NL
If we have a generic requirement like upload bulk data from front end ( irrespective of case context ) and then process and create the data as records of data objects / cases . what would be the suggested approach in pega constellation ?
adept view
NL
@Will Cho , In traditional we had that flexibility to upload from a non case context and process the data for various business usecases , from constellation I could not see any viable OOTB features which supports the same . Could you please share us if we have any mechanism which is suggested by Pega for this use case.
Updated: 2 Sep 2025 7:53 EDT
Pegasystems Inc.
US
@Unnikrishnan T N i haven't tried it outside the case context. Will need to look into that. Just curious.. is there any reason not to do it within a case context? You could create some type of utility case type and do the bulk upload within the case context. And use RBAC to give the access to only those who can bulk upload. This allows to use all the case management features like history/audit, reporting, security, SLA, etc.. It appears Constellation is built primarily around case type.
adept view
NL
Yes there was a bulk upload and data validation use case before it persisted via a UI for a particular user persona . We thought to do it via a landing page kind of model , but didnt see any option in constellation which support the same . Yeah we had same plan of a utility case type to support this if it only works with the case context .
Pegasystems Inc.
GB
See also Streamlining Data Entry in Pega Constellation Applications with pxParseExcel | Pega Community
adept view
NL
Thanks for sharing, @MarcCheong. This example is case-specific, whereas we’re looking for something that applies in a context-independent way
Pegasystems Inc.
GB
@Unnikrishnan T Nit is a good point. Constellation, being a stateless UI, processing is designed to be via a case. You could create a case that just does bulk processing, hide it from the create menu and then add it to your landing page. Something like below - the user wouldn't know the difference, its really only from a developer standpoint that we know this isn't being done at data- level initially.

Configuration is straight forward, happy to detail it out further

Extending Constellation UI
If you want to go further than OOTB provides, you could explore a DX component. This could be a lot of work, calling the right API's for creating data, error handling etc. You'd likely end up needing to call a case from the DX component just to keep this simple and maintainable. However, if you went with my earlier option, you could then refine the UI to get the UI requirements of the Landing Page "just right".
@Unnikrishnan T Nit is a good point. Constellation, being a stateless UI, processing is designed to be via a case. You could create a case that just does bulk processing, hide it from the create menu and then add it to your landing page. Something like below - the user wouldn't know the difference, its really only from a developer standpoint that we know this isn't being done at data- level initially.
Configuration is straight forward, happy to detail it out further
Extending Constellation UI
If you want to go further than OOTB provides, you could explore a DX component. This could be a lot of work, calling the right API's for creating data, error handling etc. You'd likely end up needing to call a case from the DX component just to keep this simple and maintainable. However, if you went with my earlier option, you could then refine the UI to get the UI requirements of the Landing Page "just right".
https://docs.pega.com/bundle/platform/page/platform/user-experience/UI-…
Legacy "delegated data" landing page
CRUD actions on data have a lot of advantages over the older delegated data approach. However, the one feature Constellation does not have is the bulk import that can create, edit and delete. You can argue this is a good thing, most business users struggle with this feature when i've tried to implement in the past. However, if its a good fit for you, you could bring this back in Constellation.
https://docs.pega.com/bundle/platform/page/platform/app-dev/delegating-…
adept view
NL
I truly appreciate your efforts to add these kinds of contents to the constellation ecosystem, and I thank you for the detailed information.
Pegasystems Inc.
GB
@Unnikrishnan T N most welcome, glad it helps.
Pegasystems Inc.
JP
@Will Cho Nice article!
For the step 1 of FetchExcelData activity rule, I think "D_AttachmentContent" would be better than "Obj-Open" to obtain file content...because the data page can read contents from both repository and pega DB.
By the way, FDBK-84346 is created asking for OOTB support of parsing excel content in AttachStream (i.e. base64 encoded string).
Pegasystems Inc.
US
@Chunzhi_Hong Thanks for sharing the info. I also voted on the FDBK-84346.
Updated: 11 Sep 2025 10:27 EDT
Pegasystems Inc.
US
@MarcCheong In Constellation, do you know how to display the table with Excel data populated in the same view where the Excel file is uploaded by user? In my example, i displayed the table in the next view after Submit. In traditional UI, i would have used the Refresh section on click of a button, but wasn't sure how to achieve the same outcome in Constellation. I can see that some clients will want to see the Excel data in the same view after uploading an Excel file.
Updated: 17 Sep 2025 16:32 EDT
Pegasystems Inc.
US
From what i researched, 'Form refresh setting' in flow action would be close to achieve this use case but it currently only supports a simple field type like Text. It doesn't support a more complex field type like "Attachment". Hoping that a future platform version supports this to invoke a Data Transform rule to update the embedded data and refresh the Table in the same View when a file is selected by user.
Larsen & Toubro Infotech Limited
CA
@Will Cho Hi @Will Cho , Thank you for sharing the knowledge.
I do have a similar requirement, however the attachment is coming through email listener. User send an email with attachment (.excel or .csv) and i believe, .pyAttachments() holds the attachments.
I need to loop read that file and save the data to data base. Can you please confirm if pxCreateFile works in this scenario too. pyAttachments.pyAttachStream holds the file content in Base64 format.
Pegasystems Inc.
US
@SivaR919 As long as a valid Data-WorkAttach-File instance is created in database for the email attachment, it should work. The Data-WorkAttach-File instance is then opened using Obj-Open-By-Handle and passed to pxCreateFile for processing.