
Administering Support Contacts and MSP Access
You may reset your password by connecting to “https://my.pega.com/” and by clicking on the Forgot password? link, you can reset via your company email account.
Alternatively, if you want to change your password, login to “https://my.pega.com/” , under My Settings, you will have the option to change the password.
Support for Launchpad is provided via our standard My Support Portal (MSP) application.
There are 2 roles available for Launchpad users:
- Provider Admin
- Provider Developer
These roles are created via the Launchpad Admin Portal. As a Launchpad user, you have access to MSP regardless of the Launchpad role assigned to you.
Please review: Launchpad Support for further details.
To interact with the Pega Support team, you must be designated as a support contact with the relevant Support user role. To do this your company must nominate one or more users with the Support Administrator role in My Support Portal.
The Support Administrator (also known as Support Contact Administrator or Account Administrator) is responsible for affiliating individuals to your company’s Pega Support account and assigning them with the roles necessary to interact with Pega Support team. We recommend you have at least 3 support administrators for contingency.
Assignments must be maintained on a regular basis to ensure that you have the right resources assigned, with the appropriate roles.
Refer to Administering Support Accounts for detailed steps on managing support contacts and an explanation of the Support user roles.
Cloud Specialist
The Cloud Specialist role grants the user permission to the following resources:
- My Support Portal to create, view, update, and subscribe to support cases of type Cloud Assistance or Cloud Change
- My Pega Cloud to manage cloud environments as explained in Managing your environments in the My Pega Cloud portal.
Security Contact
Security Contacts may receive periodic security alerts from Pegasystems. For Pega Cloud service accounts, the Security Contact authorizes Cloud Change (CC) requests, in production environments.
Refer to Administering Support Accounts for a detailed explanation of the Support user roles.
The Support Administrator is responsible for managing the individuals in your company who you designate as support contacts for your Pegasystems support account.
Refer to Administering Support Accounts for detailed steps on managing support contacts and an explanation of the Support user roles.
For an overview of all the roles available throughout the Pega ecosystem please see My Pega - Manage Users. Also see My Pega Frequently asked questions
Please contact your account representative, they will complete a ‘Support Account Administration Form' and forward it to [email protected] to be processed. This process is usually completed within 48 hours.
To interact with the Pega Support team, you must be designated as a support contact with the relevant Support user role.
Please try the following options to solve this issue:
- Contact your Support Administrator (also known as Support Contact Administrator or Account Administrator) - You are not affiliated to the account, or you do not have the role to perform the action.
- Firstly, ensure you are registered on My Pega (this will grant you access to My Support Portal but you will not be able to create or view tickets for your account.)
- Once registered, a Support administrator for your account must affiliate you to the account and grant you the required role(s), as outlined in Support user role
or
- Log off (Click on your username > Log off) and log in to MSP
- Clear your Web Browser cookies
- Use an Incognito Browser session
Do not delete cookies of existing, active sessions without first logging off or closing the browser completely (not just a tab), or both.
Each browser type (Internet Explorer 11, Edge, Chrome, Safari, and others) has specific steps to clear, remove, or delete cookies. Refer to the browser’s documentation to learn how to delete a site-specific cookie. Refer to Google documentation on how to run a Chrome Incognito session.
The account displays when creating a case, managing users. However, it does not display in the My Pega Cloud (MPC) tab.
To solve this issue, contact your Support Administrator (also known as Support Contact Administrator or Account Administrator) to enable the Cloud Specialist role which is required to access My Pega Cloud.
From the Header Banner select Support Administrators link. Click in the Account drop down box to select the relevant account. Support Administrator(s) for that account are displayed.
If you have yet to be affiliated to any account, you will need to contact a colleague who is already affiliated and ask them to provide you with the Support administrator's details.
Select the Get Help link on the right-hand side of the Home tab. This will bring you to the new landing page containing Frequently Asked Questions.
If your issue is not resolved here scroll down to the Still need help section and select the Contact Us button. This will direct you to the Community Feedback form.
Here you will have the opportunity to Report an issue with My Support Portal.
This action will raise an issue for the Pega Support application development team, who will respond to your query directly.
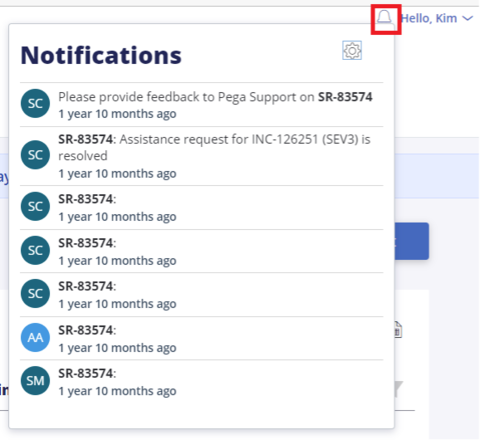
To view Notifications, click on the Bell icon in the top right-hand corner.
Here you can set or remove preferences which will enable you to be notified, of changes to your support cases.
My Support portal users can only be created by the following process:
- Users register themselves on My Pega.com for access to the Pega community.
- The Support administrator, for a specific account, affiliates a registered user to that account, providing them with access to interact with support resources.
Due to privacy issues, Pega resources are strictly prevented from affiliating clients to accounts.
Cloud Specialists for Pega cloud clients can be affiliated to a specific environment or project as outlined in Managing support contacts and Support user roles
Once you affiliate a Cloud Specialist with specific projects and/or environment groups, the user will notice the following impact in My Support Portal (MSP) and My Pega Cloud (MPC):
- In MSP, the user will only receive cloud maintenance notifications from projects/environments they are associated with
- Users are only allowed to create Cloud change requests (CC) for the environments that they are affiliated with.
- That is, whilst creating a CC case, only environments cloud specialists are affiliated with will be displayed in the environment selection list.
- A tool tip is displayed "CC can be created only for environments that user is affiliated with. If you do not see an environment that you expect to, please reach out to admin to update your cloud affiliation."
- When Pega support resources create a CC case on your behalf, we will only associate contacts with access to the specific environment.
- When cloning a case, Cloud Specialists can only select an environment they are affiliated with for the cloned CC.
- In MPC, the user will only be able to download logs and restart environments for those they are affiliated with
Clients with environments on-premises and /or client cloud can only be affiliated at the Account level.
So, for example as a Security contact for an on-premises account, you may receive a security alert that references a different application (or environment) to the one you are focused on.
Submitting tickets
You can interact with the Pega Support team by raising a support ticket via My Support Portal.
Pega Support policy is outlined in the Support@Pega Client Handbook
(Also see: Creating a support ticket)
There are several types of support tickets that you can request on My Support Portal
Report a
|
Ticket Type |
Description |
|
Development / Testing issue
|
An issue or defect in Pega Software encountered during application development or following an upgrade. |
|
Deployment / Install issue
|
An issue or defect with Pega software encountered during installation or deploying of the software in Development/ Testing /Staging environments during updates/migrations. |
|
Security / Performance issue
|
An operational issue with my application that is due to the Pega Software, such as a potential security vulnerability, a performance degradation, etc. |
|
Full system outage
|
An Incident causing complete system outage for any environment (development, staging or production) |
|
Production impact
|
An Incident causing disruption to business as usual, preventing end users from performing their tasks or processes/services from running in Production. |
|
Active security breach
|
Confirmed disclosure—not just potential exposure—of data to an unauthorized party. |
Each of these ticket types will create a ticket with the prefix INC-. They are divided into issues and incidents.
Incidents are defined as unexpected errors or events that affect our client’s business; our focus will be restoring services in the shortest possible time, to reduce loss of business.
Issues are defined as situations where clients are running into problems with Pega functionality that are not as expected, or documented, or a request for a solution or information regarding an issue they are facing.
Our goal is to resolve Incidents faster and address client Issues better by providing the best possible experience with the right expertise.
Request a
|
Ticket Type |
Description |
|
Existing Hotfix (HF-)
|
Requests for existing/published hotfixes for supported versions of the Pega platform or software. |
|
Cloud assistance (SR-)
|
Request for information for your Pega Cloud environment for example current storage usage, IP address details or 3rd party support inquiries. Note: This option is ONLY available to MSP users who are affiliated to a cloud account. |
|
Cloud Change (CC-)
|
Requests for changes to your Pega Cloud environment for example server restarts, database changes, patching and software updates. Note: This option is ONLY available to MSP users who are affiliated to a cloud account AND have the Cloud Specialist role. |
Prefix for each ticket type shown in brackets.
You will also have the opportunity to visit the Pega Support Center where you can interact with architects, developers, and administrators from Pega, Pega’s partners, and Pega’s clients. Here you can pose questions to our robust community about how to design, develop, or debug custom applications or similar types of activities.
Requesting our support is an intuitive, guided experience. You will no longer be required to select the severity for your ticket. This will be derived from the options selected during the ticket creation process.
For all case types, the support case enters the status of New-draft when you start entering the details in the case creation form. A case ID is also assigned. This helps you to Save the form and return to finish it later. The case will only be submitted to the Pega Support team for triage once you select the Finish button at the end of the multi-screen process.
Access My Support Portal to raise a ticket with the Support team. All tickets should be submitted here, including when your production environment is down.
(Also see: Creating a support ticket)
In the Home tab select the Create a ticket button.
The Create a new support ticket screen is displayed.
When reporting an issue or incident ticket type, you will be presented with a 3-step ticket creation process:
- Ticket details: Enter the details of your problem including any error messages and business impact
- Environment details: Detail the environment in which the problem is occurring. Attach relevant artifacts to assist the investigation.
- Contact information – Validate your contact information, including your phone number. Add any other contacts you wish to keep informed about the issue. Note: Additional contacts will include contacts which you included in your last incident.
When requesting a support service, the ticket creation process differs depending on the type of ticket you are raising.
For an Existing Hotfix request
You will be presented with a 2-step process, that is:
- Hotfix details: Enter the details of the existing hotfix (HFIX-) you require. Note this produces a case with a HF- prefix.
- Contact Information: Validate your contact information, including your phone number. Add any other contacts you wish to keep informed about the issue. Note: Additional contacts will include contacts which you included in your last incident.
For a Cloud Assistance request
You will be presented with a 3-step process, that is:
- Cloud assistance summary: Enter a short summary and identify your account, application and environment
- Cloud assistance details: Provide a detailed description of the assistance required
- Contact Information: Validate your contact information, including your phone number. Add any other contacts you wish to keep informed about the issue. Note: Additional contacts will include contacts which you included in your last incident.
For a Cloud Change request
You will be presented with a 3-step process, that is:
- Cloud change details: Enter a short summary and identify your account, application, and environment
- Task details: Select one or more task(s) and team responsible for each task
- Contact Information: Validate your contact information, including your phone number. Add any other contacts you wish to keep informed about the issue. Note: Additional contacts will include contacts which you included in your last incident.
Note: The support ticket is in New-draft status when you start entering the details in the case creation form. A case ID is also assigned. This helps you to Save the form and return to finish it later. The case will only be submitted to the Pega Support team for triage once you select the Finish button at the end of the multi-screen process.
During the investigation of your support ticket, you may need to share large files e.g. log files, with the Pega Support team to further the investigation. For this you will need to request an SFTP link.
To request an SFTP link, open your support ticket in My Support Portal.
Go to the References tab --> FTP server credential section and select the Request SFTP Link button.
- This button is displayed either when no link is currently available or when a previously created link has expired.
- This button is available for open Incident and issues i.e.
- INCs of type Product. Where INC type is Cloud this facility is NOT available
- It is not available for other case types e.g. Cloud change requests (CC)
Once requested, a message is displayed on screen: 'We are generating link...'
Once your request has been processed your, the link is displayed in the FTP server credentials section, with the Address, Password and Expiration time provided.
The link provided is only available for 24 hours.
The icon displayed next to the Password field will copy the password when clicked. This enables you to paste the password when required.
For security purposes, you are only able to see the credentials you have requested. If 2 people are working on the same case you will both have to request your own link to the SFTP server.
Remember: Files remain on the SFTP server for 30 days, but are only accessible when a share link is requested for a specific 24-hour duration.
Once the Link has expired it's no longer displayed on the References tab and the Request SFTP Link button is displayed again.
If a link is not generated in a timely fashion, a timeout is available. After waiting 30 seconds the following message will be displayed:
'There is some delay in SFTP link generation. Once link is generated you will be notified through email.'
Once the link is generated in the application, an email notification is sent to alert you. The link will be generated and email sent, even if you exit My Support Portal, whilst waiting.
FedRamp
Previously, FedRamp clients didn't have access to the SFTP server. We have now enabled this facility for FedRamp clients.
Access My Support Portal to view your existing tickets. Once logged in you'll be taken to the Home page. This will provide you with a personalized view of your current interactions with the Pega Support team.
The Homepage is made up of a number of tiles for example:
- Self Service
- Support Cases
- Open major incidents
- Open tickets
- Drafts
- Pega advisories
- Cloud Change and Cloud Maintenance
- Helpful links
- Pega diagnostic cloud (PDC)
- My Pega Cloud
Each tile contains information about Support ticket's which you have raised or are otherwise associated with.
Please review: My Support Portal Home Page for further details.
Access My Support Portal to raise a ticket with the Support team. All tickets should be submitted here, including when your production environment is down.
(Also see: Creating a support ticket)
In the Home tab select the Create a ticket button.
The Create a new support ticket screen is displayed.
From here you can select a ticket type via one of the ticket type buttons. Review the list and select the button that best describes your problem. The options available are:
Report a
|
Ticket Type |
Description |
|
Development / Testing issue
|
An issue or defect in Pega Software encountered during application development or following an upgrade |
|
Deployment / Install issue
|
An issue or defect with Pega software encountered during installation or deploying of the software in Development/ Testing /Staging environments during updates/ migrations. |
|
Security / Performance issue
|
An operational issue with my application that is due to the Pega Software, such as a potential security vulnerability, a performance degradation, etc. |
|
Full system outage
|
An Incident causing complete system outage for any environment (development, staging or production). |
|
Production impact
|
An Incident causing disruption to business as usual, preventing end users from performing their tasks or processes/services from running in Production. |
|
Active security breach
|
Confirmed disclosure—not just potential exposure—of data to an unauthorized party. |
Request a
|
Ticket Type |
Description |
|
Existing Hotfix (HF-)
|
Requests for existing/published hotfixes for supported versions of the Pega platform or software. |
|
Cloud assistance (SR-)
|
Request for information for your Pega Cloud environment for example current storage usage, IP address details or 3rd party support inquiries. Note: This option is ONLY available to MSP users who are affiliated to a cloud account. |
|
Cloud Change (CC-)
|
Requests for changes to your Pega Cloud environment for example server restarts, database changes, patching and software updates. Note: This option is ONLY available to MSP users who are affiliated to a cloud account AND have the Cloud Specialist role. |
You will also have the opportunity to visit the Pega Support Center where you can interact with architects, developers, and administrators from Pega, Pega’s partners, and Pega’s clients. Here you can pose questions to our robust community about how to design, develop, or debug custom applications or similar types of activities.
Requesting our support is an intuitive, guided experience. You will no longer be required to select the severity for your ticket. This will be derived from the options selected during the ticket creation process.
For all case types, the support case enters the status of New-draft when you start entering the details in the case creation form. A case ID is also assigned. This helps you to Save the form and return to finish it later. The case will only be submitted to the Pega Support team for triage once you select the Finish button at the end of the multi-screen process.
In the Home tab select the Create a ticket button.
The Create a new support ticket screen is displayed. From here you can select a ticket type via one of the ticket type buttons. For a problem with your environment select the Deployment / Install issue button.
When reporting an issue ticket type, you will be presented with a 3-step ticket creation process:
- Ticket details: Enter the details of your problem including any error messages and business impact
- Environment details: Detail the environment in which the problem is occurring. Attach relevant artifacts to assist the investigation.
- Contact information – Validate your contact information, including your phone number. Add any other contacts you wish to keep informed about the issue. Note: Additional contacts will include contacts which you included in your last incident.
In the Home tab select the Create a ticket button.
The Create a new support ticket screen is displayed. From here you can select a ticket type via one of the ticket type buttons. For a problem with your application security select the Security / Performance issue button.
When reporting an issue ticket type, you will be presented with a 3-step ticket creation process:
- Ticket details: Enter the details of your problem including any error messages and business impact
- Environment details: Detail the environment in which the problem is occurring. Attach relevant artifacts to assist the investigation.
- Contact information – Validate your contact information, including your phone number. Add any other contacts you wish to keep informed about the issue. Note: Additional contacts will include contacts which you included in your last incident.
In the Home tab select the Create a ticket button.
The Create a new support ticket screen is displayed. From here you can select a ticket type via one of the ticket type buttons. For performance problems select the Security / Performance issue button.
When reporting an issue ticket type, you will be presented with a 3-step ticket creation process:
- Ticket details: Enter the details of your problem including any error messages and business impact
- Environment details: Detail the environment in which the problem is occurring. Attach relevant artifacts to assist the investigation.
- Contact information – Validate your contact information, including your phone number. Add any other contacts you wish to keep informed about the issue. Note: Additional contacts will include contacts which you included in your last incident.
For Security Hotfixes
Security hotfixes can be downloaded directly from My Pega.
When we issue a Client Advisory for a Security Vulnerability, we will provide you with a direct link to the available hotfixes on My Pega.
For a step by step guide please review our Support document: Downloading Security hotfixes in My Pega and our Frequently asked Questions.
For all other Hotfixes
In the Home tab select the Create a ticket button.
The Create a new support ticket screen is displayed. From here you can select a ticket type via one of the ticket type buttons. To request an existing hotfix, select the Existing Hotfix button.
When requesting an Existing Hotfix, you will be presented with a 2-step process, that is:
- Hotfix details: Enter the details of the existing hotfix (HFIX-) you require. Note this produces a case with a HF- prefix.
- Contact Information: Validate your contact information, including your phone number. Add any other contacts you wish to keep informed about the issue. Note: Additional contacts will include contacts which you included in your last incident.
In the Home tab select the Create a ticket button.
The Create a new support ticket screen is displayed. From here you can select a ticket type via one of the ticket type buttons. To initiate a change in your Pega Cloud environment, select the Cloud change button.
When requesting a Cloud change, you will be presented with a 3-step process, that is:
- Cloud change details: Enter a short summary and identify your account, application, and environment
- Task details: Select one or more task(s) and team responsible for each task
- Contact Information: Validate your contact information, including your phone number. Add any other contacts you wish to keep informed about the issue. Note: Additional contacts will include contacts which you included in your last incident.
In the Home tab select the Create a ticket button.
The Create a new support ticket screen is displayed. From here you can select a ticket type via one of the ticket type buttons. To ask a question or request information about your Pega Cloud environment, select the Cloud assistance button.
When requesting Cloud assistance, you will be presented with a 3-step process, that is:
- Cloud assistance summary: Enter a short summary and identify your account, application and environment
- Cloud assistance details: Provide a detailed description of the assistance required
- Contact Information: Validate your contact information, including your phone number. Add any other contacts you wish to keep informed about the issue. Note: Additional contacts will include contacts which you included in your last incident.
In the Home tab select the Create a ticket button.
The Create a new support ticket screen is displayed. From here you can select a ticket type via one of the ticket type buttons. To report a problem with the downloads available to you in the digital delivery center, select the Deployment / Install issue button.
When reporting an issue ticket type, you will be presented with a 3-step ticket creation process:
- Ticket details: Enter the details of your problem including any error messages and business impact
- Environment details: Detail the environment in which the problem is occurring. Attach relevant artifacts to assist the investigation.
- Contact information – Validate your contact information, including your phone number. Add any other contacts you wish to keep informed about the issue. Note: Additional contacts will include contacts which you included in your last incident.
We have recently redesigned our software download capability on My Pega. Our redesigned experience makes downloading Pega software easier, quicker, and more intuitive than ever.
How to access the new software download experience
- Visit my.pega.com
- Hover over the left-hand navigation panel and select "My Software" (visible to users authorized to download software)
- For a short walkthrough of the experience, please view this How-To video.
The case creation process will guide you through the necessary requirements for the case.
Be prepared to include the following information:
- Describe the impact the issue is having on end users, development teams, project milestones
- Provide the steps to replicate the issue
- Attach screen shots which illustrate the issue
- Attach any relevant log files
- Provide any relevant information from PDC / AES
- Provide any root cause or diagnostic analysis you’ve completed prior to raising the Support case
- Reference any relevant Pega community articles you’ve found
A Client Advisory case [prefix: CAD-] is a new case type introduced by Pega to facilitate direct communication with our clients. This case type is created by Pega and used to share important messages from Pega with you.
We use the CAD case to share the following types of messages:
- Security Messages
- Policy Changes
- Other important information
CAD cases are targeted at specific My Support Portal users based on their role. So, for example if you are set up as a Security Contact you will receive communications relating to security alerts. If you are an Account administrator, you will receive communications highlighting the need to review and update the users affiliated to your account. Messages can also be shared with all My Support portal users in your account.
See Client Advisory Case for full details of this case type.
As a Security contact you may receive periodic notifications from Pega e.g. Security alerts.
See Understanding User Roles for an overview of the role.
For Pega cloud clients, Security contacts are also responsible for authorizing Cloud Change requests (CC).
See Change Management process for an overview of the process and pay particular attention to the Cloud Change approval process to understand your responsibilities.
Most support cases can be reopened by clicking the Reopen button in the top right-hand corner of your resolved support case.
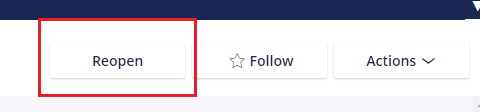
Before attempting to reopen your case, check that it meets the Criteria for reopening a support case.
Note: a case can only be reopened within 20 days of case closure. Outside this time frame a new case must be opened.
Prioritizing tickets
Reviewing tickets
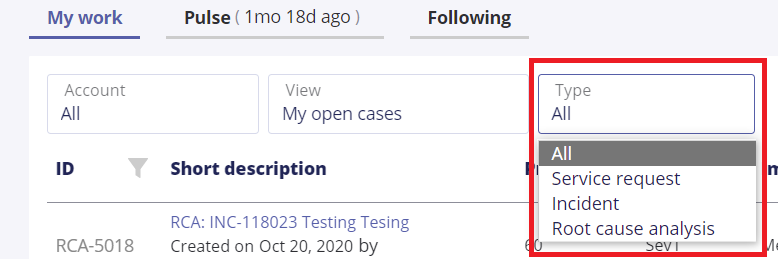
Your tickets are displayed on the Home tab in My Support Portal. There are various filters available to help you.
For example, if you are affiliated to more than one account, within your organization, you can view the cases by account or view all cases across accounts.
You can view your open cases, resolved cases or those needing your attention.
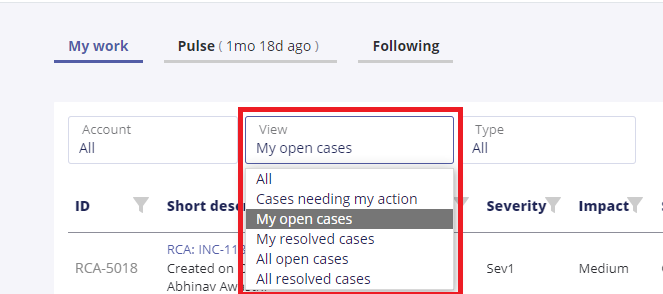
You can also filter on case type e.g., Service Requests, Incidents, Root Cause Analysis or view All case types.
Your tickets are displayed on the Home tab in My Support Portal. To view the details of an individual ticket, click on the Short description hyperlink to open the case view.
Review the case details on the Pulse, Details and References tabs.
Pulse: a record of your communication with the Pega Support team
Details: Description, Primary application, Issue details and Resolution information.
References: Attachments on the case
Regardless of the tab displayed, general case information is always available in the right-hand panel for example: Severity, Priority, Client contact, Participants and Additional contacts.
Communicating on tickets
To view Notifications, click on the Bell icon in the top right-hand corner.
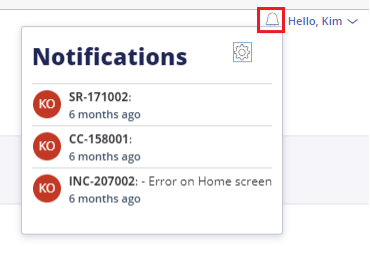
Click on a Notification to review the details in the specific case.
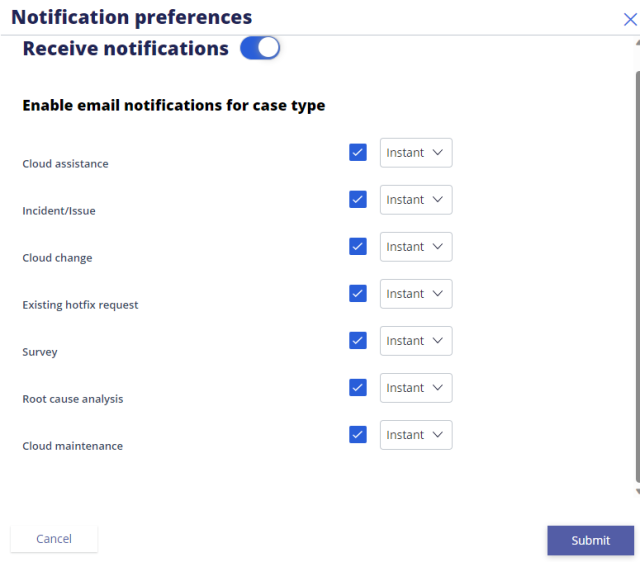
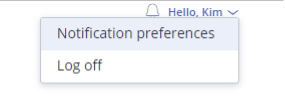
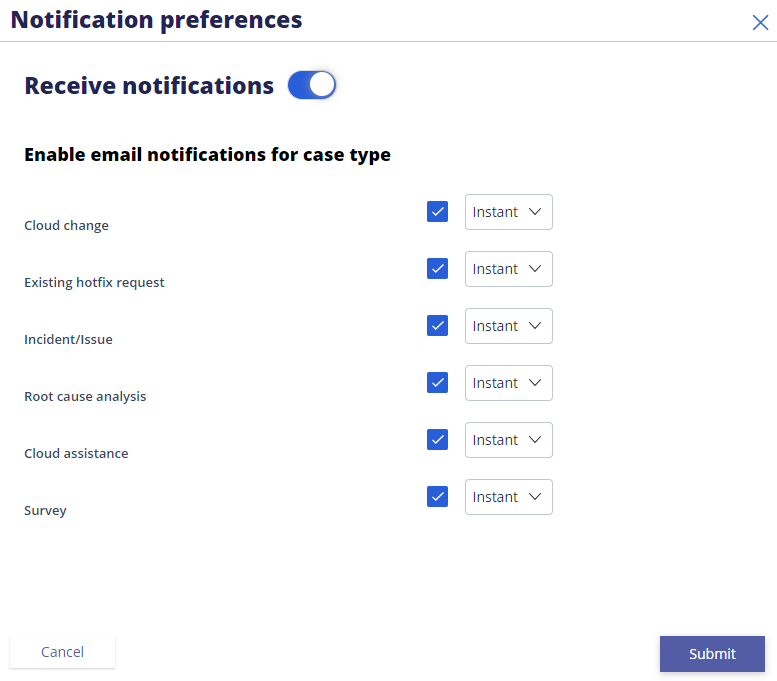
To set or amend your Notification preferences, click on your Username. Select Notification preferences from the menu displayed.
Here you can set preferences which will enable you to be notified, via email, of changes to your support cases.
Notifications can be set by case type:
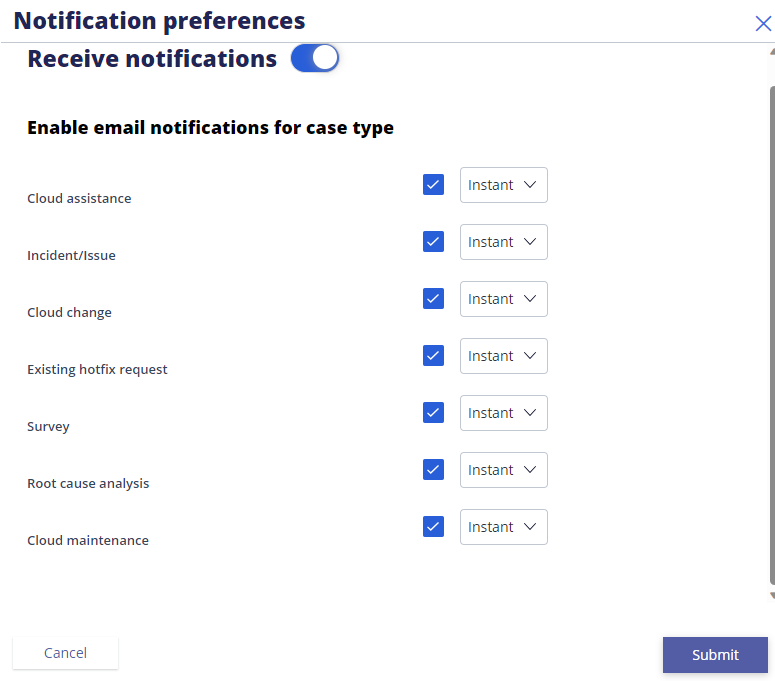
You can select whether to receive a particular case type via the check box and select the frequency of the notifications via the drop down box; options available are: instant, daily, weekly, disable
To view Notifications, click on the Bell icon in the top right-hand corner.
Click on a Notification to review the details in the specific case.
To set or amend your Notification preferences, click on your Username and select Notification preferences from the menu displayed. Here you can set preferences which will enable you to be notified via email of changes to your support cases.
Please check your Notification Preferences. To view your Notification preferences, click on your Username. Select Notification preferences from the menu displayed.
If you have previously removed notification preferences, you will not receive notification from My Support Portal. Instead, you will need to sign into the portal to review any updates to your cases.
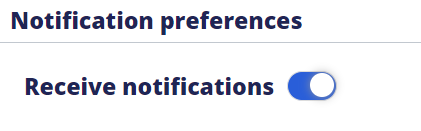
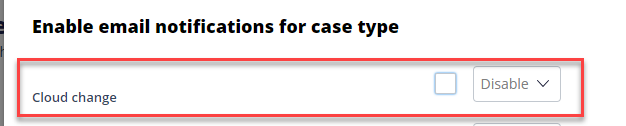
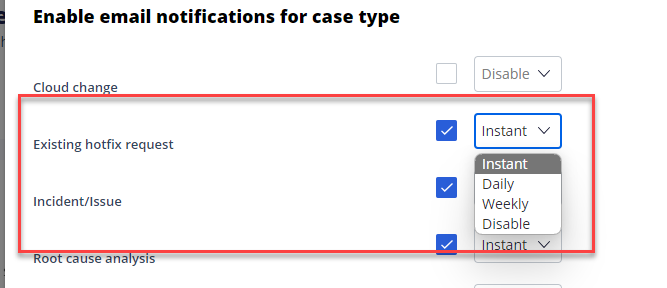
There are 3 ways you can turn off or delay notifications:
1. Turning off all notifications via the Receive notifications button:
2. Unchecked the checkbox for a single case type, to disable notifications for that case type:
3. You can either delay receipt or stop receiving notifications altogether by selecting one of the available drop-down options. For example, change from Instant to Daily or Weekly (which will delay the receipt of notifications to the specified frequency). Alternatively, you can select the disable option from the list, which will stop notifications for the case type.
The best way to communicate with the Pega Support team, or the engineer assigned to your case, is via pule posts on your support case. You can set your notification preferences to ensure that you receive email notifications when new pulse posts are received on your case. That way you never miss an update.
During an investigation you, or the GCS engineer assigned to your case, may require a meeting to discuss your issue further. In this scenario a screen share can be arranged at a mutually convenient time to walk through the issue.
If you have an urgent issue e.g., Severity 1, or an Escalation you can also call the Pega Support Call Center for immediate attention.
Note Severity 1 issues can also be summited directly into My Support Portal for immediate attention.
Reporting on tickets
Your tickets are displayed on the Home tab in My Support Portal. To report on your cases, click the Export to Excel icon.

All cases in your current filter will be exported into an Excel spreadsheet.
Once in Excel you can use the capabilities there to produce your reports.