Discussion
Pegasystems Inc.
US
Last activity: 5 Nov 2025 7:19 EST
Using Promoted Filters to Help Refine Your Data Search
What are They?
Promoted filters are user-friendly tools in Pega Constellation that appear prominently at the top of Insights and list Views. They allow users to quickly customize what data they see without navigating through complex filtering menus. By placing frequently used filters in an easily accessible location at the top of the UI control, users can efficiently analyze and refine their data on the fly.
When configured, promoted filters provide a streamlined way to retrieve specific information from large datasets allowing users to:
- Enter specific values to filter data (like product names or categories)
- Select from predefined options in picklists
- Apply custom filtering conditions
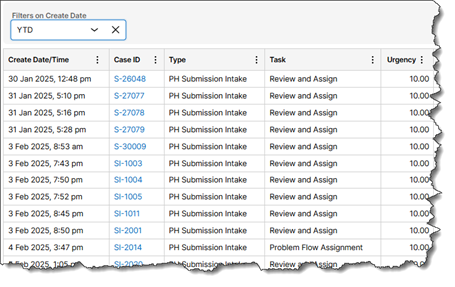
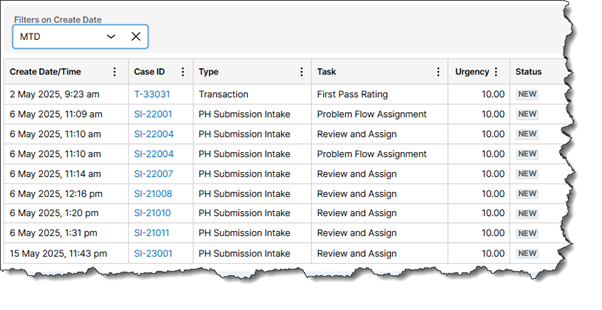
Time Period Example
Time-based filters are among the most commonly used in business applications. In this example, we'll create a promoted filter for a work queue that allows users to quickly toggle between Year to Date (YTD) and Month to Date (MTD) views of their data based on the Create Date property. This type of filter helps users analyze trends and workloads across different time periods without having to manually reconfigure filters each time.
|
|
|
|
How to Implement
Using the example above, the following steps are for adding a promoted filter to a list view on a landing page. NOTE: For steps for adding a promoted filter to Insights, use the following article (Applying Promoted Filters)
| 1 | Go to the landing page in App Studio or Dev Studio that contains the list view that you want to enhance with a promoted filter | |
| 2 | Click on the specific list view where you want to apply the promoted filter | 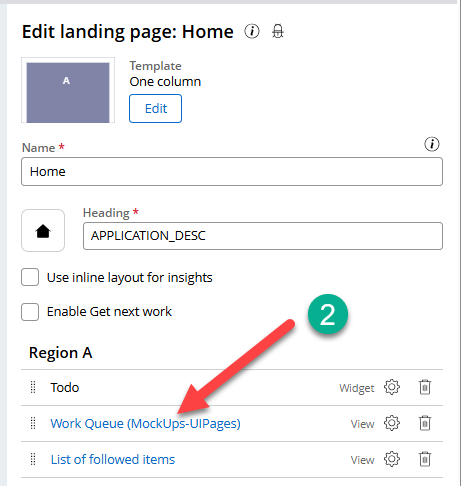 |
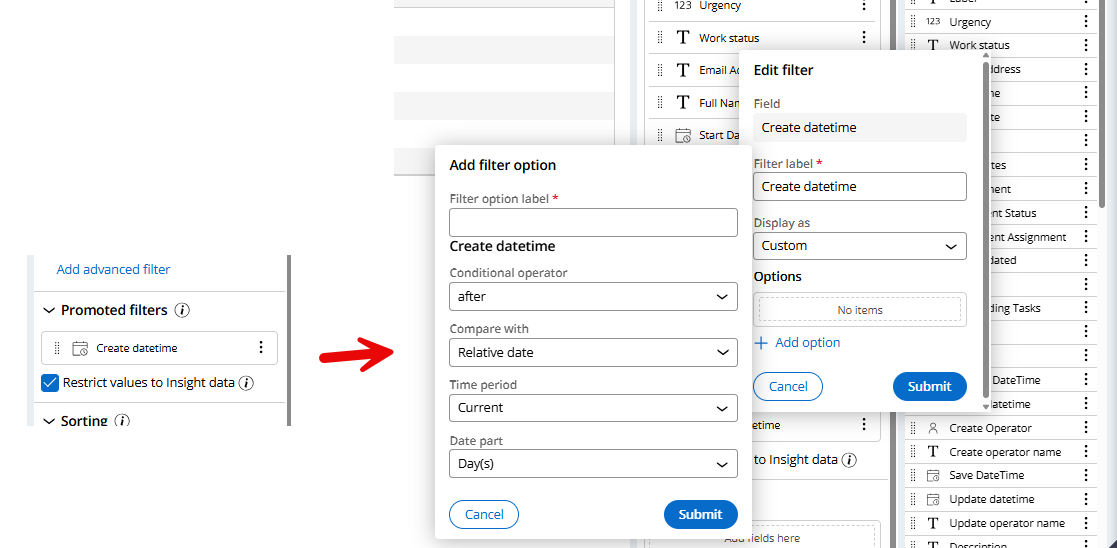
| 3 | Scroll to the bottom of the view configuration to find the Promoted filters section. Click "Add" to begin creating a new filter. You'll be prompted to select the property that this filter will be applied to (in our example, we're selecting Create Date/Time) | 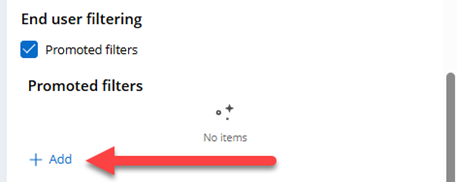 |
| 4 | After adding the filter property, click the configuration icon (gear icon) to set up your filter options | 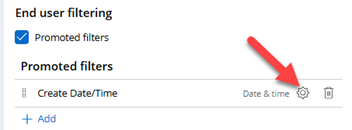 |
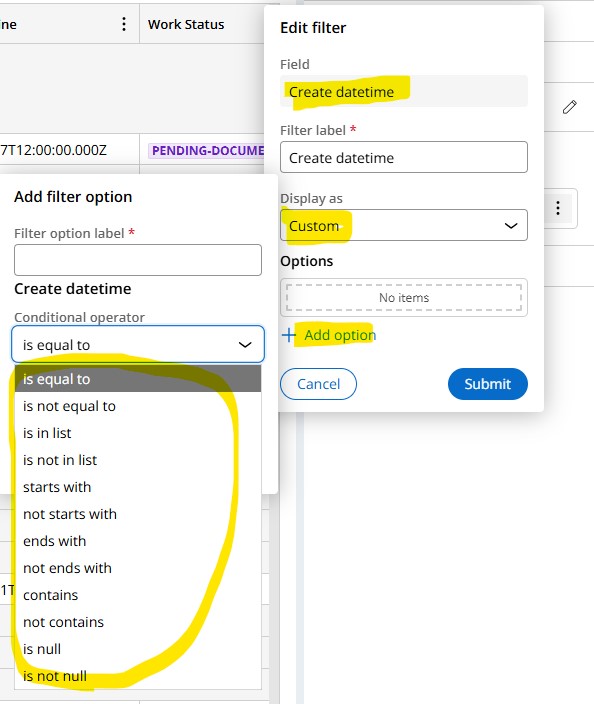
| 5 | Give your filter a descriptive name (optional but recommended). Select "Custom" from the Display as drop down to create custom filter options. Click the "Add option" link to begin defining filter values | 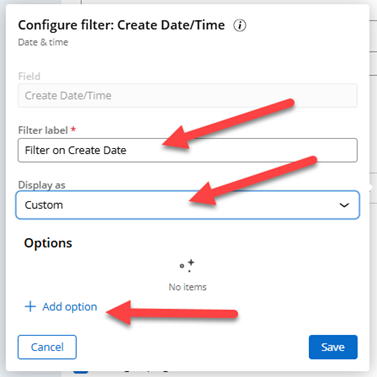 |
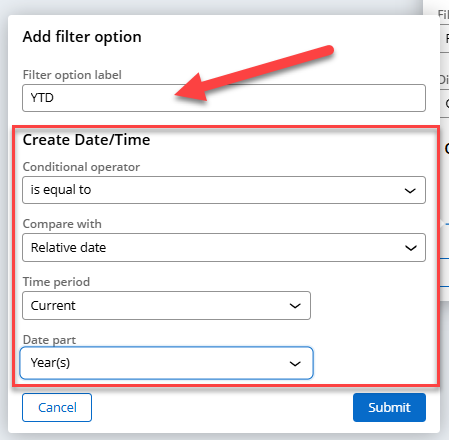
| 6 |
For each filter option:
Note: You can create multiple filter options that will all appear in the same drop down menu. This allows users to quickly switch between different views of the same data |
 |
| 7 | After adding all desired filter options, click Save to apply your changes. The promoted filter will now appear at the top of your list view. | 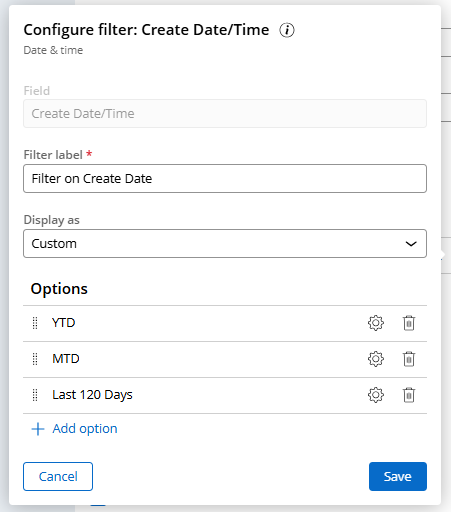 |
NOTE: You can create additional promoted filters that will act as an AND condition for filtering the data (e.g. YTD AND Quote Requested > 500,000)
Best Practices
- Focus on relevance: Include only the most frequently used filters to avoid overwhelming users. Aim for 3-5 promoted filters maximum per view.
- Keep logic simple: Ensure filters use straightforward conditional logic that users can easily understand. Complex conditions may confuse users or produce unexpected results.
- Choose appropriate fields: Select fields for promotion based on how users naturally think about filtering the data. Date fields, status fields, and category fields often make excellent promoted filters.
- Match filter types to data: Select the appropriate filter type based on the nature of the data:
- Use default filters for simple text or numeric fields
- Use picklists for fields with a defined set of values
- Use custom filters when you need to create specific predefined options (like our YTD/MTD example)
Additional Resources
Applying promoted Filters
https://docs.pega.com/bundle/platform/page/platform/reporting/applying-promoted-filters.html)
Configuring Promoted Filters
https://docs.pega.com/bundle/platform/page/platform/user-experience/promoted-filters.html
Constellation 101 Series
Enjoyed this article? See more similar articles in Constellation 101 series.
Credera
GB
@DaveFinley Do promoted filters always act as an AND condition? Is it possible to configure them as an OR condition?
Pegasystems Inc.
US
@Arunkum@rThank you for your inquiry! Dave was on vacation last week and is just now returning. 🙂 He is currently reviewing and will respond as soon as possible. Your patience is greatly appreciated. @finld
Pegasystems Inc.
US
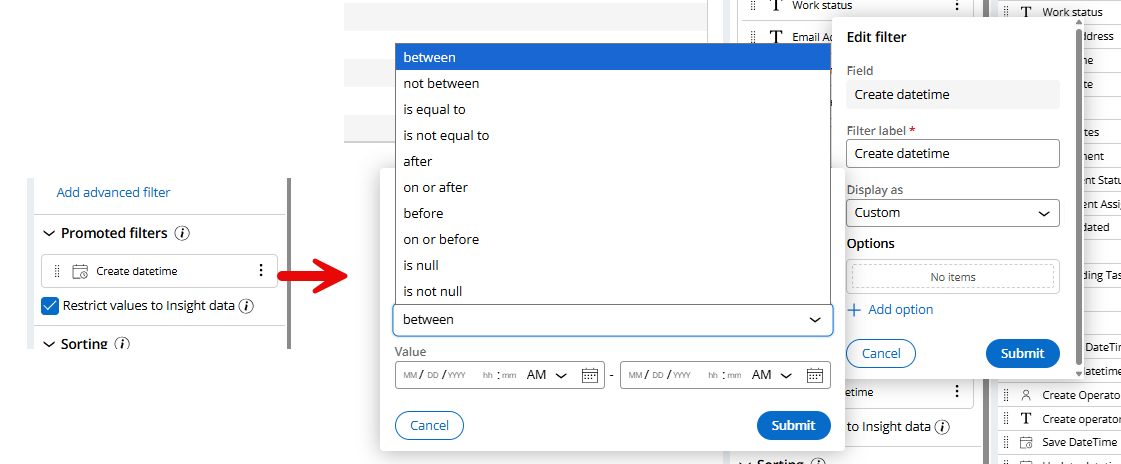
Hi @Arunkum@r while promoted filters use AND conditions by default, you can create OR conditions (and mix AND + OR) using the advanced table filtering feature.
Steps to create custom filter conditions:
- In your list view, click the table Actions menu → Filter
- Set your first filter criteria (field, operator, value)
- Click "+" to add additional fields
- Choose "AND" or "OR" for each additional condition
- Click Submit to apply the combined filter
The attached image shows an example with mixed AND/OR conditions across three fields and follows the steps above.
Pro tip: Save frequently-used filter combinations as custom views for quick access. See this personalization guide for setup steps.
Hope this helps! Let us know if you have other questions.
Also, thanks @MarcCheong for the guidance!
Pegasystems Inc.
GB
@DaveFinley@Arun For me, this makes sense - the promoted filter makes no mention of OR, so AND is the logical filtering. If we were to add OR to it, then the UX would be far more complex and less savvy users would get confused.
For the more advanced users, we can train them how to do more advanced querying and filtering like above OR even build their own Insights in Explore Data.
Barclays
GB
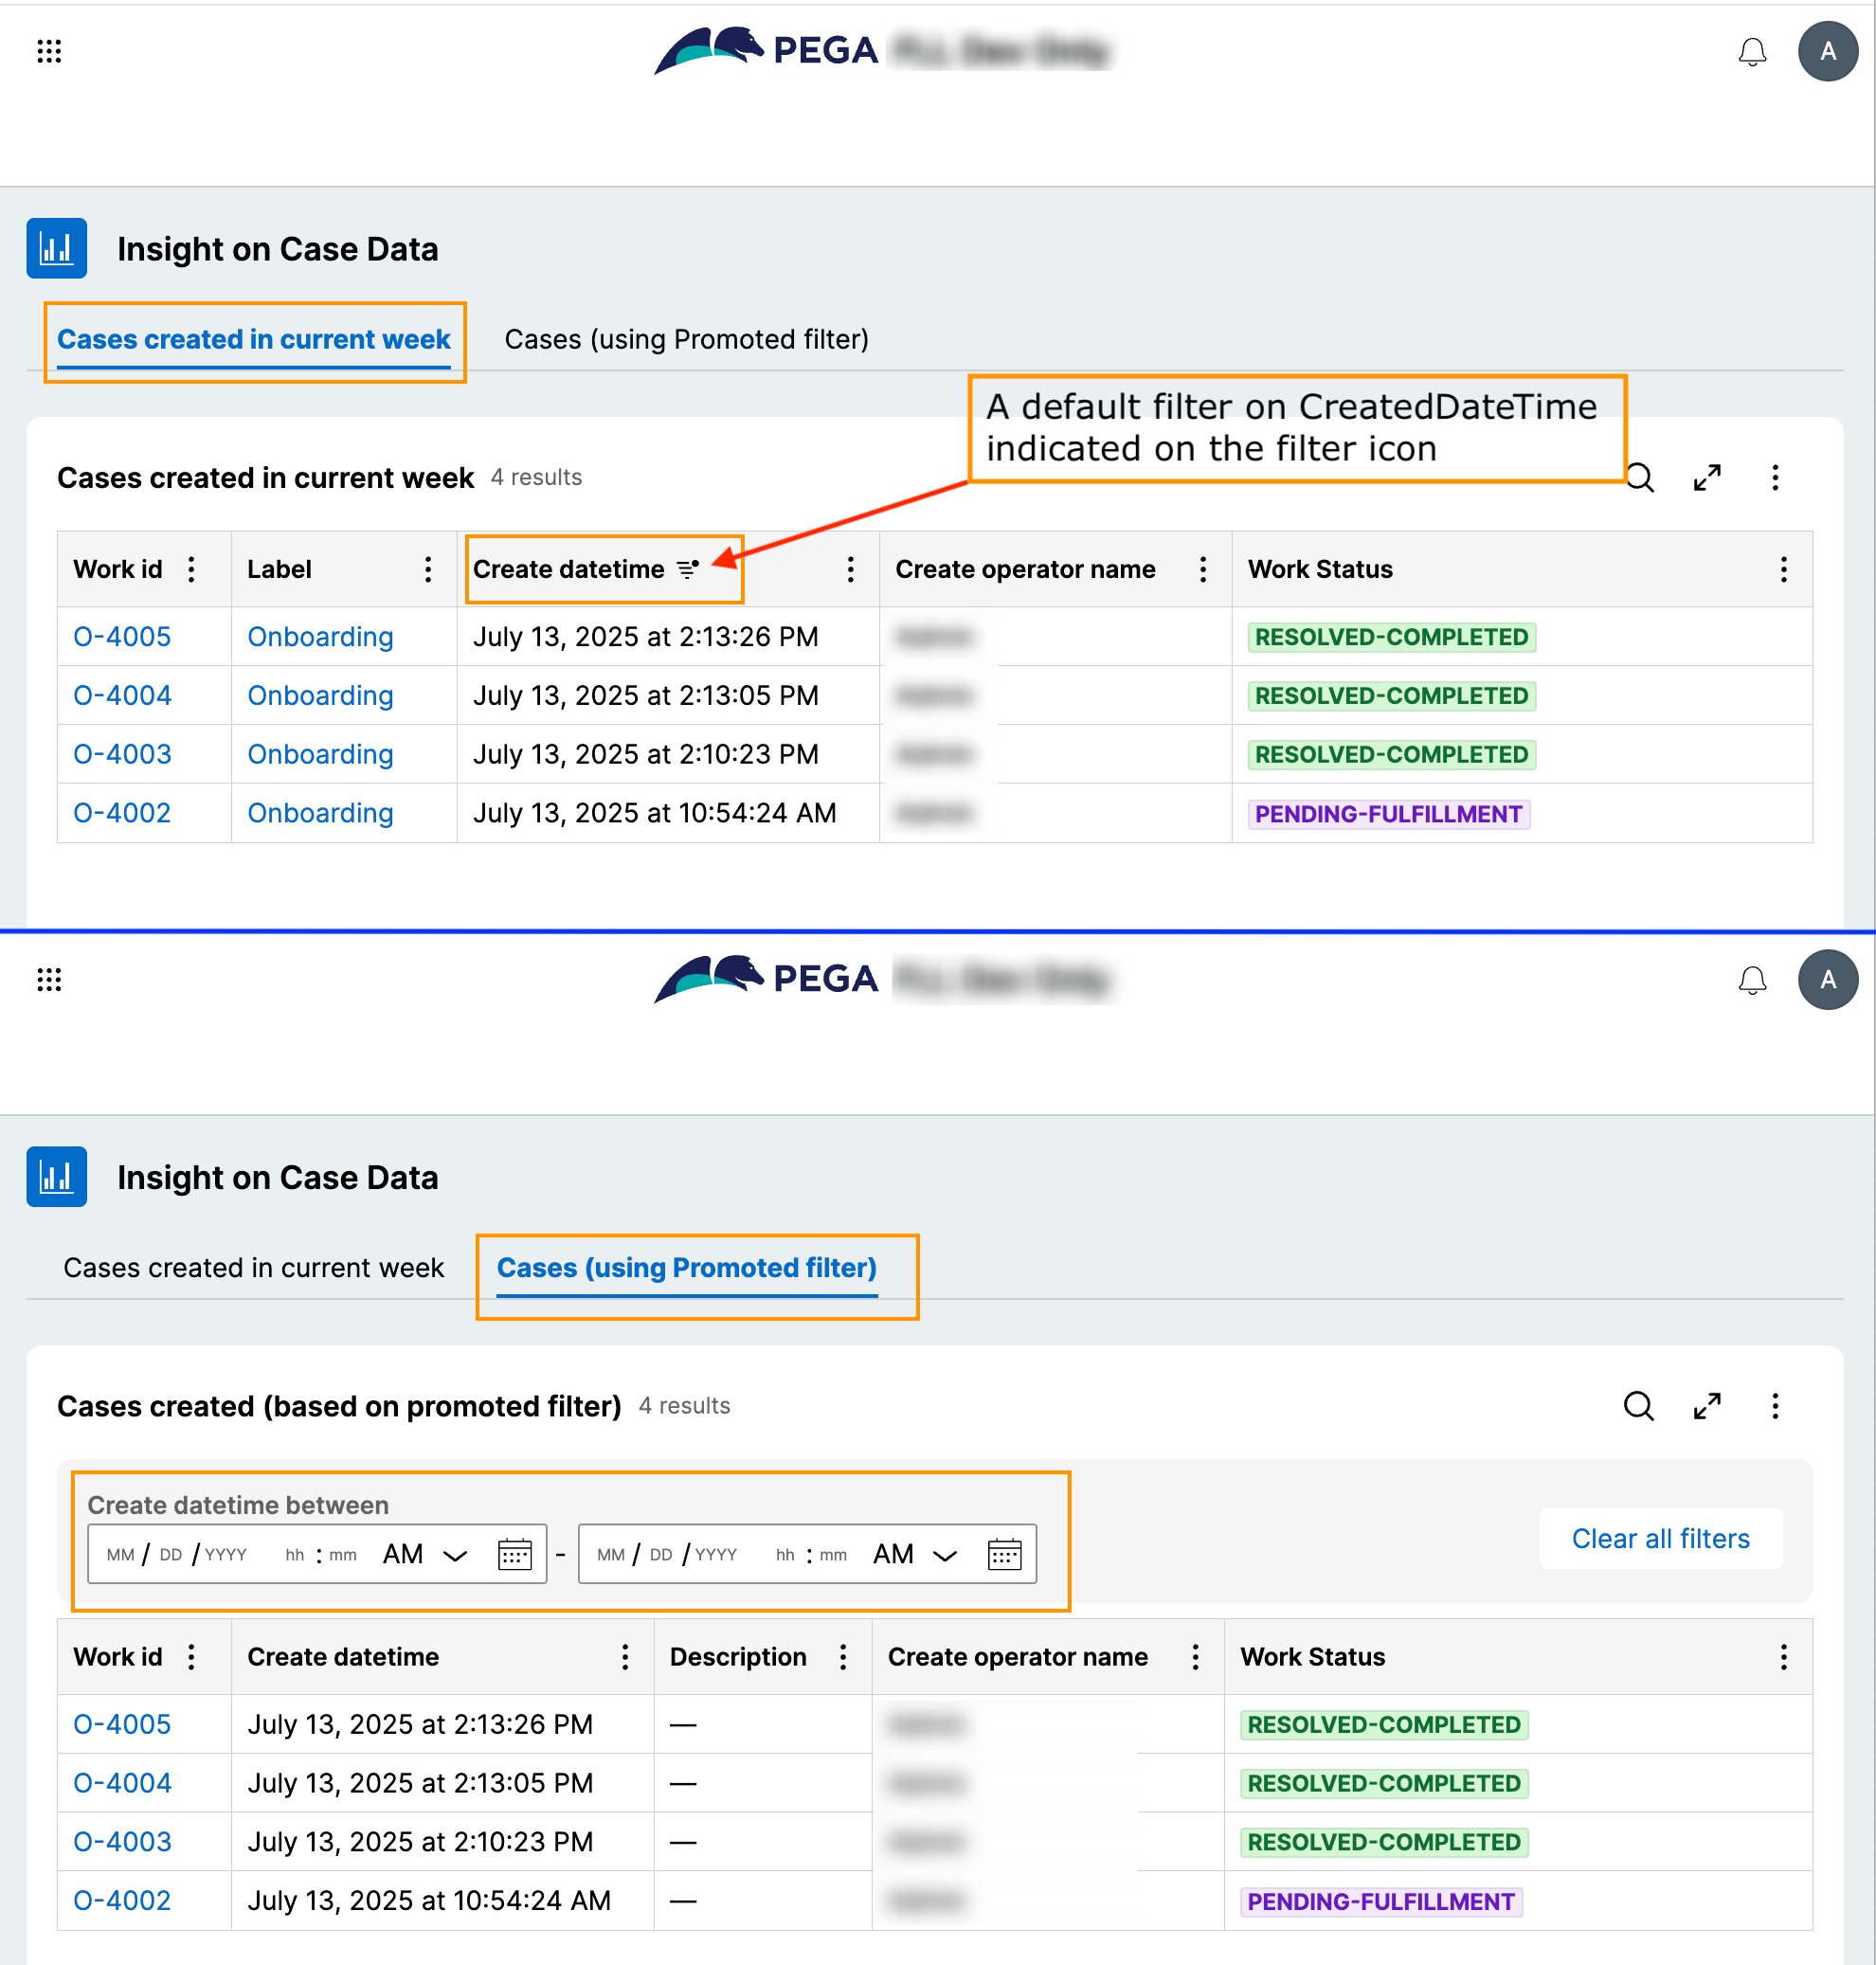
Hi @DaveFinley I’ve observed that when I create an Insight with a default filter set to show "cases created in the current week" and then configure a promoted filter to allow selection of a custom date range, the results returned by the promoted filter appear to be limited to the subset defined by the default filter (i.e., still only considering cases from the current week). Is this the expected behavior, or is there a configuration setting I might be overlooking to ensure the promoted filter overrides or expands beyond the default criteria?
Pegasystems Inc.
GB
@Abhinav_ChaudharyI was observing the same thing last week. The promoted filter is always on top of the underlying insight.
I think the scenario you are trying to do, is defaulting the promoted filter? For example, when I log in, I just want to see European created cases, so a promoted filter based on "region" but defaulted to my European cases?
This can not be achieved with the insight at design time. You can enable users to save their own views, where by they can save this as their default but Insight design time is
- designed to be generic to filter from the results on the Insight (specific filter)
- allow the end user to filter results via a promoted filter (general filter, no defaults)
Pegasystems Inc.
US
Piggybacking on what @MarcCheong shared, I agree -
This is expected behavior based on how you've described your set up. Here, the promoted filter is being included to your default filter.
For your use case, you could provide your default view ("cases created in the current week") and add a tab to the landing page which allows the user to switch to a view that allows selecting the custom date range.
If you try to do it all in one view I think you would have to show users how to go into the insight filter, remove the default and then apply their custom date range which I would imagine is not the user experience you are looking for.
Barclays
GB
@DaveFinleyThank you for your response. I was primarily concerned about the user experience, particularly the requirement for users to manually remove the default filter to get the expected results using the promoted filters.
Following your suggestion, I was able to address this by configuring a landing page of type Tabbed Page, with each tab displaying an insight for the respective views.
InnovationTeam
SA
Thank you @DaveFinleyfor this helpful article. Regarding picklists, I understand that Promoted Filters only support predefined options. Could you please confirm whether the following requirements can be achieved using Promoted Filters?
-
Populate the filter options dynamically from a Data Page For example, using a list of all users in the application.
-
Display, for a specific property, the list of all distinct values That is, show all existing values from the records for that property.
Vodafone DE
DE
Thanks for the article! This functionality is convenient!
Specifically for Insights, we are trying to make use of it but have encountered one weird issue.
If we add a date/time field (Create Date Time for example) to a Normal Filter, we get options to use Relative dates (Last week, Month, year, etc.)
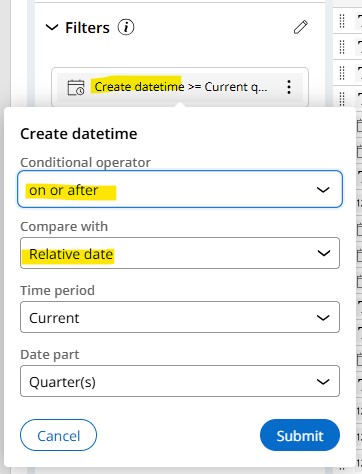
But if we use the same on Promoted filters, all these options are not available and instead we only get operators that would normally be there for Text based properties (Starts with, ends with, equal to, etc)
Is this expected behavior or just a bug in the product? We are currently using 24.2.1
Pegasystems Inc.
GB
@Roberto Burgos i just looked in my 25 build and can see it working - in that it treats it like a date.
And yes, relative date parts is there.
What I can't find to hand is if this was 24.2.2 or .25 that introduced it. Let me see if I can track this answer
Vodafone DE
DE
@MarcCheong Thank you for the update, we have found some curious behavior during our tests.
It seems like if you create the Insight with an operator having English locale (en_US or en_GB) then both Filters and Promoted filters are working as expected, with date / time operators and Relative compares. This work OK as well for all operators in the system consuming the Insight in other locales.
However, when creating the Insight using other locales (de_DE for my example) the issue happens; Filters work OK, but Promoted filters starts behaving like plain text. This will be broken for all operators in the system including those with English locale consuming the Insight.
Pegasystems Inc.
GB
@Roberto Burgos that matches my research. 24.2.3, I saw the expected behaviour (but with English locale) but have not seen any bug in our product backlog to suggest this is fixed. It could well be a current bug that hasn't been reported. Possible given how buried this is in the feature set + you need an international app.
Definitely raise this via My Pega Support if you haven't already done so, it needs investigation of the configuration and outcomes. Please share the INC number when you do.
Vodafone DE
DE
@MarcCheong For the issue we have raised the Support request INC-C51964.