Discussion
Pegasystems Inc.
GB
Last activity: 11 Dec 2025 1:43 EST
Utilising Advanced Associations (joins) with Insights in Explore Data to report on Tags
Why?
This article is written in response to a question on the User Experience Expert Circle discussion.
The question wanted to show Tags in Insights (Explore Data) with filtering.

Constellation Knowledge
It requires a combination of different Constellation knowledge areas, and is a good demonstration of advanced use cases:
- Insights
- Association rules
- Advanced associations (joining multiple data sources)
- Relevant Records
- Promoted Filters
- Tags widget in Pega
Purpose and Functionality
Pega's case tagging is designed to provide flexible classification and collaborative case management. Tags can be used to classify, manage, and report on cases in a preferred way, promoting both flexibility and collaboration among case workers. The system supports hierarchical tag organization, which can help replace your client's 32 different icons with a more structured and searchable approach.
The tagging functionality integrates seamlessly with Pega's case management framework, allowing tags to be used not only for visual identification but also for business logic, prioritization rules, and automated processing based on external system statuses.
Implementation Steps
This explanation assumes that we’re starting from the beginning. At a high level, the steps are:
- Add tags to your case type(s)
- Add association rule to the Tag data so it can be used in Insights (Explore Data)
- Mark the fields in the Tags data object relevant, so they can be reported on via Insights (Explore Data)
- Add the Association explicitly for use in Explore Data
- Create an Insight with Promoted Filters
1. Enable tags on your Case Type(s)
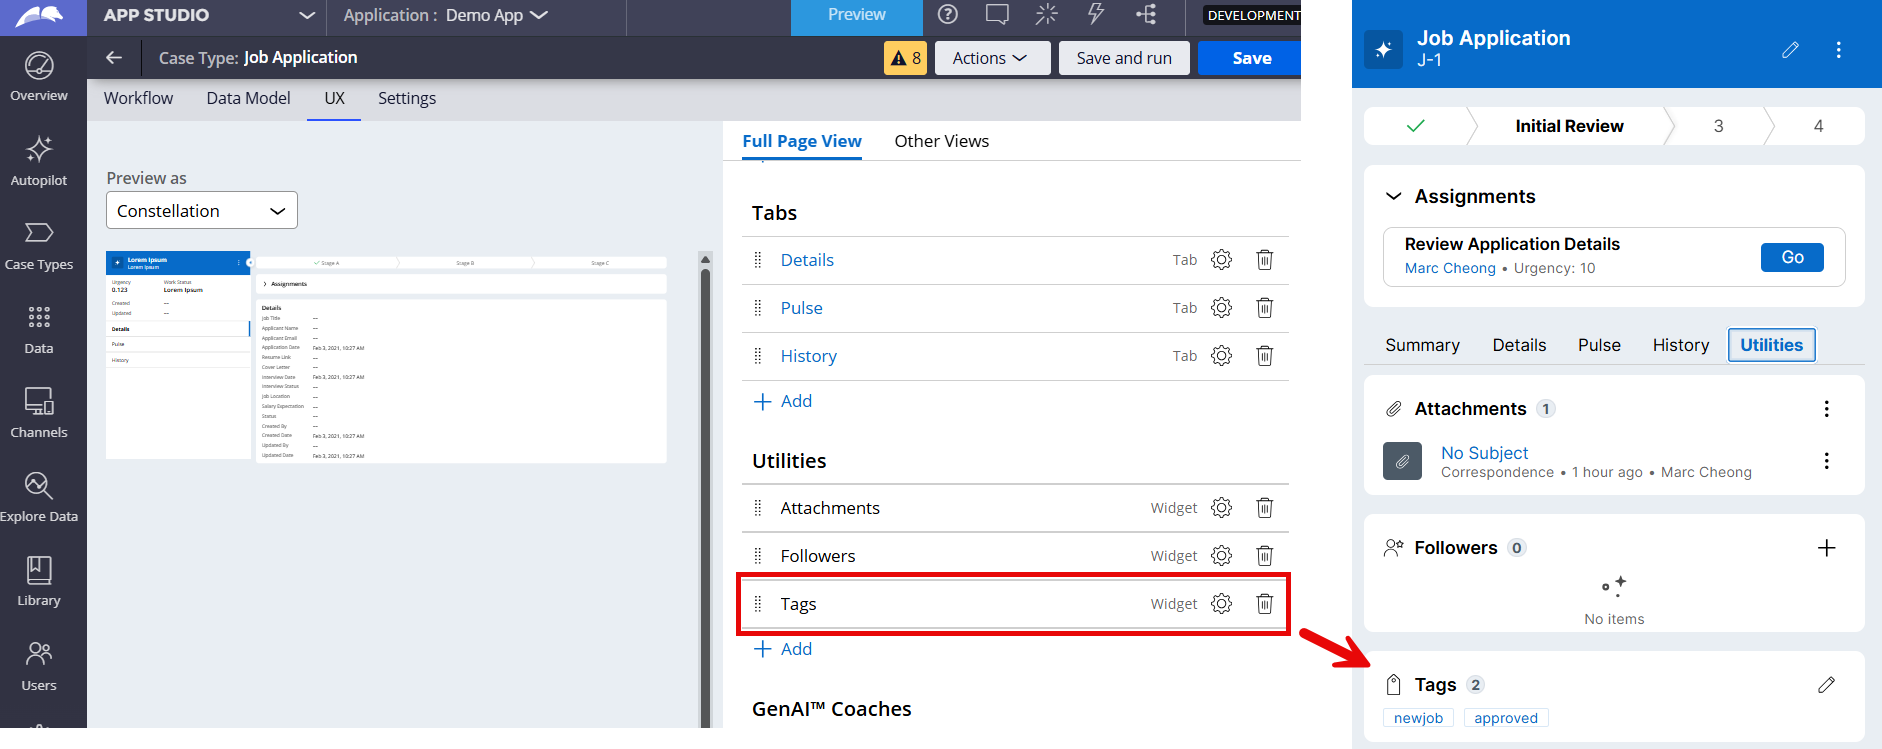
- Open your Case Type
- Navigate to the UX Tab
- Remain on the Full Page View, scroll down to the Utilities Menu
- Add the Tags widget
2. Association rule to enable access in Insights (Explore Data)
When you reference data that stored outside your case, you require an Association to access this data. This is fields like Data Reference, Operator Reference and Case Reference.
Basically, we store an ID of the data being used, then you are looking up all the other details about data. These save storing huge amounts of data inside the case.
If you have a look at the Out of the Box (OOTB) Insights you can see we provide a few for you already: Create Operator, Update Operator and Owner.
- Navigate to Dev Studio
- Open the Records menu on the left-hand side
- Right-click on Data Model and select Create > Association

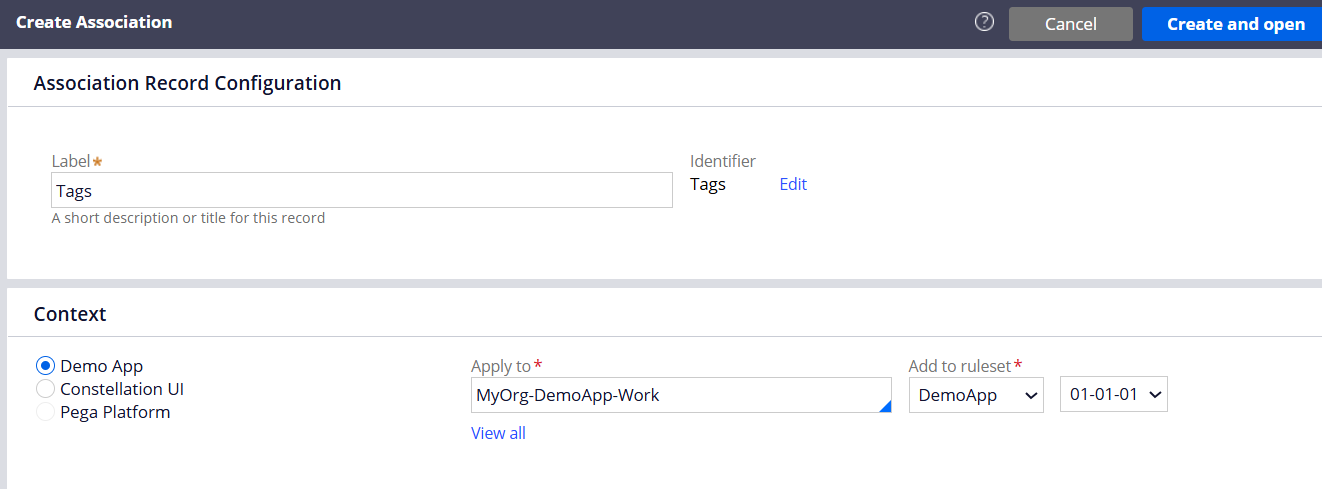
Create association rule
- Create a new rule, called Tags, in your work class. E.g. MyOrg-DemoApp-Work (in my example)
- By putting it at Work class instead of Work-CaseTypeName, you are making it available for all cases
Association rule creation
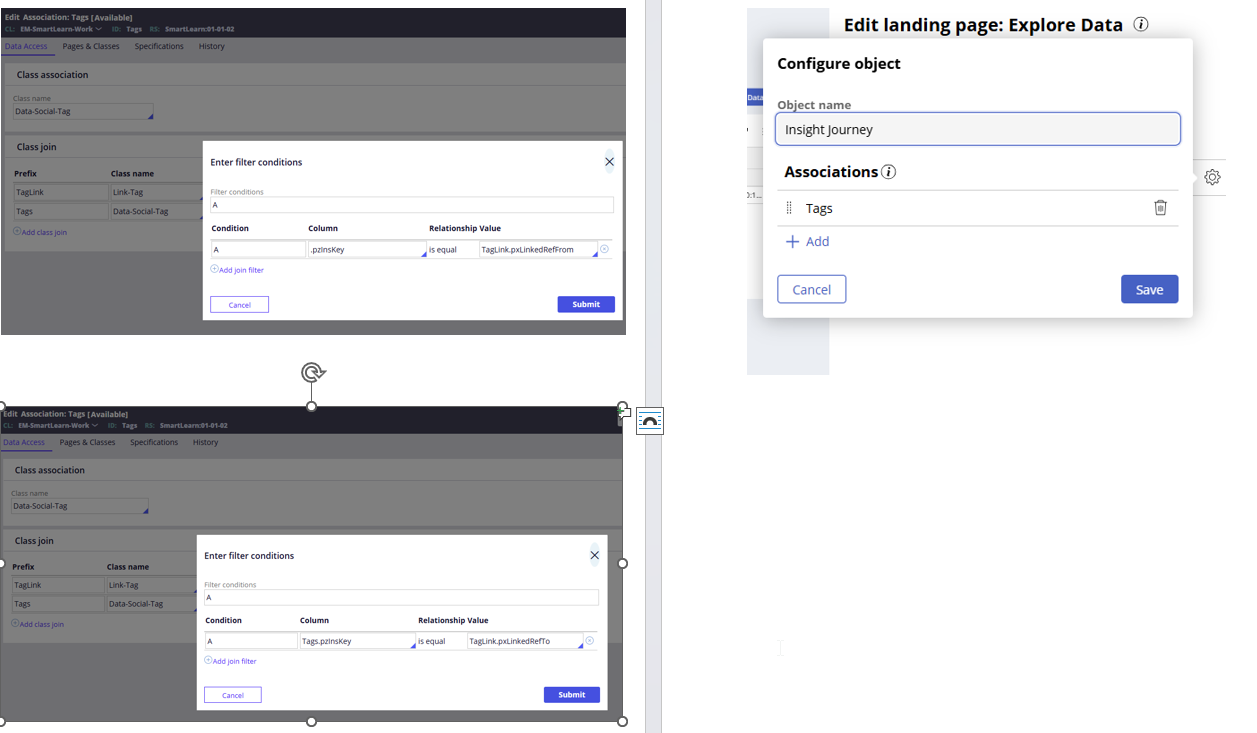
- Click “Convert to advanced configuration” as we need to do multiple joins here
- Complete the form as below
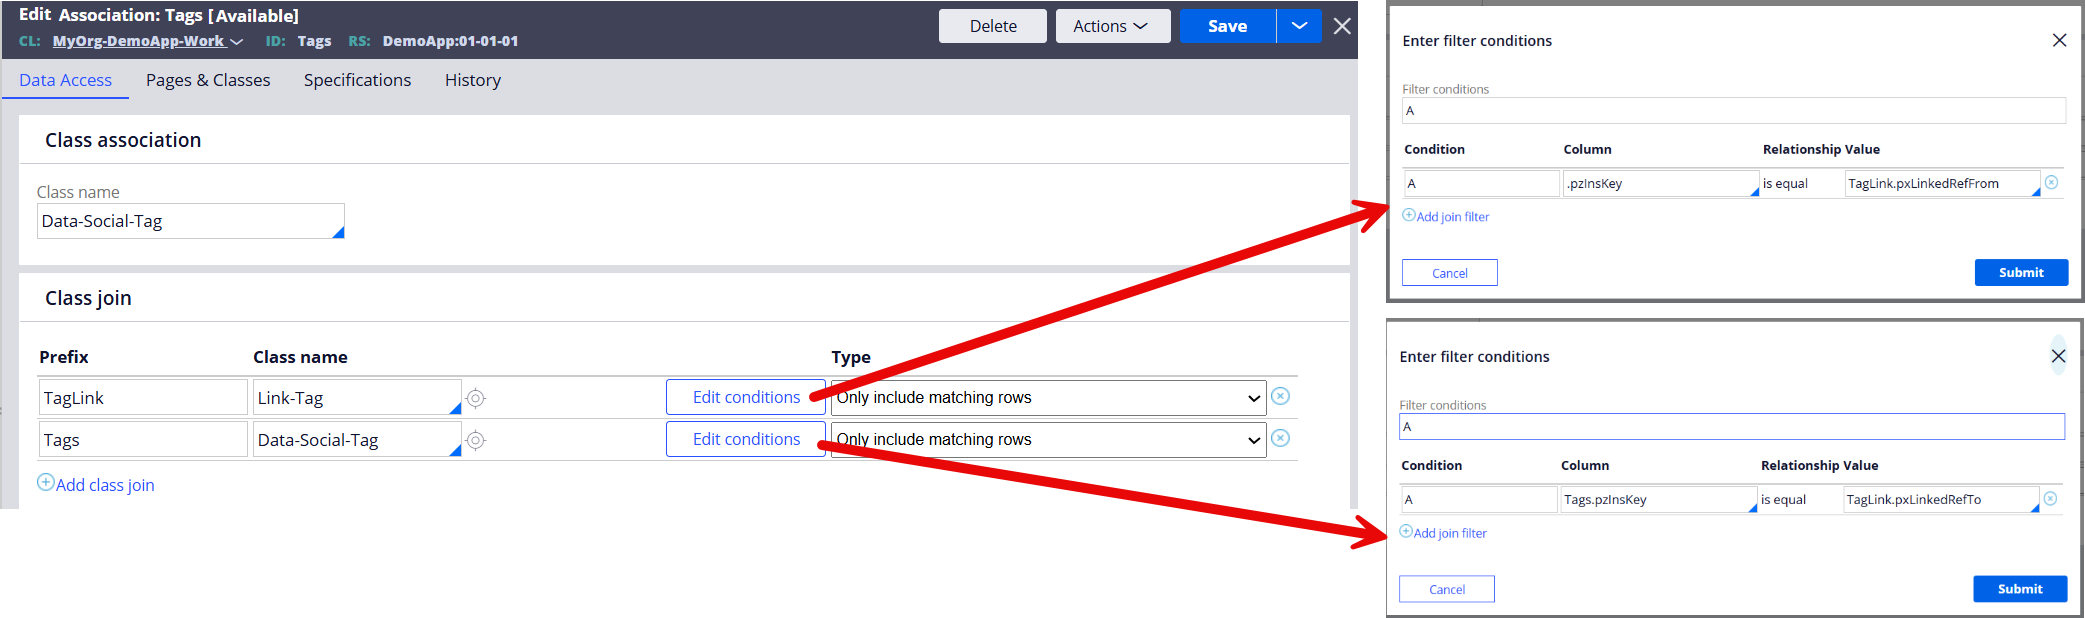
Advanced class join association details - Classes
- class = Data-Social-Tag
- with 2 joins
- TagLink prefix for Link-Tag class
- Tags prefix Data-Social-Tag class
- Edit the conditions for both joins
- TagLink should be as below, .pzInsKey = TagLink.pxLinkedRefFrom
- Tags should be as below, Tags.pzInsKey = TagLink.pxLinkedRefTo
- Save your rule
3. Mark fields relevant
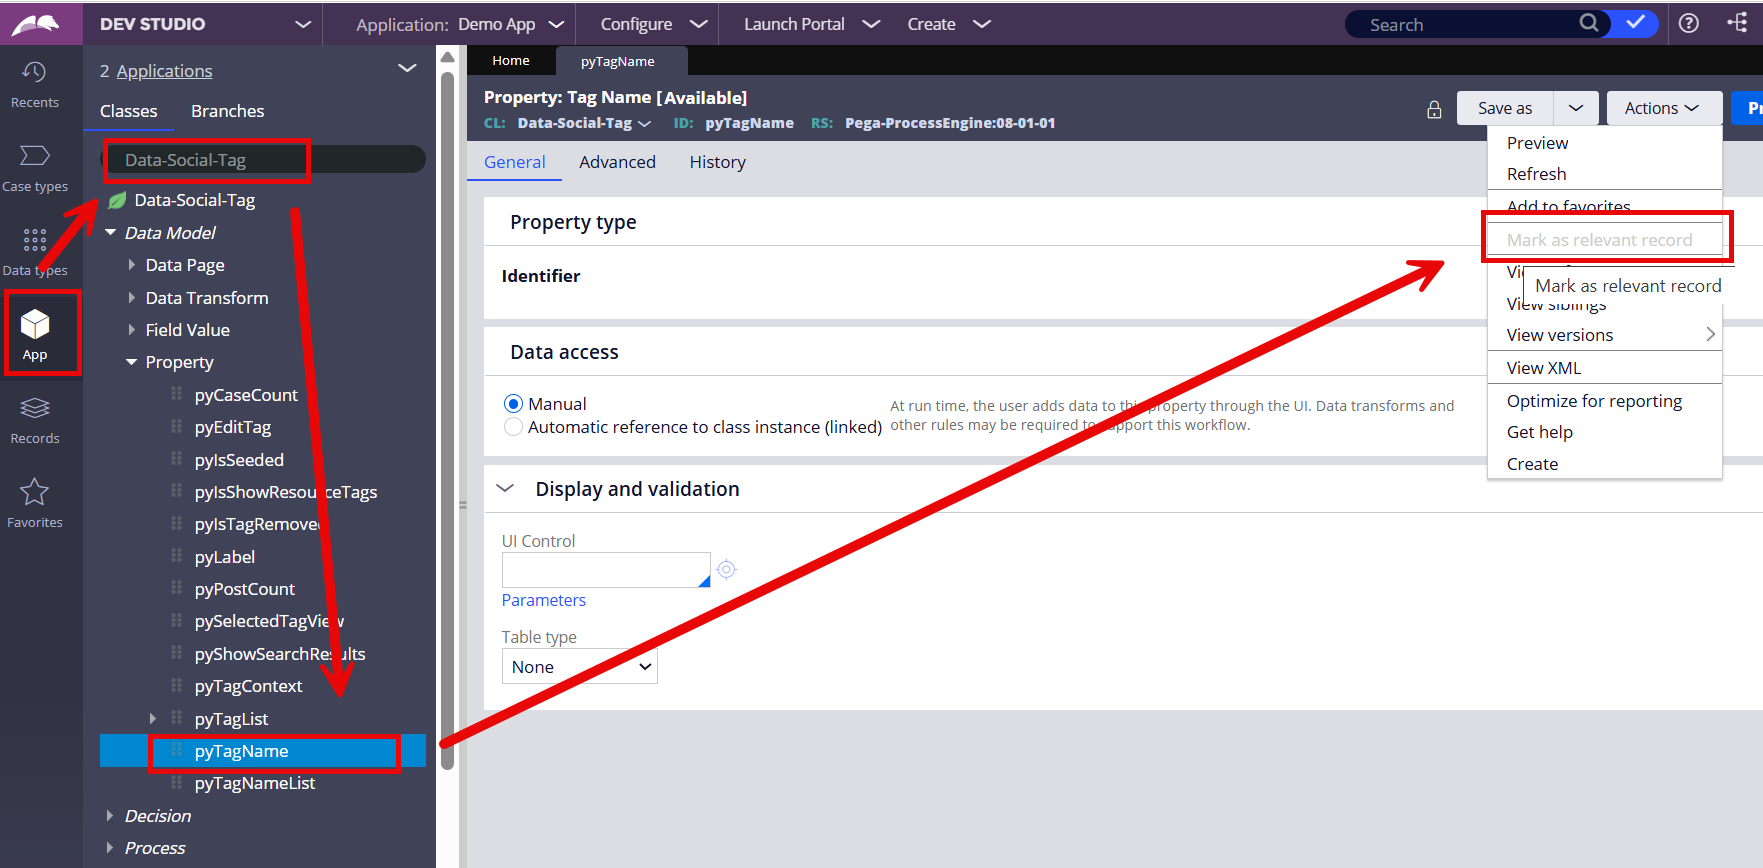
- Navigate to Dev Studio (if not already there)
- Click the App menu on left hand side
- Explore the class Data-Social-Tag
- Expand Data Model
- Expand Property
- Left-click to open pyTagName
- Go to Actions on the rule form, and click “Mark as relevant record”
- My image below, it is greyed out, as I have already done this (you can only do this once). In your example, it will be active and selectable.
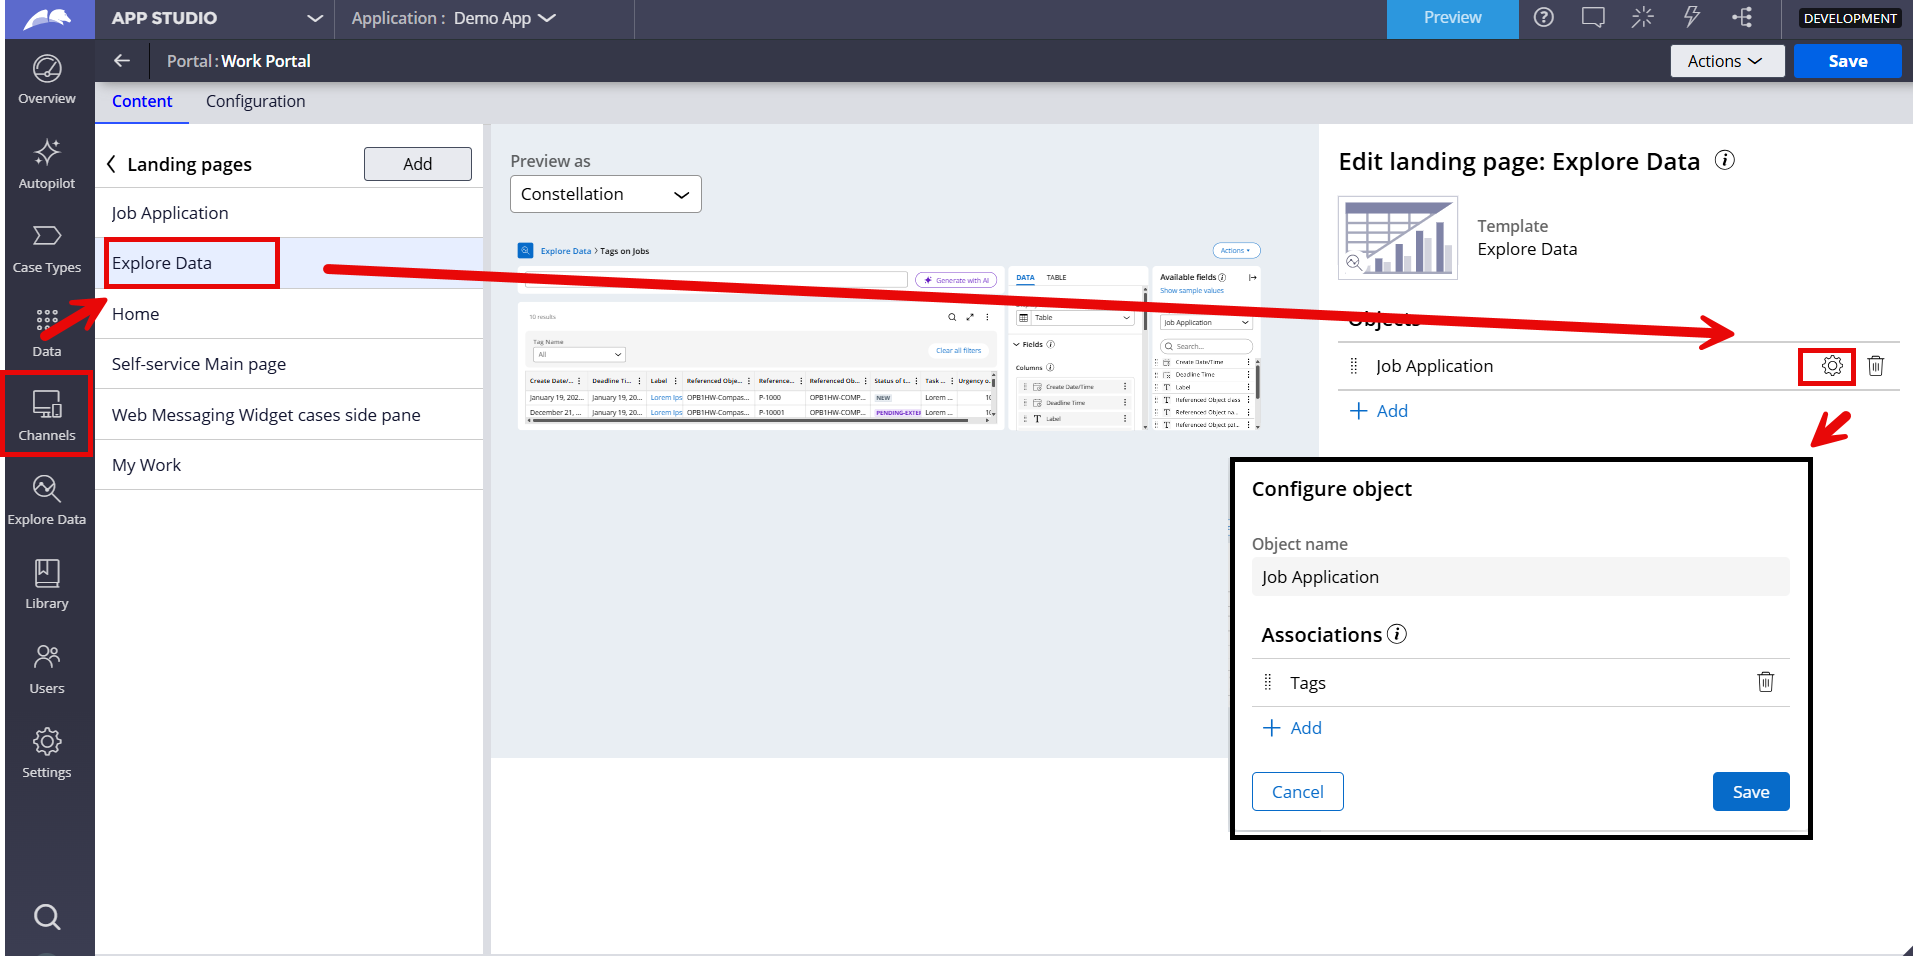
4. Add the Association explicitly for use in Explore Data
Simple association rules are automatically included in Explore Data for use in Insights. However, more complex ones, require you to add this to Explore Data landing page – a feature that is not well known.
- In either App or Dev Studio navigate to your Channels (and Interfaces)
- Open any User Portal you have created, default is typically “Work Portal)
- Navigate into the landing pages
- Open the Explore Data landing page
- On the right-hand side, add your case(s) you want this feature to appear
- Click the gear icon
- Add the association for Tags we just created
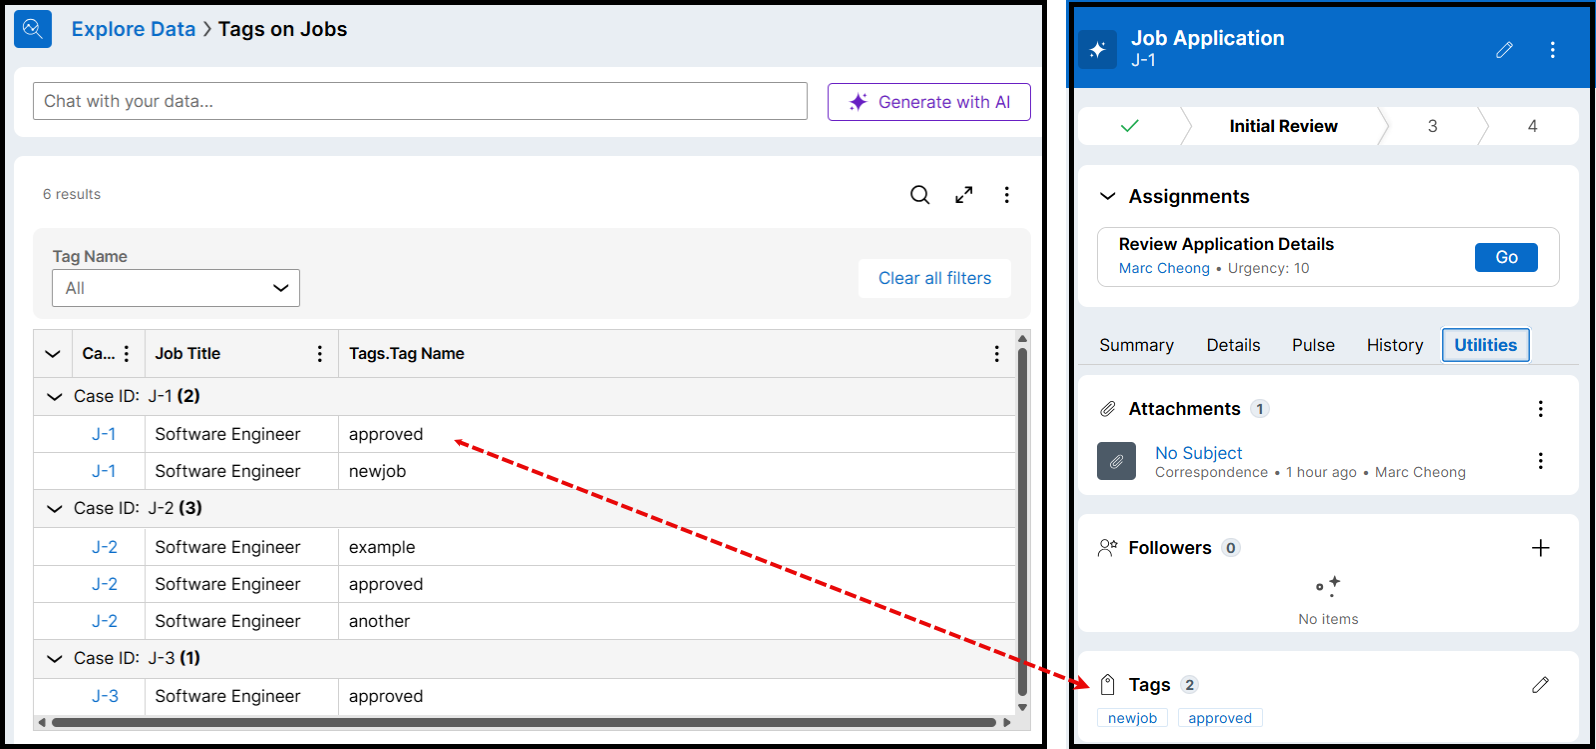
5. Create an Insight with Promoted Filters
Now we bring it all together.
- Open Explore Data
- Explore the case type you want to create the Insight for
- In the Columns configuration add the Tags > Tag Name field
- In the Promoted Filter configuration add the Tags > Tag Name field
- For a better UX (in my opinion)
- Click the configuration of this Promoted Filter
- Select edit filter
- Click Display as Picklist
- Submit
- Now test it out! If you’re happy either save this insight, add it to a Landing Page or a Dashboard for the users to use.
Constellation 101 Series
Enjoyed this article? See more similar articles in Constellation 101 series.
Pegasystems Inc.
US
Excellent article @MarcCheongI got this working exactly as you have outlined.
This may be obvious but is it possible to show a single case with the tags as a delimited list?
Pegasystems Inc.
GB
@DaveFinley i figured you would ask :)
When you join data together, it is always presented as a list. That's because it is a list inside your case.
This has always been challenging for business users to understand, as we tend to think of a case as a single row. Forgetting Pega for a second, even when using tools excel, we start merging cells to make it look like this. This was part of the reason, i suggested the groupings.
IF having them as delimited is 100% must have, then you need to look at your data model. It would be a "calculation" on you case to merge them together like this. In '25, Insights should support on the fly calculation as well - this could be a future solution (though i have not tested this yet).
Pegasystems Inc.
US
@MarcCheong makes sense with the Excel example, thank you for that.
For now I'm using the group by approach since I think it closer aligns to how the business will wish to categorize the cases based on a selected flag.
Erste Digital
AT
@DaveFinley @MarcCheong I have tried adding tags into my case type insight, But the fields related to the association 'tags' are not available to add into insight.I have made Tags.pyTagName as relevent record.What can be the issue?
Pegasystems Inc.
GB
@RumelaBasu what is the end result? can you show the Explore Data screen you have?
To me it sounds like Tags is not there at all, so either
- your Advanced Association Rule setup is done wrong (go back to "2. Association rule to enable access in Insights (Explore Data)" OR
- you haven't added it to Explore Data (go back to "4. Add the Association explicitly for use in Explore Data"
If you can provide some screenshots, might be able to pick up what is missing
Erste Digital
AT
@MarcCheong After recreating the Insight from Webportal, I got the option of Tags association fields to be added into insight, But the strange thing is , though I have added tags into the cases I created, It's not appearing in insight.I have run the default work class report definition also to get the tagNames associated with caseID, but that's not working.Attached are the screenshots of before and after adding tagName field into association.
Pegasystems Inc.
GB
@RumelaBasuyou are almost there, positive you can see the tags association in Insights. That leads me to suspect your association rule isn't 100%.
- can you confirm which version of the platform you are using?
- can you provide both filter conditions you used? or check it? I don't see that in your document.
- It should look like the image below.

Erste Digital
AT
@MarcCheong Hi Marc, thanks for responding, yes , I am using community edition of Pega Infinity '24.2.2 and I have attached the screenshot of association rule and join conditions below.
Pegasystems Inc.
GB
@RumelaBasu your second condition, the one for "Tags" (Data-Social-Tag) should be "is equal to" the value "TagsLink.pxLinkedRefTo".
- The word you provided has TagsLink.pxLinkedClassTo
That is likely why the Association is not finding the data you are after BUT is shown in the Insights as a valid association... Easy oversight, especially when the autocomplete doesn't actually find this, you have to manually type it.
Erste Digital
AT
@MarcCheong Thanks a lot , not sure why it was not identified after several reviews and now it's working perfectly fine for me. I believe in this way we can also use this advanced association feature for attachment related fields to be displayed in insight. Thanks for sharing such a useful article.
Pegasystems Inc.
IT
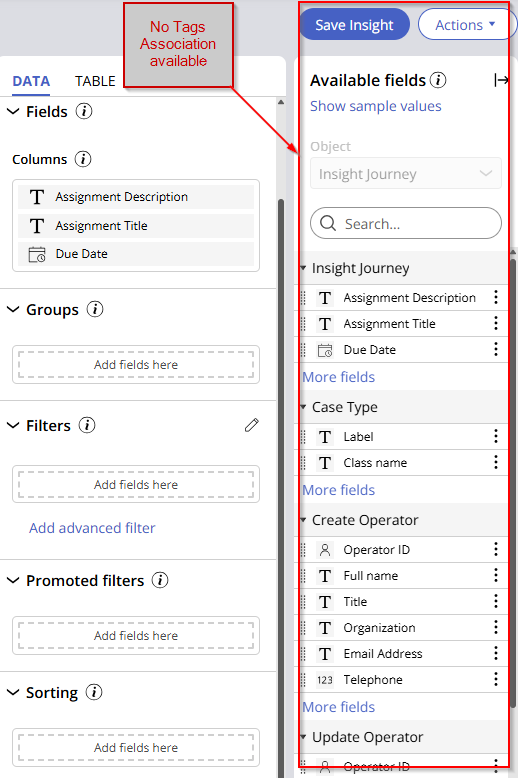
@MarcCheong I did configure as per your suggestion step by step, but when editing insights related to my case (Insight Journey) I do not see my association available.
See below screenshot if that can help. Anything missing?
Thks
Capgemini
IN
Hi @MarcCheong, thank you so much for the article. It really helps a lot.
Can you please tell me if I manually add a tag (manual case) on my case and create an Association rule, then can I see the tag value i.e. 'Manual Case' in the clipboard of the case? If so, what will be the page name of that?
Or we need to refer the Association rule only whenever we need to refer the tag value?
Pegasystems Inc.
GB
@SHATAKSHIB the example given, Tags, use 2 different concrete classes to store both the Tags and the link between that Tag and the Case ID. In this scenario, our Association rule was joining those tables so that you could run these on Insights.
Clipboard is trickier. Constellation is stateless so using the clipboard in the same way you did in Traditional UI can be problematic (though I have not tried for Tags). If your use case is attempting to check the tags to use that for some sort of processing or logic, then you could reuse this association to do that. At least then you're not having to build different logic for Insights vs Case Logic.
I'm making a few assumptions with your use case, but I assume you want to check a datapage, with a report definition, showing the "manual case" results to run logic? You could do that and reuse the association in your report definition that feeds your datapage that feeds your logic?
On a side note, I'm not sure Tags is a great use case for this - they can be added/removed, you can't author restrictions to this and we don't keep field level auditing for them. So depending what you want to do, it might be worth having a field on your case and having field level auditing if someone is toggling it on or off.
Capgemini
IN
@MarcCheong Yes, you are correct. I want to show a table (source RD or Data page) where there will another column for Tag which will show the tags for that particular case. I got your approach - using the same association for join to the RD so we can fetch tags for each case in the row. We will try to do that.
Thank you so much!
Updated: 18 Jul 2025 9:28 EDT
Capgemini
IN
@MarcCheong, can we automatically assign a case type with a tag or multiple tags without creating it from the tags widget at runtime and assigning it to the case with above approach.
Example: Assume I have created a Loan Request Case where I have to automatically assign a tag with name "New Loan Request" only when pyStatusWork is equal to "New" and supress the tag when it is not "New".
Pegasystems Inc.
GB
@RAPURIB17069707 i am sure you can BUT remember the Tags widget allows people to remove tags too. I think I remember having the same dicussion with @DaveFinley in this post or another of his - programmatically adding a tag is a good idea but we have no way of stopping people removing that tag AND then you might have to programmatically remove it too. In this scenario, i'd look at having my own embedded field or data reference to track whatever you need that tag to track. Tags are flexible for a reason.
Assuming you want to proceed, I don't know the activity that would create the tag record. I assume there is one you can call that would create the records in the two classes mentioned.
- Link-Tag class
- Data-Social-Tag class
CAPGEMINI AMERICA PVT LIMITED
US
@MarcCheong To automatically add the Tags to the case Pega Article is showing below steps
1. In the navigation pane of App Studio, click 'Case Types', and then click the Case Type that you want to open.
2. Click the 'Settings' tab, and then, in the navigation pane, click 'Collaboration'.
3. In the 'Tags' section, in the 'Configure tags' field, enter a tag that you want to create as a suggested tag, and then click 'Add'.
But, we did not see that Collaboration tab, is there any component needed or any DSS we have to enable that section? Or any other way we have to add them?
Pegasystems Inc.
GB
@SivasenaReddy which article are you referencing? Collaboration tab, on Case Settings, from memory was a Theme-Cosmos capability - this is not present in Constellation. However, i don't recall there being a "suggested tags" capability - this might be getting mixed with Decisioning which also uses that terminology.
I have not specifically implemented this use case, and as i said, i wouldn't implement it this way (using tags). However, a quick search of Activities in the platform and you can see the Automation pzTagCases (API), which calls the activity pzTagCasesImpl. This would be a good starting point. #
OR better yes, tracing the DX API for this. Constellation has a rich tapestry of API's you can call to do case management functions, tagging is no different.
https://docs.pega.com/bundle/dx-api/page/platform/dx-api/dx-api-tags-en…
However, give your struggles and the complexity of the tag infrastructure, in addition to the user problems of people deleting automated tags, I'd be leaning towards implementing my own embedded data (multiple records) field to track this. It is also easier to report on than the complex association need for tags.
Citi group
AU
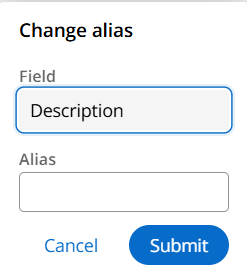
@MarcCheong how to rename the column from Tags.Tagname to Tag name. Tags.tagname looking more technical
Updated: 4 Sep 2025 9:13 EDT
Capgemini
IN
@VenuGopalaKrishnK17232485 , click on the three dots beside the property and select "Change Alias" option. provide the name you want to display in Alias and submit.
EY GDS
IN
@MarcCheong In my scenario I had to join my work class with a data class to create one insight. My data class is having pyGUID as Key and Work class have Case ID and pzinskey therefore I needed to configure the advanced association but even after following how you added in explore data the association is not showing up. Please advise if I am missing anything.