Discussion
Evonsys
US
Last activity: 16 Mar 2022 10:45 EDT
Pega-Robotics: Capturing the screen from a Pega Robotic Automation
Pega robotic automation allows to access the user's screen in order to capture a screenshot. This is represented by a static object called 'PrimaryScreen' which resides in the namespace 'System.Windows.Forms' . Here is the link for the documentation.
Note that the Assembly name is System.Windows.Forms.dill

Lets add this static property in to the toolbox. In the Pega Robotic studio, Go to 'Tools' -> 'Choose Toolbox Items...' -> 'Pega Robotics Static Members' -> 'From Global Assembly Cache'
Now from the 'Assembly' drop down, select the above mentioned assembly. Note that I have selected System.Windows.Forms, Version= Proprietary information hidden as below.
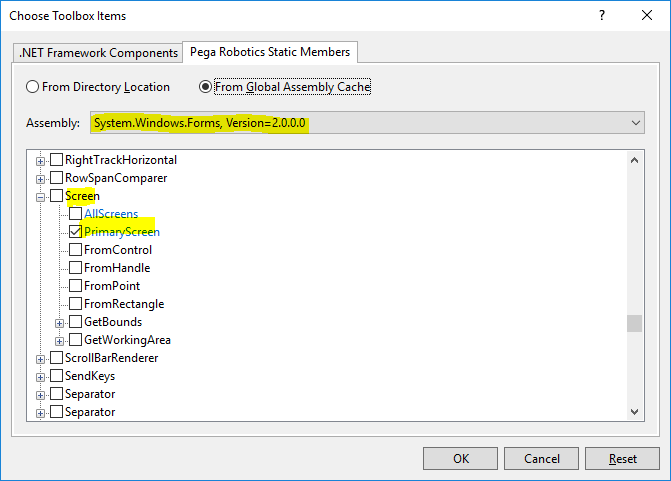
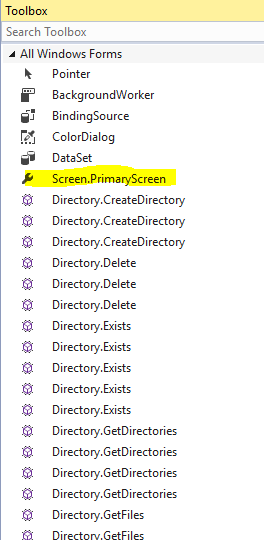
Also note that when expanding the tree option 'Screen', you can see the 'PrimaryScreen' static property as above. check it and click Ok. The 'PrimaryScreen' static object will then be in your tool box under 'All Windows Forms' as below.
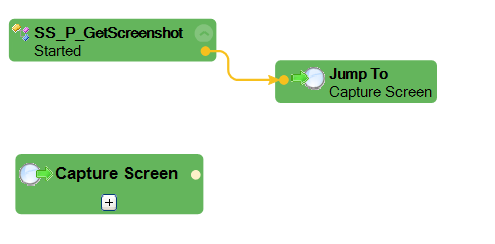
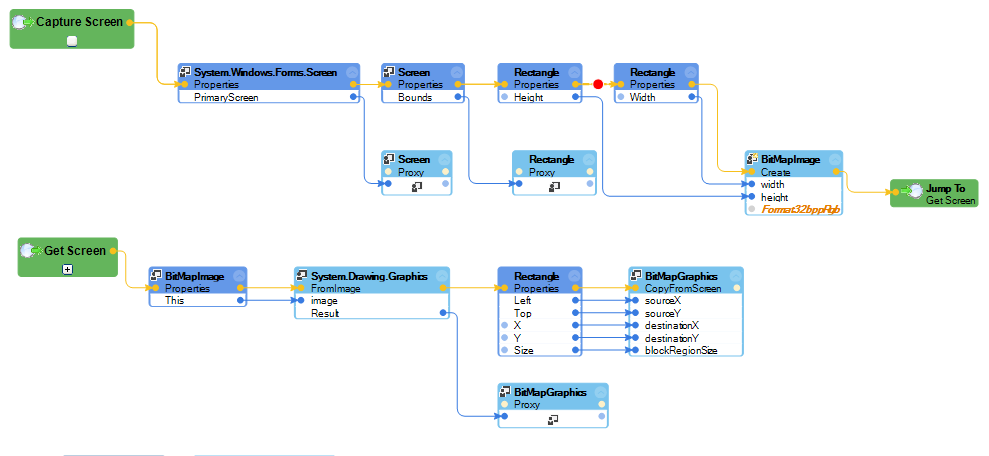
Now lets start to write the automation. I'm using the automation's 'Started' event to trigger the logic.

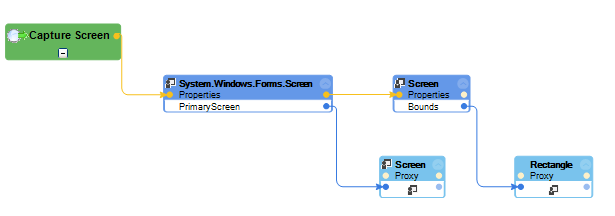
I have added a label called 'Capture Screen' and whenever the automation started the execution will direct to this label. Here's how the automation looks like.
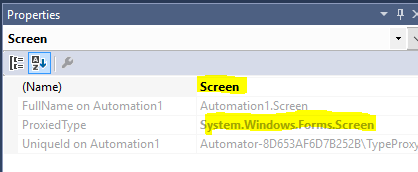
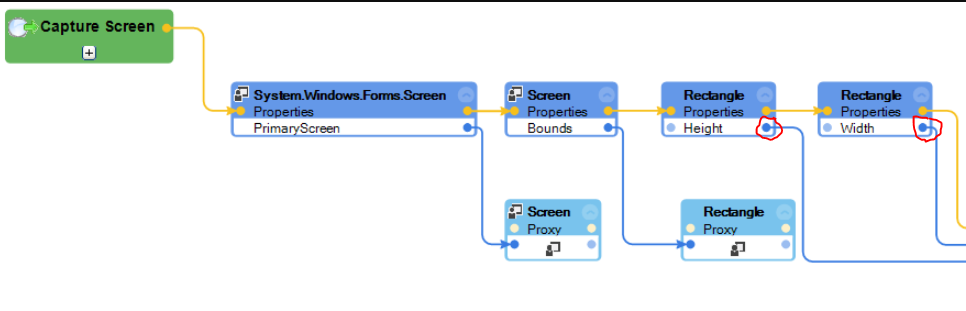
As the fist step, extract a proxy from 'PrimaryScreen' that we just added into the tool box. This will provide a proxy of type 'System.Windows.Form.Screen'. Using the properties window, rename it as 'Screen'.
At this point the automation looks like below.

Same way, access the properties of the proxy 'Screen' using the object explorer window and extract a proxy of 'Bounds' object. This will provide a proxy of type System.Drawing.Rectangle. Rename it as 'Rectanlge'.

At this point, the automation looks like below.
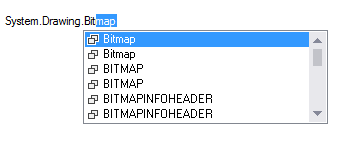
Now we are going to create a Bitmap object. For this we need to access 'Add Constructor for Type' icon in the toolbar.

Click that Icon and click back again in the automation area. Type 'System Drawing Bitmap'. When typing, the options will be narrow down to the exact match. Press enter when you find the exact match.
When enter is pressed, we might need to select the exact constructor.

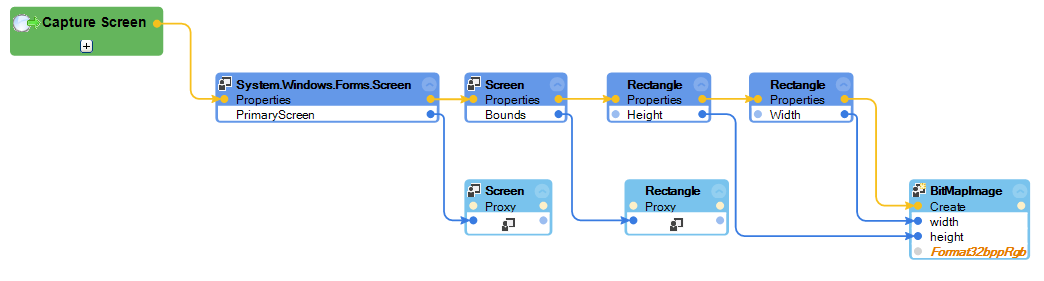
As highlighted above, select the constructor which accepts two Int32 variable called width and height and a PixelFormat object called 'format' and click ok. The bitmap object we just created will then be available in somewhere in the automation area as below.

Rename this object as 'BitMapImage'. Access the properties 'Height' and 'Width' of the the proxy 'Rectangle' and pass the same appropriately into the object 'BitMapImage'. Also select the pixel format as 'Format32bppRgb'. Now your automation looks like below.
Now that we have successfully created the Bitmap. Its the time to form an image from it. Again there is a static method called 'FormImage' in the 'Graphics' class. Here is the documentation.
According to the documentation, this time I'm going to select the assembly 'System.Drawing, Version= Proprietary information hidden'. Once the tree option 'Graphics' is expanded, I can find the 'FormImage' method as below.

Once added, I can find the method in the toolbox under 'All Windows Forms' as below.

Now I'm going to add another label called 'Get screen' in my automation. when the bit map was created, I'll be jumping into the new label and then continue the rest from there. First thing I'm going to do in the newly added label is capture the graphics. For that, I am passing the 'BitMapImage' in to the newly added static method 'FormImage'. When we extract a proxy from the results, it will give me the graphics that I needed. Following is how the automation looks like when complete these steps.
 Rename the newly extracted proxy of type 'System.Drawing.Graphics' as 'BitMapGraphics'.
Now we are going to fill all the graphics. For that, we need to access following properties of the 'Rectangle' proxy.
1.) Left
2.) Top
3.) X
4.) Y
5.) Size
In order to understand why we need these properties, lets run the automation by adding a break point where we extract the 'Rectangle' proxy.

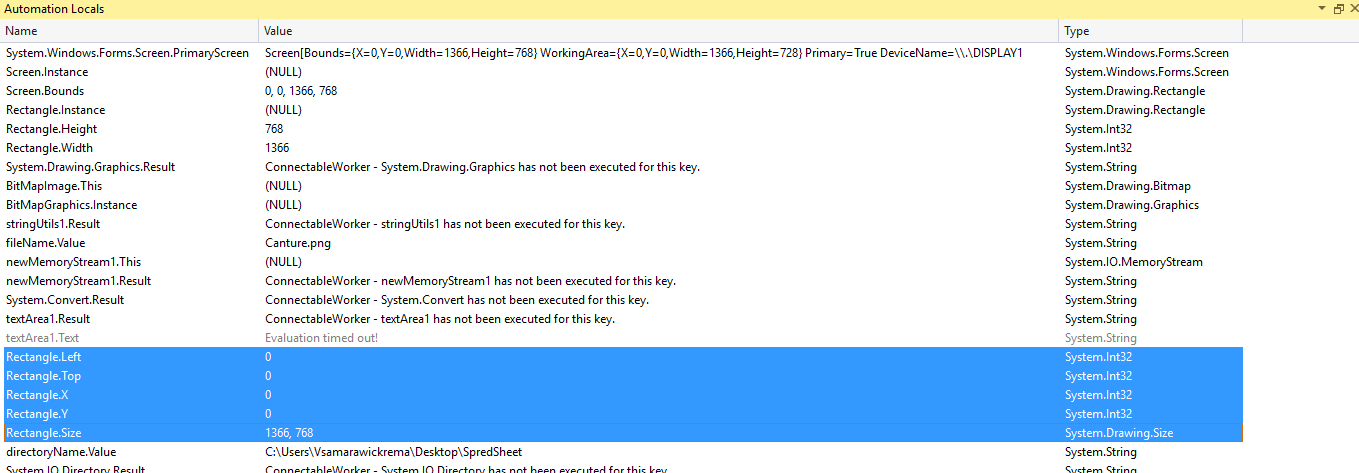
Add a break point as above an run the automation. Once the execution stops at the break point go to 'Debug' -> 'Windows' -> 'Automation Locals' . In the top most entry, you can see the string representation of the 'PrimaryScreen' object.

Note that as per the automation, we created the 'Rectangle' object from 'PrimaryScreen' through 'Bounds' object through proxies. Therefore the relevant properties in the rectangle is successfully initiated as below.
Imagine when you use snipping tool to capture the whole screen. Then you would start placing the pointer from the top left corner of the screen and drag it up to bottom right corner to capture the entire screen. This dragging will be form a rectangle by adjusting the area we need to capture.
Same way, we need a rectangle which's top left corner to be placed in the screen's top left corner and then resize it's size to the screen's resolution.
The screen's top left corner is considered as (0,0). We need the same coordinates to place our rectangle start point. Then the X and Y values should be initialized into zeros. As we see in the automation local values the TOP, LEFT, X and Y are initialized as appropriately as we need. The SIZE has two values, which is 1366 and 768 in above example. This is the current screen's resolution. This is the exact reason the we used the 'PrimaryScreen'. It is the exact size we need to capture the entire screen. Therefore, even if the screen resolution changes, we do not need to worry at all. This is the reason to use above property values in our next step.
As the next step, I'll be using the above values to capture the graphics for entire screen. I'm using the method 'CopyFromScreen' method of 'BitMapGraphics' proxy that we extracted earlier. Following is how the automation looks like when completing these steps.
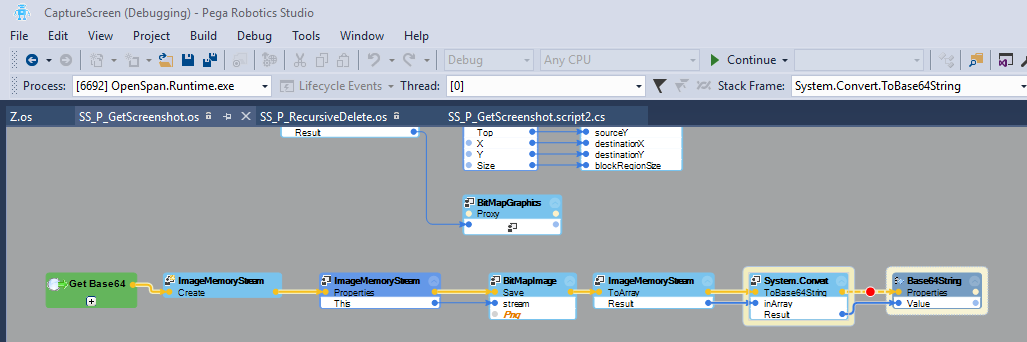
Most of the time, we might need to send this captured image into an integrated application with this robotic automation, (E.g. Pega) and not saving it locally. We can use base 64 encoded strings to represent this image. Let's look in to that also.
I'm going to add a new label in to my automation called 'Get Base64'. The first thing I'm going to do is creating a memory stream object. As we did earlier, use 'Add Constructor for Type' option. This time type 'System.IO.MemoryStream'. Also choose the default constructor as below.

Rename the object as 'ImageMemoryStream'. Now I'm going to invoke the 'Save' method of 'BitMapImage' object that we created earlier by passing this memory stream object that we just crated and set the image format as PNG (This image format can be selected from a drop down in that method. Also note that we need to use the save method which accepts a memory stream. There might be overloaded methods). After that I'm going to invoke the 'ImageMemoryStream' object's 'ToArray' to get the byte array representation of the image.
Finally add the ToBase64String method by using the same way we added the other static methods and properties into the toolbox. This time I'll be using the assembly 'mscorlib, Version= Proprietary information hidden' depicted in the below figure.

Also expand the tree option 'Convert' and choose the correct overloaded method of 'ToBase64String'. Here, since my memory stream object's 'ToArray' method returning byte array for me, I'll use the highlighted overloaded method of 'ToBase64String'. After completing these steps my automation's 'Get Base64' label will looks like below.

Note that I have used a String variable called 'Base64String' to store what is returned from 'ToBase64String' method. Let's see how the whole automation is now look like.

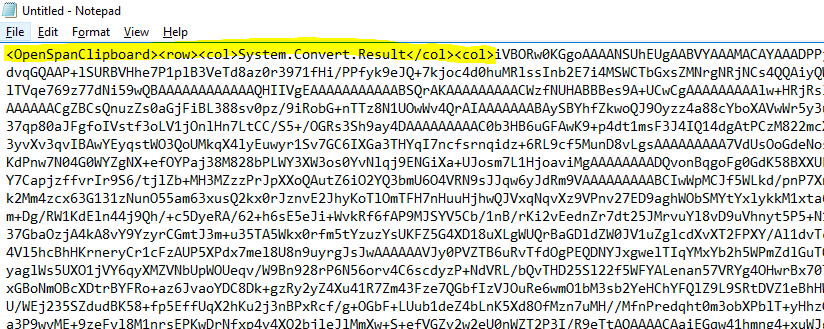
Now it is the time to test our work. Add a break point at the last process link in the automation and debug. The execution should stop as depicted below.
 Lets check the value of what is returned from the method 'ToBase64String' in the automation locals window as discussed earlier.

We can copy the value to the notepad file as above, but do not forget to delete following highlighted tags at the beginning and the end which are additionally copied from the automation locals window.
Now you can use any online tool available to convert this as an image. Remember, when we save the memory stream, we gave the format as PNG? So do not remember to goole something like 'convert base 64 to PNG' got it? Here's how I converted it and verified.

Cheers.
***Edited by Moderator Marissa to change content type from Question to Discussion***
Verizon
IN
Hi Andrew,
I'm having the similar usecase to capture the screenshot. I have followed the same steps as you have explained above. But, I'm not getting any errors on running the automation neither I'm not getting the stream of the current screen(screenshot).
In my scenario, I'm using the web adapter. I need to capture the screen on the web adapter. Can you please let me know, if I have to do any other thing to make it work?.
Thanks in advance.
Evonsys
US
Hi Sethuraman,
I cannot suggest anything unless I take a look at your automation. Please double check and find if you have done any mistake. This automation is perfectly working and this kind of approach should only used in the absence of utilities such as adapters.
For example, adapters contain such functionalities for you to make you life easier. For web adapters, you can use the 'GetScreenshot' method existing for every web element which are interrogated using the web adapter. Sample automation is given below.
Hope this helps. cheers :)
Verizon
IN
Hi Andrew,
Thanks for your reply. I have tried to implement the script which you have stated in the above comment for web adapters. But using that, the system throws me an error "GetWorkingInstance() could not get instance from TypeProxy". Can you please let me know, if I'm doing any mistakes?.
Note:Please find the attachment for the automation script and error that I'm getting.
Thanks,
Sethuraman.R
Evonsys
US
Hi SethuramanR,
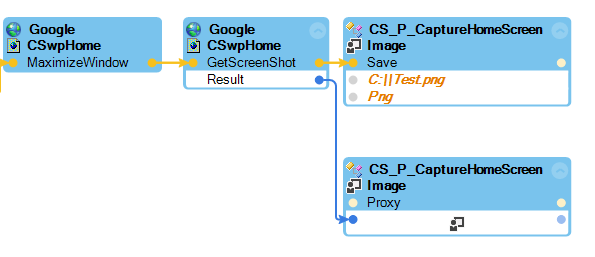
You have connected the execution link for the proxy extracted from the returned image by invoking the 'GetScreenShot' method. Remove it and connect directly from 'GetScreenShot' to 'Save' method. refer the attachment.
Verizon
IN
Hi Andrew,
Thanks for the quick response. But, I have tried what you suggested above and I'm still getting the same issue.
Note: Please find the attachment for the modified automation script.
Thanks,
Sethuraman.R
Evonsys
US
Hi SethuramanR,
The reason for this error is the proxied image could not instantiate by invoking 'GetScreenShot' method on 'NPPES_NPI_Registry' element. I cannot tell the exact reason as I cannot see the exception stack. Once you get the exception message, click on 'Show Details' button and send the entire exception stack trace.
For time being, could you complete the below steps and let me know whether it is working?
1.) Interrogate any web element which is a child element of 'NPPES_NPI_Registry'.
2.) Invoke 'GetScreenshot' method on the newly interrogated web element.
3.) Check the C:\\Test.png is created on your PC as expected without giving any error.
Pegasystems Inc.
IN
Hi,
I initially want to thank you for the posts you have put up.
I have tried this method for taking the screenshot and it worked for me. But there is an issue with the size of the screenshot. It just takes a part of the screen. Should we configure any settings to get the entire screen or do anything else.
Please do suggest the actions.
Thanks
Revanth Tej
Evonsys
US
Hi suncr,
Please perform following steps.
1.) Open up the snipping tool and capture an image of the entire screen visible. Save it in your PC.
2.) Right click on that file and click on 'Properties'.
3.) In the 'Details' tab you can see the dimensions of that image. Note down the 'Width' and 'Height' values.

4.) Same way, get the 'Width' and 'Height' value returned by your your automation's 'Rectangle' object. For this you must add watches and run the automation in the debugging mode with break points.
Hi suncr,
Please perform following steps.
1.) Open up the snipping tool and capture an image of the entire screen visible. Save it in your PC.
2.) Right click on that file and click on 'Properties'.
3.) In the 'Details' tab you can see the dimensions of that image. Note down the 'Width' and 'Height' values.
4.) Same way, get the 'Width' and 'Height' value returned by your your automation's 'Rectangle' object. For this you must add watches and run the automation in the debugging mode with break points.
5.) Now compare these values and see whether any differences can be observed.
If they are different, then the 'Screen' proxy extracted from System.Windows.Forms.Screen.PrimaryScreen cannot be used to succeed the automation and another approach needed to solve your issue.
If they are same, then I need to check my automation to see where I have gone wrong and how can I enhance it to handle such exceptional scenarios.
Thank you.
Andrew.
Verizon
IN
Hi Andrew,
Thank you so much..!! It worked.
But, is it possible to get the whole page as a PDF Stream ?. If possible, what are the components that we can use for it?.
Thanks,
Sethuraman.R
Evonsys
US
Hi SethuramanR,
I have two approaches to meet your requirement.
1.) Using 'Microsoft Print to PDF'
2.) Using html2canvas
Approach 1:
The 'Microsoft Print to PDF' is a printer that you can install in a windows environment. In your automation you can complete following steps.
i) Set the default printer as 'Microsoft Print to PDF' from an automation script. You can check whether it is set to default from the control panel as depicted below.

ii.) Once the screen is loaded, get the print window.
Hi SethuramanR,
I have two approaches to meet your requirement.
1.) Using 'Microsoft Print to PDF'
2.) Using html2canvas
Approach 1:
The 'Microsoft Print to PDF' is a printer that you can install in a windows environment. In your automation you can complete following steps.
i) Set the default printer as 'Microsoft Print to PDF' from an automation script. You can check whether it is set to default from the control panel as depicted below.
ii.) Once the screen is loaded, get the print window.

ii) Interrogate the required controls and then you can save the screen as a PDF.
Approach 2:
If your requirement is not specific, you can capture the screen in a different manner. The following website gives you all the information you need.
https://html2canvas.hertzen.com/
Here, it describes how you can use html2canvas() javascript method to capture the website content. It will return a canvas object and you can save it as an image or even convert it to a base64 string.
This requires two tasks.
i.) Downloading htmlt2canvas.js and adding it to your automation.
ii.) Passing the parameters correctly to html2canvas() method. (refer the documentation)
Using pega robotics studio, you can add a javascript method to the solution.

And then you can invoke javascripts using the following functions.

Hope this helps :)
Cheers.
Pegasystems Inc.
IN
Hi,
I found this article very useful. I would also like to know, if we can create an image and save it directly making use of the same automation mentioned, rather than getting the Base64string?
Can u please provide suggestions on that
Regards
Revanth Tej
Evonsys
US
Hi Revnath Tej,
Yes, we also can save the Bitmap object as an image. Please perform following steps.
1.) For your requirement, remove only the following code blocks in your automation which are highlighted in red (only three).

2.) Continue the event links from that point to the code below.
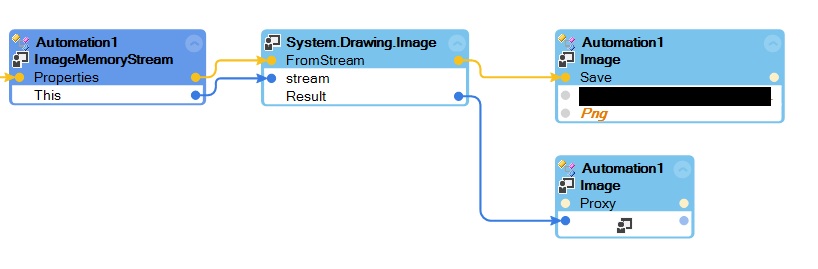
The 'FromStream' method used in the above automation code is a static member that you need to add into the Toolbox as same as when adding any other pega robotics static member. The assembly to select is 'System.Drawing' version Proprietary information hidden and it is available under the 'Image' tree.
Hi Revnath Tej,
Yes, we also can save the Bitmap object as an image. Please perform following steps.
1.) For your requirement, remove only the following code blocks in your automation which are highlighted in red (only three).
2.) Continue the event links from that point to the code below.
The 'FromStream' method used in the above automation code is a static member that you need to add into the Toolbox as same as when adding any other pega robotics static member. The assembly to select is 'System.Drawing' version Proprietary information hidden and it is available under the 'Image' tree.
After extracting the proxy, use it to invoke the 'Save' method which has two parameters. The first parameter is to enter the file name and the second one is to specify the image type. Hope this helps.
Cheers.
Andrew.
Boubyan Bank
KW
Navy Federal Credit Union
US
Hi Andew,
Can you please explain on how to attach the screenshot from RPA to a platform case