Discussion
Pegasystems Inc.
US
Last activity: 1 Dec 2023 2:40 EST
Pega Robotics - Excel How To
This series of posts will demonstrate how to use Pega Robotics to automate using the Excel connector. If you follow along and add the automations that we will build in this series into a solution you should end up with a reusable library for automating Excel. In order to automate we will need to understand some fundamentals.
Fundamental #1 - Proxy
When an object has properties that are complex objects, in order to access the Properties, Methods and Events of that property you must extract a proxy. To extract a proxy, right-click on the blue dot and choose Extract Proxy from the context menu.

Fundamental #2 - Casting
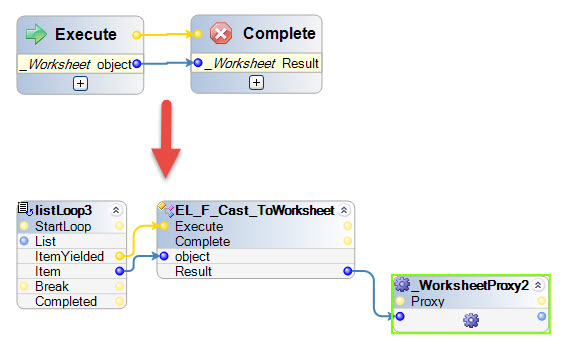
Often you may need to iterate through a collection to find the correct object. This is typically done using a ListLoop. The item yielded may be of the correct Type or it may be a generic object. If the ListLoop outputs a generic object, casting the object to the correct Type will render an object that you can extract a proxy from and work with. Pega Robotics can perform this cast operation automatically using a simple trick. Set up an automation that accepts and outputs an object of the required Type and then just pass your object in to it.
Fundamental #3 - Excel Object Model
To work with Excel a basic understanding of the object model is required. It is not complicated, but required to do anything more complicated than reading and writing a cell. What you will use will be principally the following objects:
- Excel Application - this is the top level of the hierarchy and can be used to control the application itself
- Workbooks - the Excel connector can work with a single workbook at a time
- Worksheets - a workbook can contain multiple worksheets, the Excel connector works with the active worksheet
- Range - a range is a collection of cells, it may be a single cell or an entire worksheet or something in between
- Cells - a cell belongs to a range and is the individual cell you see in Excel
To find documentation on Properties, Methods and Events for any of these, search Google using a search string such as "C# Excel Interop worksheet". This should return an article in MSDN which provides you details and some C# code samples.
Starting with the next post we will start to build automations for our Excel library.
***Updated by moderator: Lochan to add FAQ Group Tag***
**Moderation Team has archived post**
This post has been archived for educational purposes. Contents and links will no longer be updated. If you have the same/similar question, please write a new post.
-
Share this page Facebook Twitter LinkedIn Email Copying... Copied!
Pegasystems Inc.
IN
Pegasystems Inc.
US
Now that we have an understanding of the fundamentals, let's create 3 automations that we will use to perform Casting. We will need to cast to Workbooks, Worksheets and Ranges.
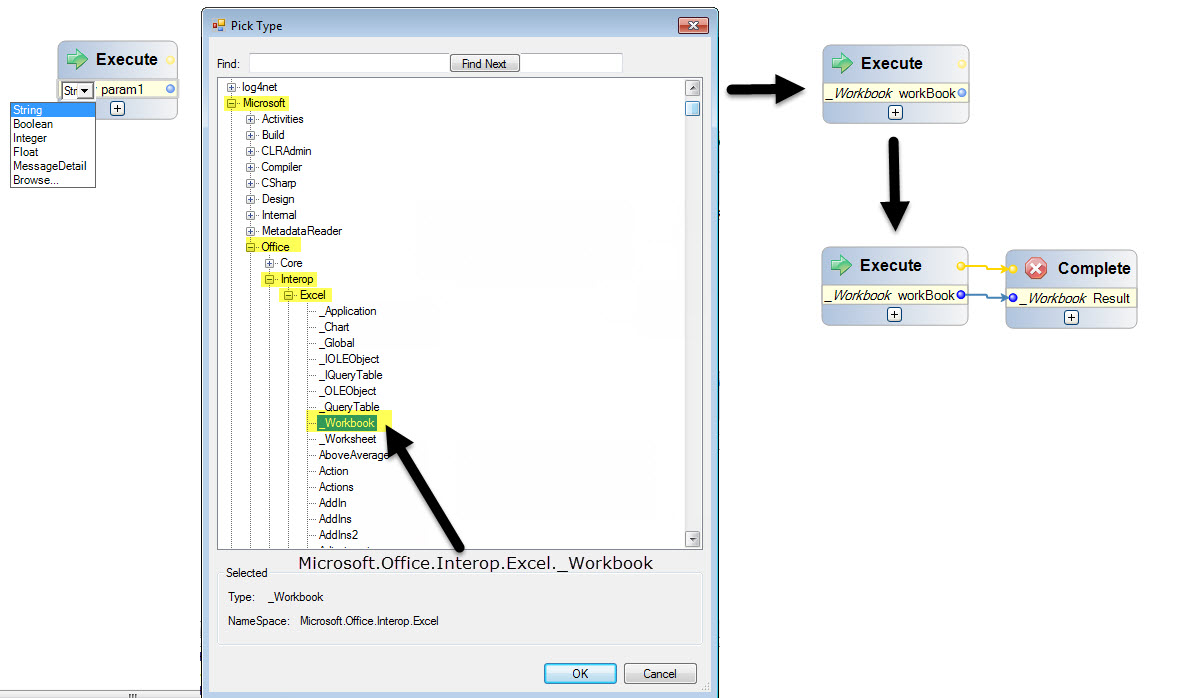
The first automation we will create will be called EL_F_Cast_ToWorkbook. We need to add a parameter to the Entry Point. In the Type column, click Browse and set the type to Microsoft.Office.Interop.Excel._Workbook. Add an Exit Point to the automation and set its Result type to the same. Now connect the Entry Point and Exit Point together and the automation is complete. It should look like this.
Now we will do the same for worksheet and range. The type for each is similar:
- For worksheet pick: Microsoft.Office.Interop.Excel._Worksheet
- For Range pick: Microsoft.Office.Interop.Excel.Range
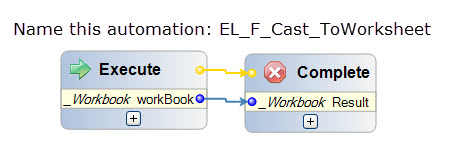
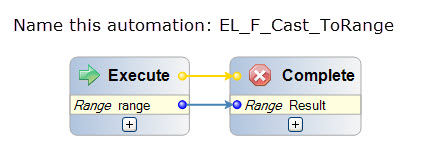
These two automations should look like this:
Now that we have an understanding of the fundamentals, let's create 3 automations that we will use to perform Casting. We will need to cast to Workbooks, Worksheets and Ranges.
The first automation we will create will be called EL_F_Cast_ToWorkbook. We need to add a parameter to the Entry Point. In the Type column, click Browse and set the type to Microsoft.Office.Interop.Excel._Workbook. Add an Exit Point to the automation and set its Result type to the same. Now connect the Entry Point and Exit Point together and the automation is complete. It should look like this.

Now we will do the same for worksheet and range. The type for each is similar:
- For worksheet pick: Microsoft.Office.Interop.Excel._Worksheet
- For Range pick: Microsoft.Office.Interop.Excel.Range
These two automations should look like this:
Now that we have some utility automations ready, the next step will be to actually do something with Excel. The next post will show how to find a worksheet by name.
GE
IN
Hi Jeff,
I am unable to find the office inside Microsoft as per the screenshot mentioned above. Can you help me resolve this issue ?

Pegasystems Inc.
US
First, you must have Office installed on your machine. Then make sure you have Microsoft Office support enabled for Studio? You will need both. To be sure that Microsoft Office support is enabled go to your %appdata%\OpenSpan folder and edit StudioConfig.xml. Check the OfficeVersion key and make sure it agrees with the version of Office installed on your machine. It looks like this:

Updated: 12 May 2017 5:18 EDT
GE
IN
Hi Jeff,
I tried editing the Studioconfig.xml file to 2016 which is the version of Microsoft excel I have installed in my system. Unfortunately that did not work. So I uninstalled and installed the openspan again this time with office integration of 2016 which is present in my system.

Still the browse option in entry point does not contain the Microsoft.office
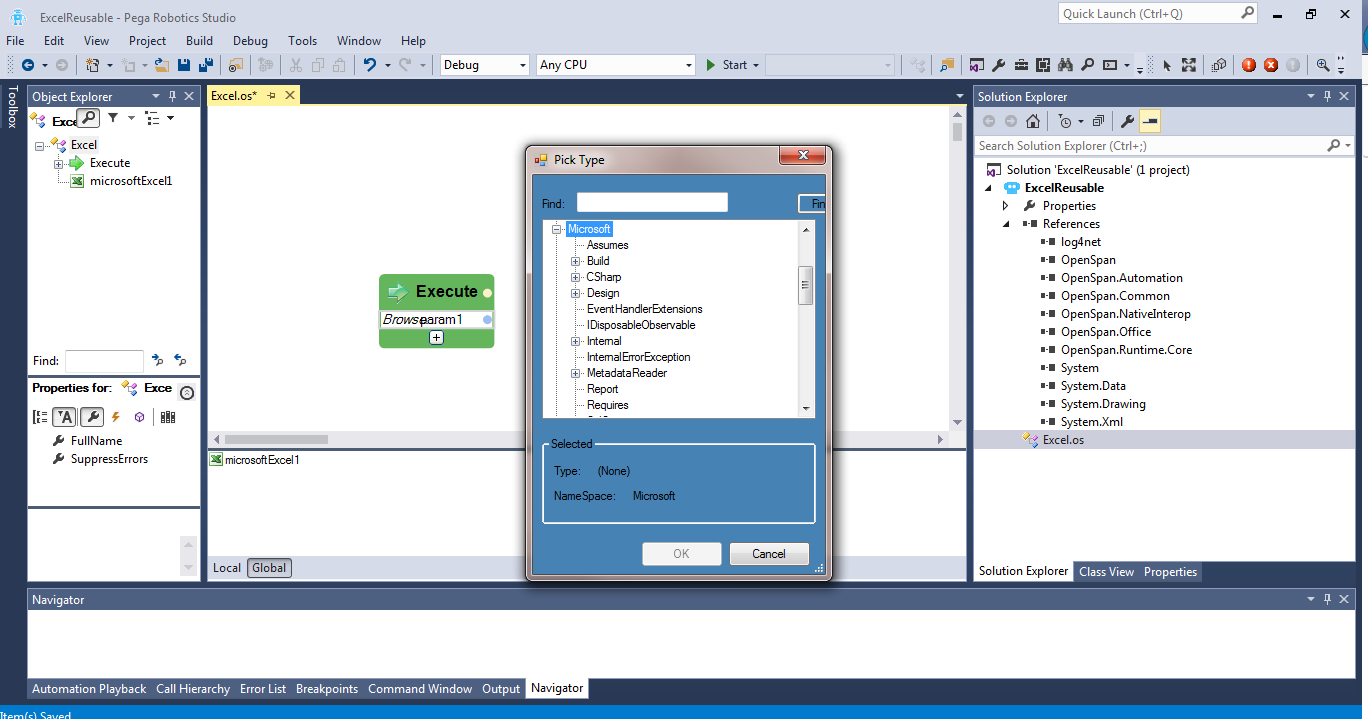
Thanks in advance,
Bargavi
Pegasystems Inc.
US
Is Office installed on the machine?
GE
IN
Yes office is installed on the machine. What else needs to be checked ? Please let me know the steps to debug the problem.
GE
IN
Also when i add a excel connector to an automation , the properties of the microsoftexcel shows supported name as office2010 although i have given the studioconfig.xml with <add key="OfficeVersion" value="2016" />. I have microsoft excel 2016 version installed in my system. Where do i check why this connector is taking 2010 rather than 2016 ? Let me know steps to debug it
Evonsys
US
Hi Jeff,
Ms Office 2013 is installed in my PC. and i have also set the office version to 2013 in Studio config. But still the office option is not visible inside the "Pick Type". please refer the attached screenshots.
regards,
Andrew.
Pegasystems Inc.
US
Make sure you have the following files in your install folder (where Pega Robotics Studio is installed). If these are missing copy the contents of the Office2013 folder (found in the install folder) into the install folder.

Evonsys
US
Hi Jeff,
I checked both Studio installation folder and "office2013" folder. Files are there as you mention. This may be any other missing configuration. Any Clue on this? Please refer the attachments.
Regards,
Andrew.
Evonsys
US
Hi Jeff,
I was able to resolve the Issue. What I did was, simply completing the steps in the attached screenshots stating from Step1.png, Step2.png, Step3.png.
After completing the steps, I clean and rebuild the solution. Also I closed the Studio and then opened again. then the "Office" option was visible in the "Pick Type" window as shown in the attachment picktype.png.
regards,
Andrew
Areteans Technology Solutions
AU
Hey Andrew,
This worked perfectly! Thanks :)
UHC
US
Thank you Andrew!
Pegasystems Inc.
US
In this post we will build an automation that will return a worksheet by name. We will name this automation EL_F_Worksheet_GetByName.
Before creating this automation, we need to add a Windows static method to our Toolbox. To do this, right-click on the Toolbox and select Choose Items. Next select the OpenSpan Static Methods tab. On this tab choose the From Global Assembly Cache radio button and then select mscorlib, Version= Proprietary information hidden in the Assembly dropdown. Finally, scroll down until you see String and check the checkbox next to Equals. This will add the String.Equals method to the Toolbox which will use in this automation.

Now we will build our automation. The Entry Point will accept an OpenSpan.Office.MicrosoftExcel object (you will pass your Excel connector to this parameter) and a string with the sheet name. Add a Counter object to the automation and name it "sheetCnt" and add a string variable named "msg" as well. These should both have Local scope. In the Object Explorer, choose the excel parameter and then select the ExcelWorkbook property.
In this post we will build an automation that will return a worksheet by name. We will name this automation EL_F_Worksheet_GetByName.
Before creating this automation, we need to add a Windows static method to our Toolbox. To do this, right-click on the Toolbox and select Choose Items. Next select the OpenSpan Static Methods tab. On this tab choose the From Global Assembly Cache radio button and then select mscorlib, Version= Proprietary information hidden in the Assembly dropdown. Finally, scroll down until you see String and check the checkbox next to Equals. This will add the String.Equals method to the Toolbox which will use in this automation.

Now we will build our automation. The Entry Point will accept an OpenSpan.Office.MicrosoftExcel object (you will pass your Excel connector to this parameter) and a string with the sheet name. Add a Counter object to the automation and name it "sheetCnt" and add a string variable named "msg" as well. These should both have Local scope. In the Object Explorer, choose the excel parameter and then select the ExcelWorkbook property.
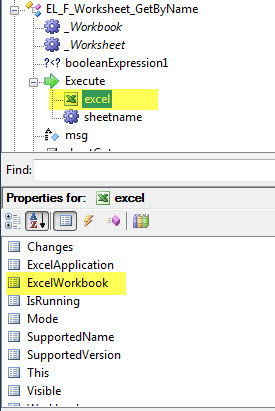
Now build out the first line of the automation as you see below.

We now have a proxy for the Worksheets in the Workbook and a counter with the number of sheets found. Now build out the rest of the automation. It should look like this.
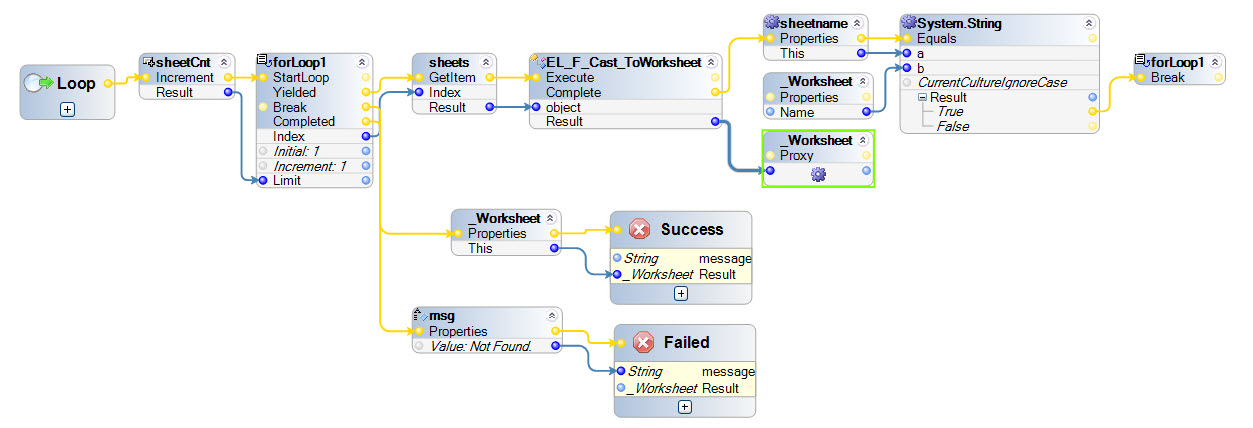
Excel collections are not zero-based, they are one-based. This means that the first sheet would be index number 1. So our ForLoop to iterate through the sheets must loop from index 1 to index sheets + 1 to examine every sheet. To accomplish this, we use the Increment method of the Counter object to add 1 to the sheetCnt. We then set that value to be the loop limit (right-click on the loop limit and choose Reset Changes to enable it).
The ForLoop outputs an index value which we pass to the GetItem method of the sheets proxy. This returns an object which must be cast to a worksheet. Here we use our utility automation. Extract a proxy from the Result of the cast to get a _Worksheet object. Now all that is required is for us to compare the name property of that object to the sheetname we passed in to the automation. If the names match we Break the ForLoop and control passes from the Break to the Success Exit Point and we pass the _Worksheet proxy to the Result. If the loop does not get broken control will pass to the Failed Exit Point with no _Worksheet proxy. The Result parameter type is Microsoft.Office.Interop.Excel._Worksheet.
So how do we use this. First we open a workbook using the Open method of the connector then we can do the following.
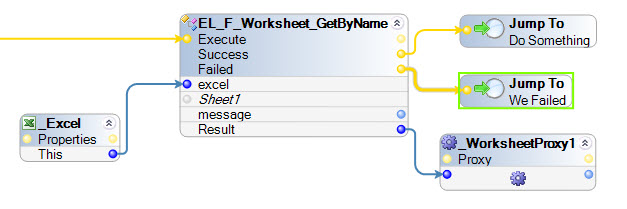
The next post will show how to use this to determine the Used Range of a worksheet.
Mphasis
US
How to pass the Excel Connector to the parameter in entry point??
Pegasystems Inc.
US
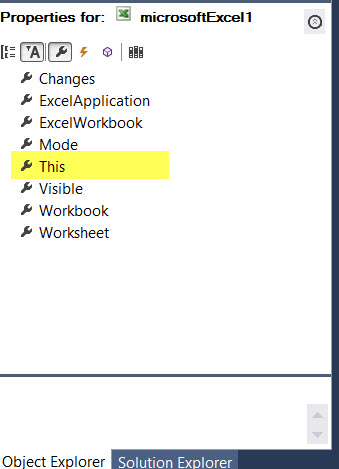
This is done using the This property of the connector. Passing the connector in allows you to write generic automations that can be re-used in many projects.
UHC
US
Hi Jeff.
I added an Excel Connector in a global container under the project (at the project level). When I try to drag the "This" property of the connector to the Execute/Entry block, it just creates another block. Would you mind doing a bit more explaining to get me straightened out here?
Pegasystems Inc.
US
Dante,
You need to add a parameter to the execute block. You do this by clicking the plus - and then choosing Browse.
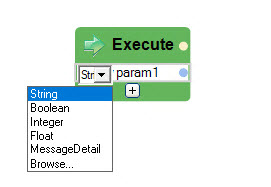
When the browse window open, choose Microsoft --> Office --> Interop --> Excel --> MicrosoftExcel
This will add the parameter to your Execute block - now when you call the automation you can attach the "this" property to the Execute parameter.
Jeff
Evonsys
US
Hi Jeff,
I'm unable to set the current sheet count as the limit the loop will run. in your automation you have done it successfully. Therefore currently, I hard coded the limit as 3. Please refer the attachment. I'm using Robotic Studio 8.0.1016.0. Any idea how to complete this?
Regards,
Viduranga.
Mancera S.C. Ernst & Young
MX
I think this can help, haven´t run it yet, but make sense to me.
Mancera S.C. Ernst & Young
MX
Only need to Reset Changes, it will change the "Constant" to "Variable" (Blue dot Disabled to Enabled)
It appliest to any block
Astolfo
HCL technologies
IN
Hi,
I am unable to find the Office -> in OpenSpan root. "OpenSpan.Office.MicrosoftExcel object " Could you please guide me.
I already added reference like Microsoft.office.interop.excel in references and clean the solution, build the solution, later closed and reopened. after that also no luck...
Thanks,
srinivas
Pegasystems Inc.
US
In this post we will build on our previous automations to build an automation that will return the number of columns and rows that have data in a worksheet. We will name this automation EL_F_Worksheet_GetUsedRange.
We will create an Entry Point and 2 Exit Points for this automation. The Entry Point will accept our Excel connector and the sheet name.
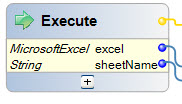
The Exit Points will be called Success and Failed and will return a string named message, an integer named rows, an integer named columns and a Microsoft.Office.Interop.Excel.Range object which will be the used range.
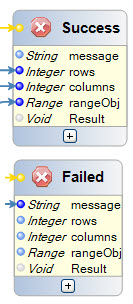
Add 2 integer local variables, name them rowsCnt and columnCnt. The automation will look like this.
In this post we will build on our previous automations to build an automation that will return the number of columns and rows that have data in a worksheet. We will name this automation EL_F_Worksheet_GetUsedRange.
We will create an Entry Point and 2 Exit Points for this automation. The Entry Point will accept our Excel connector and the sheet name.

The Exit Points will be called Success and Failed and will return a string named message, an integer named rows, an integer named columns and a Microsoft.Office.Interop.Excel.Range object which will be the used range.

Add 2 integer local variables, name them rowsCnt and columnCnt. The automation will look like this.


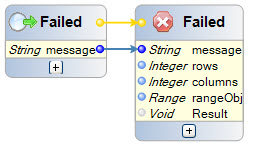
So what we have done here is used our automation to find a worksheet by name to return a _Worksheet object. That object has a UsedRange property. We extract a proxy for this property and now we can examine the Rows and Columns property which have a Count property each, to find the number of rows and columns in the used range.
Infosys Limited
US
Hi Jeff,
I was able to run the automation related to sheet name comparison successfully. But when I try to access the usedrange property of the worksheet, I am getting exception. Need your help to understand what is the issue. I have attached the screen shots for reference
Pegasystems Inc.
US
Please show us your whole automation so that we can see what you are doing.
Infosys Limited
US
Hi Jeff,
Please find the complete function automation
Pegasystems Inc.
US
In this post we will build an automation that converts a number (number of columns) to an Excel column letter. For instance, simple conversion works like this 1=A, 2=B, 3=C, etc. This gets a little more complicated though if you have 28 columns which you need to represent as AB. This is done by using the Modulus operator in C# which returns the remainder of a division operation.
So, if we have 28 columns we set our dividend to 28. We divide the dividend minus 1 by 26 to get the remainder - (28-1) / 26 returns a remainder of 1. Using some character math we now add 1 to the character A which return B. This will be the last letter in the address B. Next we subtract our remainder from our dividend (28 - 26) and divide by 26 and the quotient becomes our new dividend. We perform this operation until our dividend is 0 - each time placing the new character at the front of our string. Therefore on our second pass we get the character A and the new result of AB.
In C# this is pretty simple - it looks like this:
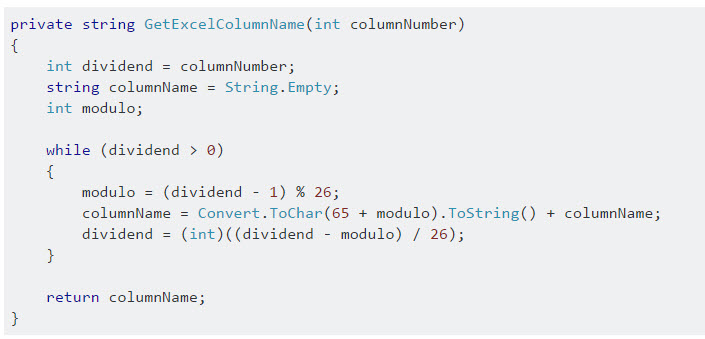
We can add this as a script to a script container and use as needed. However, how would we do this using the components available in Pega Robotics?
In this post we will build an automation that converts a number (number of columns) to an Excel column letter. For instance, simple conversion works like this 1=A, 2=B, 3=C, etc. This gets a little more complicated though if you have 28 columns which you need to represent as AB. This is done by using the Modulus operator in C# which returns the remainder of a division operation.
So, if we have 28 columns we set our dividend to 28. We divide the dividend minus 1 by 26 to get the remainder - (28-1) / 26 returns a remainder of 1. Using some character math we now add 1 to the character A which return B. This will be the last letter in the address B. Next we subtract our remainder from our dividend (28 - 26) and divide by 26 and the quotient becomes our new dividend. We perform this operation until our dividend is 0 - each time placing the new character at the front of our string. Therefore on our second pass we get the character A and the new result of AB.
In C# this is pretty simple - it looks like this:

We can add this as a script to a script container and use as needed. However, how would we do this using the components available in Pega Robotics?
Step 1# - create an automation named EL_F_Column_GetLetter and the following local variables:
- dividend - type of integer
- modulo - type of integer
- columnName - type of string
Step #2 - add the code to start the automation and test for dividend greater than zero

Step#3 - add a Loop jump label, a ForLoop component and the numeric expressions shown below

Step #4 - add the rest of the logic required to finish the loop operations

Step #5 - add an Exit jump label and finish the automation
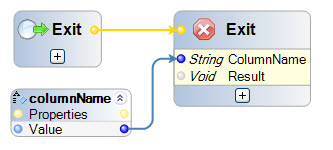
The final automation looks like this. It will take a column count and return the column letter combination required for Excel.

Infosys
IN
Pegasystems Inc.
US
In this post we will export a worksheet to a datatable. First we need to create a new automation - call it EL_F_Range_Export. We will pass it the upper left cell to start with, the lower right cell to end with and whether or not to use the first row as column names for the data table. Here is this simple automation:
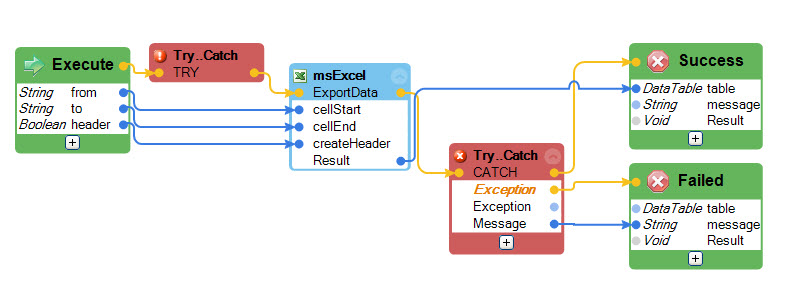
Using our previous automation we can determine the used range for the worksheet and convert the row and column counts returned to an address which is the lower right corner of the data. Then we can pass the coordinates for our range to our new automation which will return a datatable. This is all it takes:

If we are going to store the result in a LookupTable component, make sure that the first column is a unique identifier (this will be the primary key for the LookupTable) and that the column names match exactly what you have set up in the LookupTable.
Synechron Technologies Pvt. Ltd.
IN
In automation EL_F_Range_Export, how do we get msExcel instance?
I am getting error "GetWorkingInstance() could not get instance from TypeProxy. Instance name: excel" when trying to execute ExportData function.
Datacom
AU
Could you please mention where should I add this last piece of automation that you have shown in this post.
I have created a new automation named *_Convert_Datatable where I have written the last automation but I am just clueless what should I pass as the parameter as I am getting invalid cast type error when I am passing the excel "this" or "workbook" as parameter into this automation.
Pegasystems Inc.
US
You need to make sure that your Excel document is opened and set to the correct worksheet first (call the Open method and then set the Worksheet property). Has that been done first?
Synechron Technologies Pvt. Ltd.
IN
Yes, excel is open, I did that part. I am able to get the range properly using other automation.
Pega_P_WorkSheet_GetUsedRange
Pega_P_Worksheet_GetByName
Pega_P_Cast_ToWorksheet
Pega_P_Column_GetLetter
But in Pega_P_Range_Export, I am not getting the excel instance and getting the above error.
Pegasystems Inc.
US
The msExcel object in that automation is the Excel connector. You simply grab it from your global container where it is stored. It needs to be the same one you are opening and setting the worksheet on.
Synechron Technologies Pvt. Ltd.
IN
Done...!! Successfully implemented the solution given in this post. Its great article, very helpful. Thanks!!
Intel Corporation
CR
Pravin can you share the solutions you created and how to tested?
Infosys
IN
Hi,
I am trying to find the value from the range object as attached in sample image. But it is not return the value.
Provided value for 'what' and missing value for other properties.
Don't know how to set values for lookin , lookat etc.
Please help me.
Capgemini
US
I am an issue with accessing the count of worksheets. Please let me know how to get it.
Pegasystems Inc.
US
The count is a property of the proxy you extracted from the previous step. You just need to click on the proxy you extracted from the Workbook.Worksheets property in the earlier step and add the count from the lower section of Object Explorer where you get all the other Properties Methods and Events.
Capgemini
US
Thank you for the response. Now I am facing another issue. Not able to connect the Result parameter output to the DataTable input param of the end point. Screenshot is attached.
Also how do I view the datatable with the exported results from excel?
Pegasystems Inc.
US
Is your result type System.Data.DataTable? That works for me.
The easiest way to view a DataTable is to send the results to a DataGridView control on a Windows Form. You can easily do this by passing the table to the DataSource property of the DataGridView.
Capgemini
US
Yes the Result type is Data table. Please see screenshot. If the types are matching I should be able to connect. Surprisingly I am able to connect Result with the string type in the exit point shape.
Please suggest what could be the issue
Pegasystems Inc.
US
I do not have any suggestions for you. The result type from that method is System.Data.DataTable. If you have setup your exit point parameter correctly, it should work. You might try recreating the automation from scratch to see if you have corrupted something. I was not able to reproduce your problem. I have attached screenshots.
Infosys
IN
Hi Sasnt,
Let me know how to find the value is exist or not in excel using used_range. I attached screenshot in previous posts.
Pegasystems Inc.
US
I'm sorry, I do not understand your question. Would you please restate it? I would suggest you create a new post and elaborate your question with more detail as well.
Capgemini
BR
Hi sasnt
I'm testing the DataGridView component as you've suggested. But how can I iterate between cells? I've searched for that in but I did not find any content about it.
Sorry if it's a simple question. I'm new using Robotics.
Thank you
Pegasystems Inc.
US
Marco,
Please elaborate on what you are doing (but please do so in a new post as this one is deviating from the original question).
Comptech Associates Inc
US
With the Excel Connector, it does not appear possible to directly get access to an Excel workbook that is already open on a user's desktop. There are circumstances when this might be desirable such as when a user selects download from a website but does not want to save the Excel file so selects "Open" rather than "Save" or "Save As". [And yes, I know that the contents are saved somewhere in the user's profile but I don't want to mess with that.] The snippet of code below shows how to find all open workbooks and use the Excel Connector to interact with them.
The process begins by adding "GetActiveObject" to the Toolox. To do so, right-click on the Toolbox, select "Choose Items...", select the Pega Robotics Static Members tab, then the From Global Assembly Cache radio button, then find "mscorlib.dll, Version Proprietary information hidden", then find and expand Marshal, and put a checkmark on GetActiveObject and click OK. [Whew!]
Drag GetActiveObject onto your automation. Change the ProgID to "Excel.Application". You can use Jeff's method for casting the output of GetActiveObject as shown above, but I have had success by (temporarily) dragging the "ExcelApplication" property of the Excel Connector I am using, right-mouse clicking on it to extract a proxy, then renaming it to "_ExcelProxy1". Once I have the proxy, I disconnect it from the ExcelApplication and connect it to the GetActiveObject, and delete that ExcelApplication tile. Voila! I have cast the object as an ExcelApplication!
The workbooks property of the _ExcelProxy1 will give you a list of open workbooks. Please note that this did not work when I tried to use it on Citrix, and I haven't the resources to investigate properly. But then we know Citrix is a little weird...
Incidentally, I learned more than I expected about Listboxes. If you set the DisplayMember property to "Name" and add the actual object to the Listbox, you have the situation where if you click on one of the entries, you can get the actual object instead of just the Name in the SelectedItem property of the Listbox. Maybe that just displays my lack of education and experience with .NET, but I found it made everything easy and wanted to pass it on.

With the list of workbooks in one Listbox, the code to list the worksheets in the selected workbook in a second Listbox is straightforward and even elegant. Note that the casting as a workbook is done with the method previously shown.
-
PH
Hi,
I'm a newbie here.
Just a quick question. Is there a readily available project where we can download these?
It will help a lot of people and save a lot of time and effort to read Excel file.
Thanks

Thanks Jeff!!
We are looking forward to this series of posts!
Regards,
Lochan | Community Moderator | Pegasystems Inc.