Selenium Grid integration with Scenario Testing Framework
What is Selenium Grid: Selenium Grid is a part of the Selenium Suite that specializes in running multiple tests across different browsers, operating systems, and machines in parallel.
Selenium Grid setup: A Selenium Grid is a combination of Selenium Hub and a set of Selenium Nodes. A simple Grid setup has Hub along with one node. Illustration here will be in context of this setup. Selenium jar of Version 2.46.0 is used for the Grid set up. And as of today Pega Scenario Test Framework supports 3.x and 4.x version of selenium as well.
The prerequisite for Selenium Grid setup is to get Java installed on the machines chosen to perform the setup.
In order to setup Selenium Grid using Selenium 2.46.0, a Selenium standalone server 2.46.0 jar is required to be downloaded from web. It can be downloaded from https://selenium-release.storage.googleapis.com/index.html
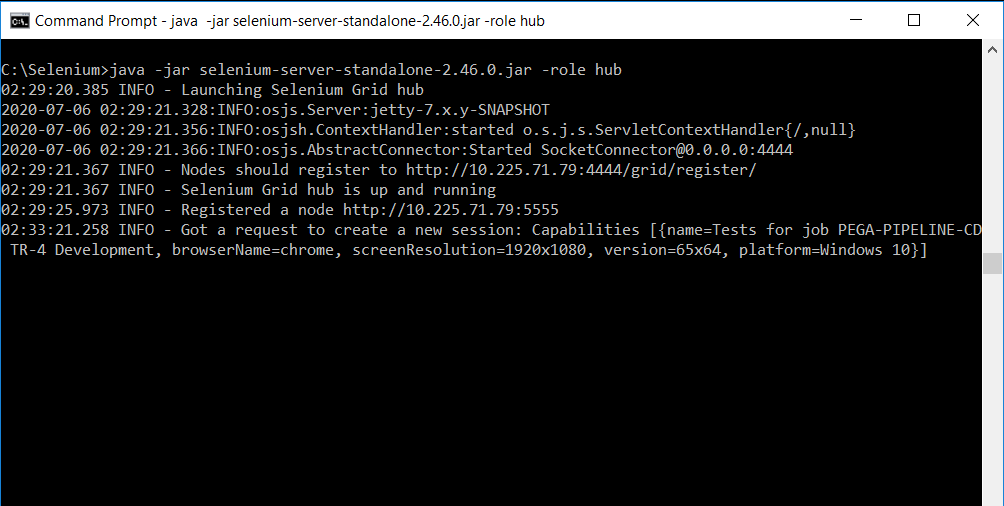
From the directory where this jar is downloaded, launch the command line interface and run the following script which takes care of brining the Hub server up.
Java -jar selenium-server-standalone-2.46.0.jar -role hub
The Hub server is on default port 4444. A specific port can also be configured by using including “-port” argument at the end of the command.

Picture-1
Before making the node server up, need to download a browser specific driver which is needed for Selenium Web driver to communicate with the specified browser. The drivers can be downloaded from web using the link http://www.seleniumhq.org/download/
Now to bring the Node server up, open one more command line interface instance, and run the following script (Considered chrome driver)
java -Dwebdriver.chrome.driver=C:\Selenium\chromedriver.exe -jar selenium-server-standalone-2.46.0.jar -role webdriver -hub http:// Proprietary information hidden:4444/grid/register/
Command above has included chrome driver. Since the browser chosen is Chrome, the driver is Chrome driver. Similarly, other driver path can be included in the command appropriately based on the browser chosen.

Picture-2
The command line interface trough which Hub is brought up, will show a message like the below, which can be seen in Picture-1.
“Registered a node http:// Proprietary information hidden:5555”
Here port “5555” is the default port of the node.
The status of the grid can be verified by accessing the grid console, which looks like the below.

Picture - 3
To verify whether the grid is setup properly or not, a sample script can be run. If browser session is created and the tests are run in it, the setup is successful. Or, ValidateSeleniumStandaloneSetup activity can be invoked by passing all required parameters to it. This lets us know if the setup done is proper or not. It also shows the exception (if any) encountered when one tried to invoke/run the tests on the grid console.
This utility activity is available when PegaTestAutomationKit component with Version 1.2 is added to Built-on applications. PegaTestAutomationKit is compatible with Pega 8.5 version onwards. Following is the link to download the component. https://community.pega.com/marketplace/components/pega-test-automation-kit
If there is issue in running the tests in grid, need to cross check the setup steps again.
Integration with Scenario Testing: Once the Grid is setup successfully, scenario tests can be run using it. Tests can be run by
- Configuring a task on Deployment Manager pipeline
- Configuring a Jenkins job
Here Deployment manager pipeline is chosen. On a Deployment manager pipeline, task named “Run Pega Scenario Tests” can be configured as shown with all the parameters related to candidate application login, Selenium grid and required capabilities.

Picture - 4
Params of the task:
User name: Log in user ID of System under test or Canidate application (SUT)
Password: Password required to log in to SUT
TestServiceProvider: “Standalone”
Provider URL: “<SeleniumHubURL>/wd/hub” (Make sure to enclose this URL always in double quotes as shown in Picture-4). This URL can be copied from Hub console logs. Some thing similar to “Registered a node http:// Proprietary information hidden:5555” will be shown there. Append “wd/hub” at the end of this URL. Then, it can provided as “Provider URL”.
Browser: Browser of choice
Browser Version: Required version of Browser
Platform: OS name (Ex: linux/ Windows10/XP)
Screen Resolution: Required screen resolution (Ex: 1920x1080)
Passing all the required capabilities specifically is more suggested as shown in Picture – 4.
Once the Pipeline report shows “COMPLETED” status against “Run Pega Scenario Tests” task, it can be inferred that execution of scenario tests from candidate application is completed. So, the execution details can be verified by going to the candidate application.
Similar configuration can be done on a Jenkins job as well.
Verification of Test results
The statuses, execution time taken by the test cases and the other details can be found by logging in to candidate application, going to Dev studio and launching Scenario Tests landing page. The page can be launched by clicking on the Scenario Testing icon which is a conical flask on the footer.
