Scenario testing: How to create, run & Edit test cases
Before using the Scenario testing tool, please make sure you have the previlige pxScenarioTestAutomation a part of your access roles and the DSS setting pzPegaSUT set to true and an unlocked ruleset to save the test cases recorded.
Along with this please make sure that all your UI components have unique data-test-ids generated. If you have created an application in the latest version of Pega using OOTB components, this should get generated by default.
A. How to create a scenario tests
1. Click on the Test icon. On clicking test icon right panel with existing tests and a recording button appears.
![]()
2. Click on Create test case button. On Clicking “Create test case” button user is presented with “Portal” and “Case Type” menu options
2.1 Portal menu option lets you record portal level test cases.
2.2 Case type menu option has all the case types defines for the application as sub-menus. If the user selects any of the case type then that case type is created and the right panel is refreshed with the Initiate case type step.

3. Once the user has selected the type of test he/she wants to create, an orange highlighter starts appearing when the user hovers over a supported element.

4. To record steps for the test, click on the supported element and as soon as the element is clicked right panel gets refreshed with that step.
4.1 Click on any element records an implicit assertion and can be seen by clicking on the gear icon beside the step on the right panel.
4.2 Users can add explicit assertions as well by clicking on the “+” within an orange highlighter. Once the user clicks on “+” icon an overlay with all the possible assertions will be displayed and can be selected from dropdowns.
Here is an example of an explicit assertion overlay for a button control :
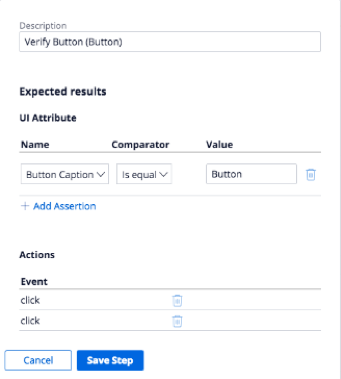
5.Once the recording is done click on Stop and Save test case. User will be presented with a new rule form, enter details and save the test. The test case can be saved in a branch as well as a ruleset. While saving the test cases in a ruleset make sure rule set is marked as a test ruleset.
Providing Dynamic data to the test case
We can provide dynamic data to the test case in the cases where we need unique values for each execution of the test case.
A predefined Data page D_pyScenerioTestDataof type Page is made available to the user through which he/she can provide the dynamic values.
User can populate the DataPage using any source(activity/Data Transform/...) and he/she is supposed to set the dynamic values in the source.
If we use a Data Transform say pyScenerioTestData to populate the DataPage, the Data Transform would look like

We can use the property populated above in the test case.
Provide dynamic data to the test case from test case rule form.
In this case, the test case needs to be recorded first.Then the dynamic data should be referred in the test case as shown below:

Next time the test case is run, we see that the "newdyncustomer" is entered in the Lastname field.We can also assert the dynamic values in the same way.
Provide dynamic data to the test case while recording:
The data which we have populated in the Data page can also be referred to while recording any test case.

Asserting CaseID' s using regex in test step assertions:
You can also assert the dynamic data like Case IDs which are not the same every time using a regex.This approach can be used when user need not want to assert the exact data but wants to assert the pattern of the data like CaseID.The data which changes needs to be replaced with {} as below:

B. Running a Scenario Test case
Once the test case is saved then it gets listed within the right panel. Once a user clicks on the test, the right panel gets refreshed and detailed steps are shown. The same panel has Run and Debug & Modify buttons.
Run Mode: Clicking Run would run the test in normal mode and if there is a step failure in this mode then test execution doesn't stop.
Debug & Modify Mode: Clicking Debug & Modify would run the test in debug mode.In debug mode if test step failure is encountered, test execution stops at that step and the user is presented with options to either Save(if there is any change done to test step) or Resume. Clicking Save would save and checkin the changes done to the step.


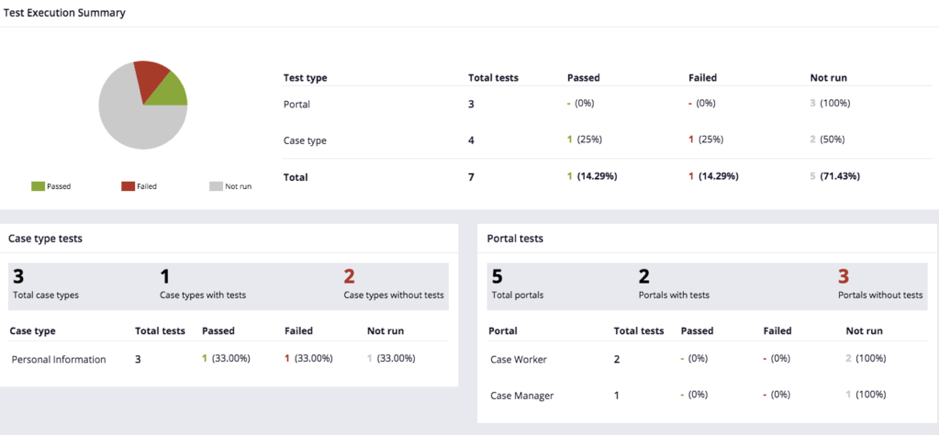
Test Case recorded and reports having test case execution can be seen under Application -> Quality -> Automated Testing -> Scenario Testing Landing Page.
Test Cases can be run from the landing page as well.

Note:
- Scenario tests cannot be run from the Actions > Run menu of the service rule form.
- Run option from the test case rule form is removed in the latest releases.
Configuring delay for the Scenario Test case Execution.
In some cases, we may want to purposefully slow down the execution of the test case whenever we need to debug the failures on a particular page. We have an option to delay the execution by the time the user wishes to.
Navigate to Application->Quality-> Settings
At the bottom of the page, we see an option to Configure delay for scenario test execution. Checking that option will provide you a field wherein the user can mention the time for which the execution of each step needs to be delayed in milliseconds and then save the Quality settings page.

C. Editing and updating a scenario test case:
A user can edit the scenario tests at two levels.
- Editing assertions in a step
- To edit assertions on a step click on the edit button of the test case
- On each step of the test case, you can see an edit icon on hover
- Click on the edit icon which displays an overlay with the recorded assertions
- A user can edit/ add/ delete the assertions on a particular step

- Editing steps in a Test case
To know about editing the steps in a scenario test click here
Do's and Don'ts while recording the Scenario Test cases
Do’s
- Wait till the step gets updated in the right panel.
- If something goes wrong while recording then cancel and re-record steps.
- Close the work item tab in the interaction portal after done with the test recording or record the closing of the tab as part of the step. Reset the portal by closing interaction or the case items created.
- Login and create case types manually before executing tests, so that pages are cached and render fast. This needs to be done if the server cache has been cleared and the server is restarted.
- Collapse right panel while recording, if any element which needs to be recorded is behind the panel. After recording expand the right panel again so that steps getting recorded can be seen.
- If there is an element that on hover shows there is no unique selector then it means either there is no data-test-id for that element or element is not supported by infrastructure. If it’s a supported element then generating Test Id should make that element recordable.
Don’ts
- Don’t rush through elements while recording elements involving ajax calls like cascading dropdowns, refresh actions, etc. Just wait for the UI to get updated and right panel to get refreshed with the step.
- Do not use autofill to enter data in forms.
Known limitations
- CSS styles on hover are not possible to capture now, for e.g., on hover assertions. On-hover action is not supported for capturing while recording a test case.
- Scenario testing can only be run in the requestor context. i.e., a user has to login to Pega and run the scenario tests
- Unlike selenium, Scenario tests cannot be run using different personas or logins. As we are tightly coupled with the requestor, once the user logs out, the scenario testing will end and we will not be able to continue running the same test with a different operator.
- A scenario test cannot be included in another scenario test, which is generally the case with other test frameworks that allow atomic level test cases to be included in the main test case.
- Scenario tests are portal dependent. i.e., once recorded on a portal, they cannot be run from a different portal. They have to run in the portal on which they are recorded.
- In order to run the scenario tests from the Deployment manager, customers should have accounts with third-party platforms like Cross Browser testing or an in house selenium grid which can take care of launching the Pega instance and logging the user into the portal.
- Attachments & uploading files and export to excel are not yet supported as they transfer the control to the native OS elements and so cannot be recorded.
- Multi select control is not supported as of now for recording
LTIMindtree
IN
Pegasystems Inc.
IN
Hi,
We don't yet have the support for complex actions like attachments and export to excel.
Pegasystems Inc.
ES
hI @NAQUS!
One question about Scenario Tests and dynamic data.
I'm working to configure a regression test suite to execute on different environments. I need use different setup data for each environment, so I'm getting the data from D_pyScenerioTestData data page.
I'm creating regression tests for different case types, so specialize this data page for each case type class being able to manage different test data for each different case type.
What I'm not sure how to manage is when I have to test different test cases for the same case type. Eg. I have two test cases for the same case type, happy and unhappy path. Each one of these test cases need different test data, getting in a dynamic way from D_pyScenerioTestData. Adding input parameters to D_pyScenerioTestData could be a good way to solve, but I tried it and it doesn't work.
What is the best approach to manage the scenario described above?
Thanks!!
Celgene Corporation
US
Are there SetUp and TearDown hooks within scenario testing. I would like to remove D_pyScenerioTestData so that it can reload with new values.
Pegasystems Inc.
US
Support for setup/cleanup is planned for a future release, likely 8.5 or after.
CareFirst Inc
US
I am using Pega 8.2.1, however I could not find data page D_pyScenerioTestData. How to enable this page?
Pegasystems Inc.
IN
Hi fengxiangc4852 ,
This data page can be used in 8.2.1, Can you try to search and open the data page from Records-> Data Model- > Data Page-> filter data page with name "D_pyScenerioTestData".
There are no steps for enabling this data page. you can directly use in your test case step as mentioned in the above explanation.
Infosys
IN
Hi,
Can you please provide steps to utilize this data page.
I am not getting a clear idea on how to call this data page and set values with it.
Pegasystems Inc.
IN
Hi SutirthoP,
There is one heading in this post explaining about "Providing Dynamic data to the test case" are you able to see that and able to follow it?
If you are not able to find out at a time, you need to click on "show more" to expand and see the full content.
But below are the high level steps to use data page D_pyScenerioTestData:
Step1: Open the data page D_pyScenerioTestData in your application.
Step2: Modify the source data transform with your property and values.
Step3: Use the D_pyScenerioTestData in the test case steps actions section with values as "D_pyScenerioTestData.newPropertyUsedInDataTransform".Thats it, let me know if you need further help on this.
Eai Systems
US
@NAQUS I have a query.I want to perfom functional test using automated scenario testing.How can we perform if you can provide steps will be helpful