Discussion
Pegasystems Inc.
US
Last activity: 27 Jan 2025 2:12 EST
Pega Infinity ’23 and Constellation UI offers faster and easier ways to configure dynamic form field behavior
Oh, hi! It’s me again. Earlier, we explored why you don’t need Action Sets in Pega Infinity’s Constellation UI architecture. And as an example, we explored configuring dynamic form field behavior without action sets by building cascading dropdowns.
In those explorations I had promised to write more about configuring dynamic form field behavior without action sets, specifically a new capability in Pega Infinity ’23 that makes it even easier and faster. And that’s what we'll explore in this article.
Let’s start with a typical use case pattern.
Pattern: Use my billing address as shipping address
You’ve seen this pattern, right? When purchasing something on the web, you must specify a billing address and a shipping address. If you’re lucky, the form offers a checkbox to make them the same, saving you from typing your address again.
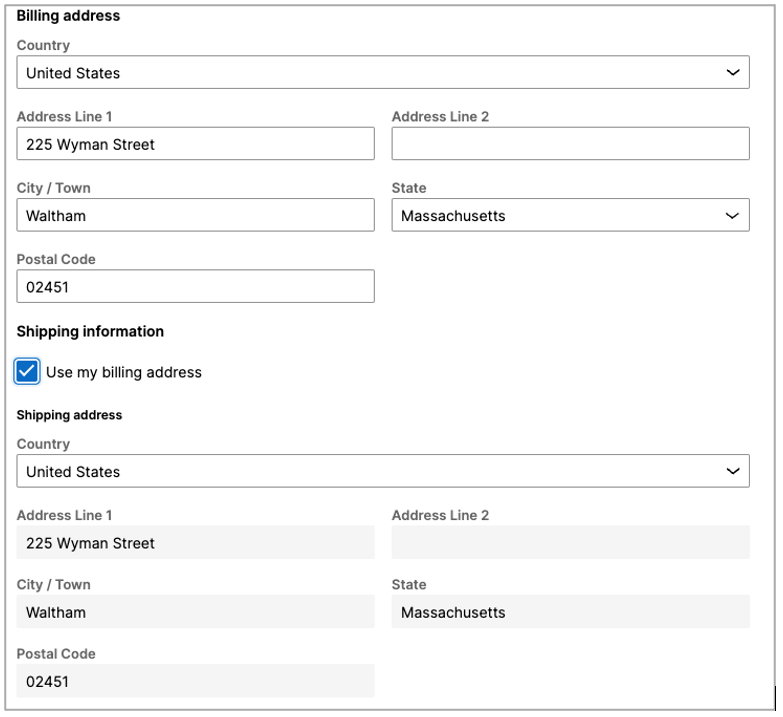
In Pega Infinity’s Section rule architecture, you probably implemented this by configuring an OnChange event on the checkbox control, then configured an Action Set to run logic to copy one address to the other, then refresh the section.
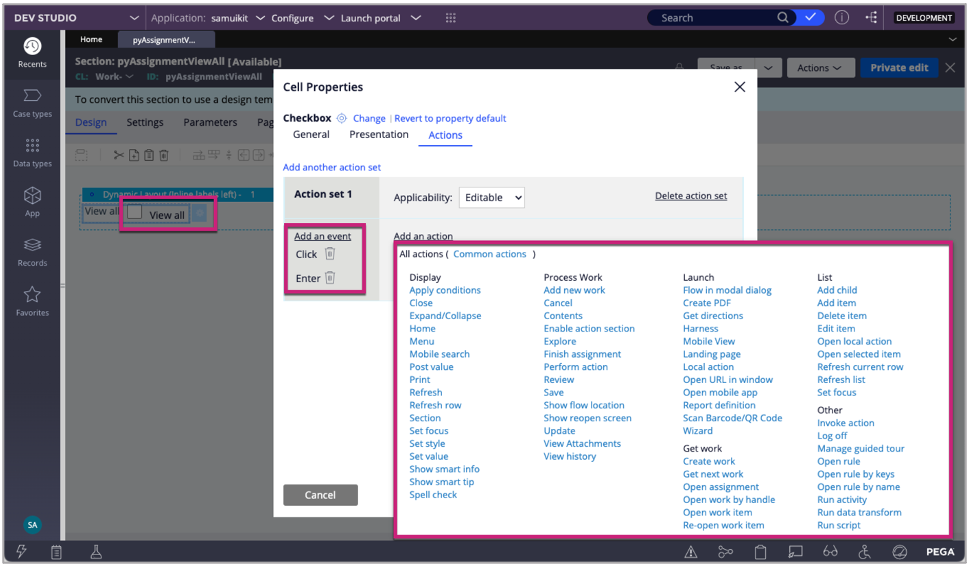
This is UI-centric and requires deep knowledge about “Pega UI” and front-end.
In Pega Infinity’s Constellation UI architecture, the name of the game is center-out, removing business and process logic from the channel and database and instead focusing on customers and the outcomes they want to achieve. In other words, configuring logic in the center, which makes your app resilient.
As an added benefit, application builders save time because Constellation configures the end to end, including the eventing on the form elements.
Let me show you.
The Workflow
We’re keeping it simple, ya’ll. The first stage is for selecting the parts you’re ordering, which I won’t show here because it’s irrelevant. The Collect billing and shipping step is where we’ll prompt for shipping and billing addresses.

The case’s data model
Super-simple. My “Order” case type has two fields: Billing Address and Shipping Address. Both fields are of type Address.
A property, UsingBillingAddress of type Boolean will help us know when to make the addresses the same.
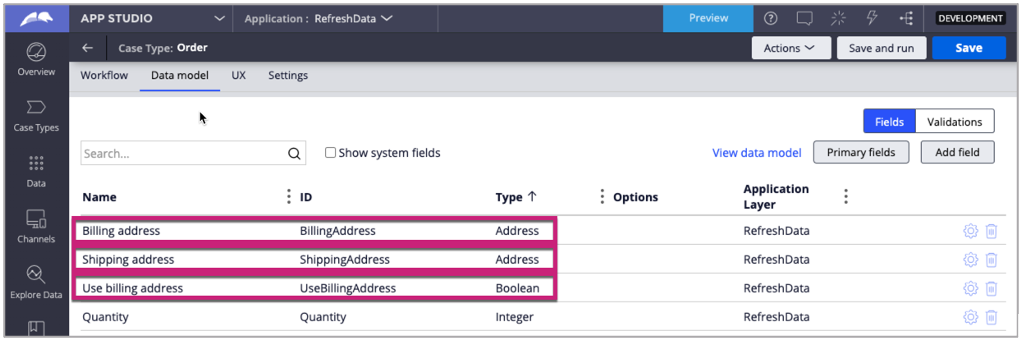
So far, so good. Now, let’s configure our form.
The Form View
Configure the View for this step.
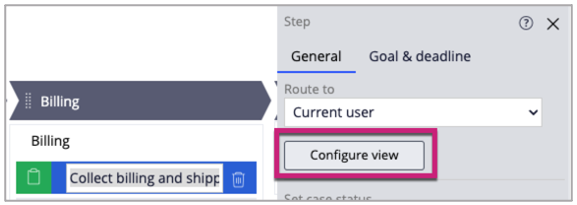
In the Form view, add the Billing Address, UsingBillingAddress, and Shipping Address fields, in that order.
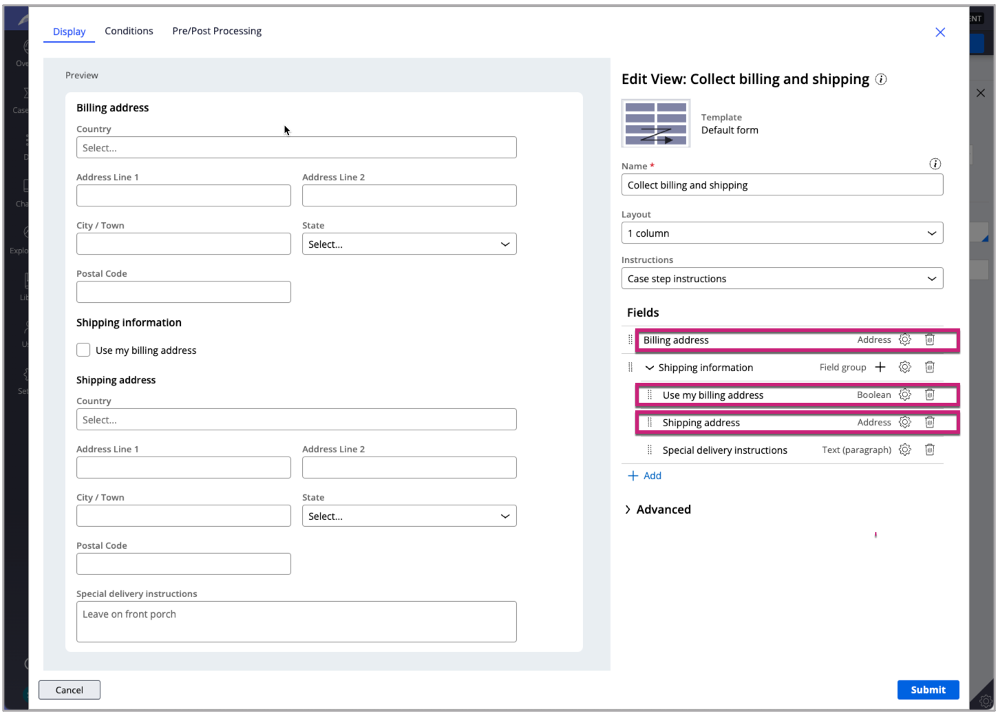
(As a side note and shameless public service announcement: Because you’re using App Studio and mapping case fields into a templatized layout, notice, in the screenshot above, the pixel perfect spacing between elements and the correct heading levels. What you can’t see is that responsive behavior and Accessibility best practices are also built in. It is significantly faster to build forms with Views rather than with Section rules, dynamic layouts, Skin formats, UI controls with action sets, and all the various property panels.)
Alright, ready for the fun, new stuff? Let’s easily configure the dynamic form field behavior so that when Use my billing address is selected the shipping address is automatically populated.
Don’t blink because it’s so fast to build this that you might miss it!
Configure dynamic form field behavior with the Flow Action and a Data Transform
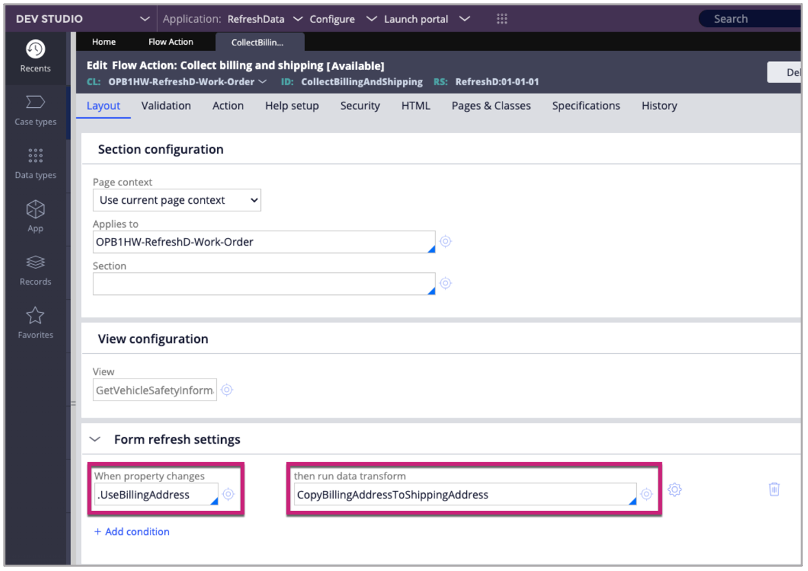
In Infinity ’23, “Form refresh settings” section on the Flow Action rules lets you specify properties to monitor for changes and data transform to run when they change.
In this Flow Action’s configuration, when “use billing address” property (the bound to the checkbox in our form) changes, run a Data Transform to copy the billing address to the shipping address.
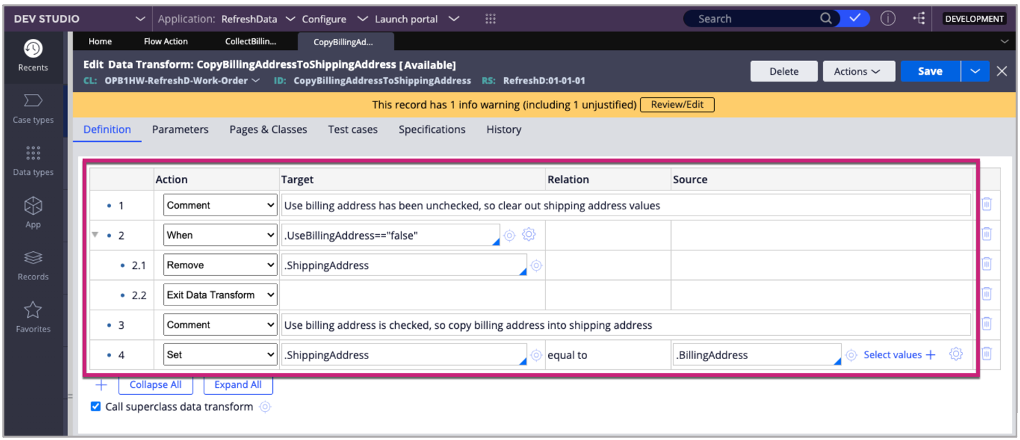
In pseudocode, here is what is happening in the Data Transform:
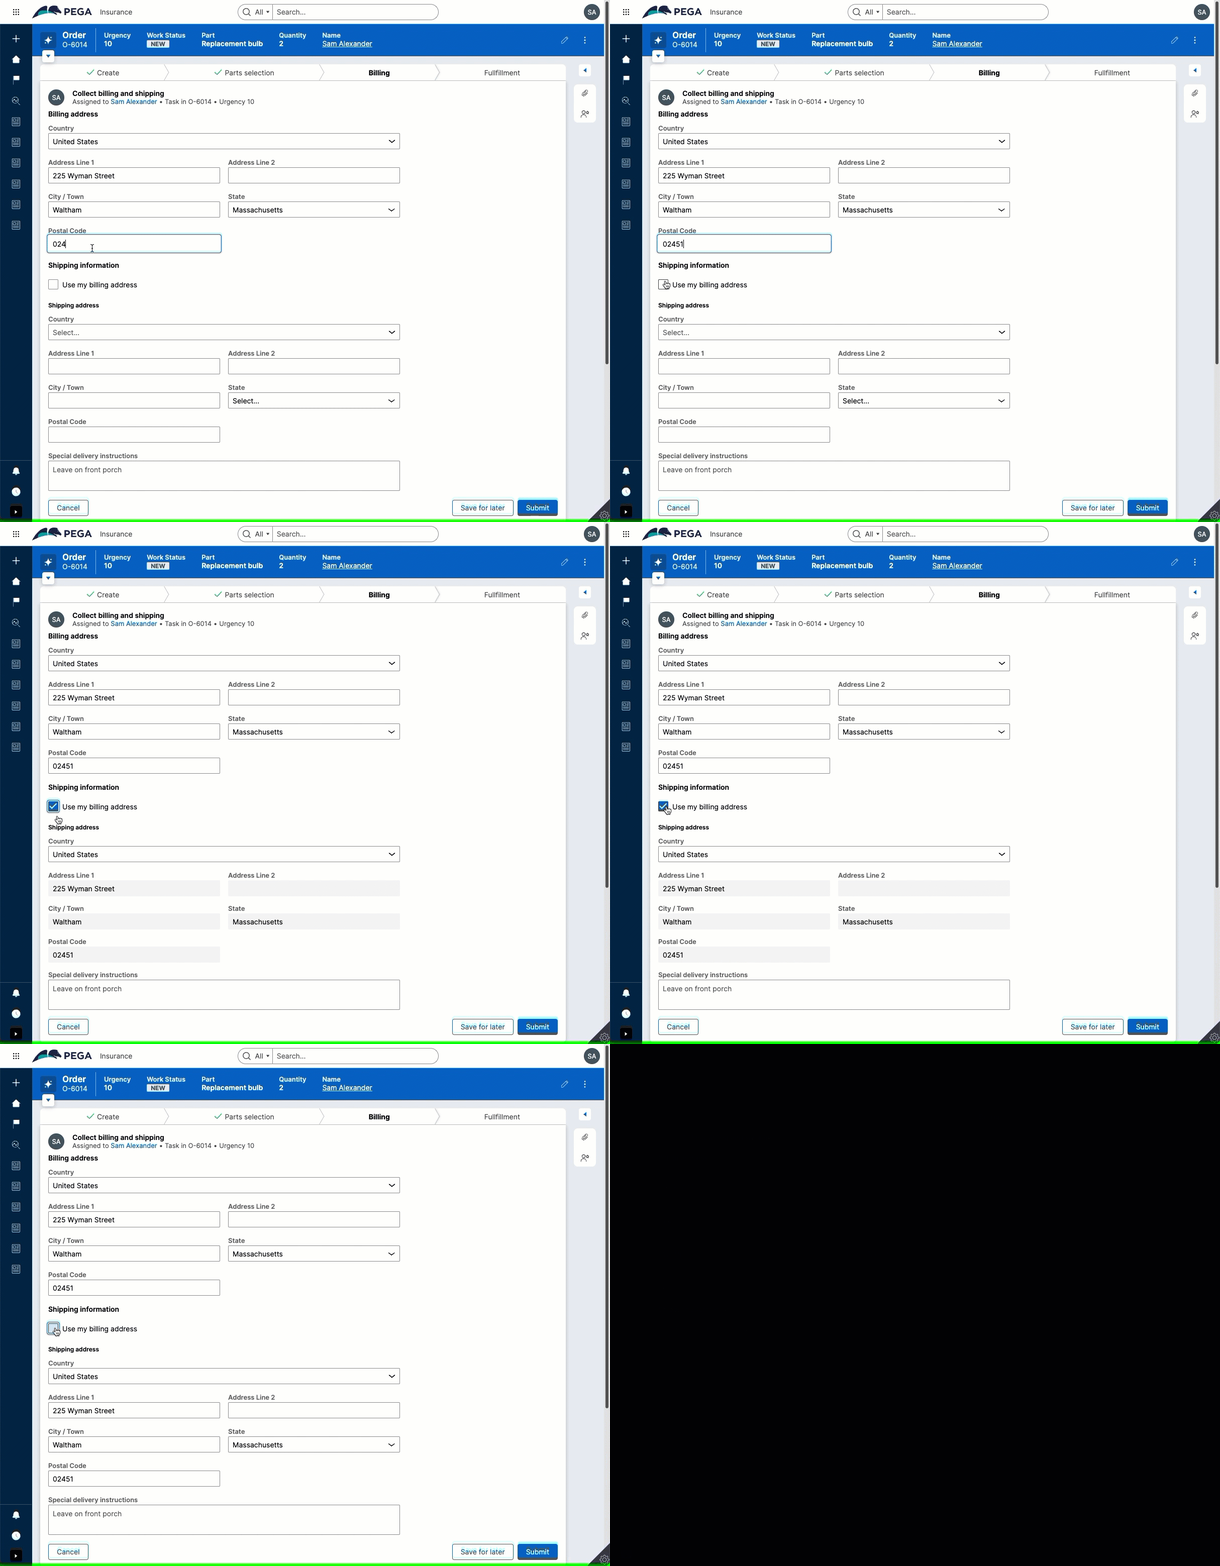
- When Use my billing address is unchecked (false), then clear the shipping address fields and allow the user to type in an address.
- When Use my billing address is checked (true), then simply copy Billing Address to Shipping Address
How does this follow the “center-out” approach?
Remember, to build this pattern with Section rules, the logic was mostly in the UI, but now the logic is moves out of the UI. My colleague, Richard Marsot , Senior Director of Front-end Development, explains it best:
We removed the business logic from the UI (when user clicks the checkbox, you need to refresh the section with a Data Transform) and instead moved the business logic closer to the case inside the step definition (e.g. Flow Action). It is now easier to manage as a business rule on the step definition where we can see that if ‘useSameAsBilling’ is true, we need to run some special logic.
Well said. That’s how Constellation UI adheres to Center-out approach.
Did you just switch to Dev Studio to edit the Flow Action and Data Transform?
Good catch. Yes, I did. And I am always forthright with my audience, so here’s my response: Our goal is to make it easier and faster for professional and citizen developers to build apps with the power of App Studio. At some point, more advanced configurations require Dev Studio, but where is that line? My colleagues and I continue to evaluate what belongs in App Studio and what belongs in Dev Studio. It’s a journey. Divide and conquer.
Taking it the extra UX mile: Making Shipping Address Read-only when it’s the same as Billing Address
I work with amazing UX designers at Pega like Chiranit Prateepasen (Director of UX & Product Design) and her team as well as talented engineering colleagues like Richard Marsot. They said, “Why don’t you make the Shipping Address read-only when it’s the same as the Billing Address?”
That makes sense. That way, the end user easily sees the values but can’t accidentally change them. Let’s do it.
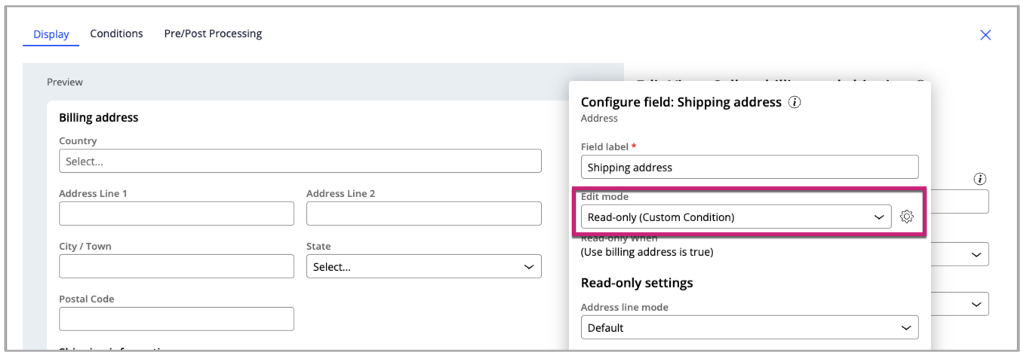
Back in the View, click the Gear icon for the Shipping Address field.
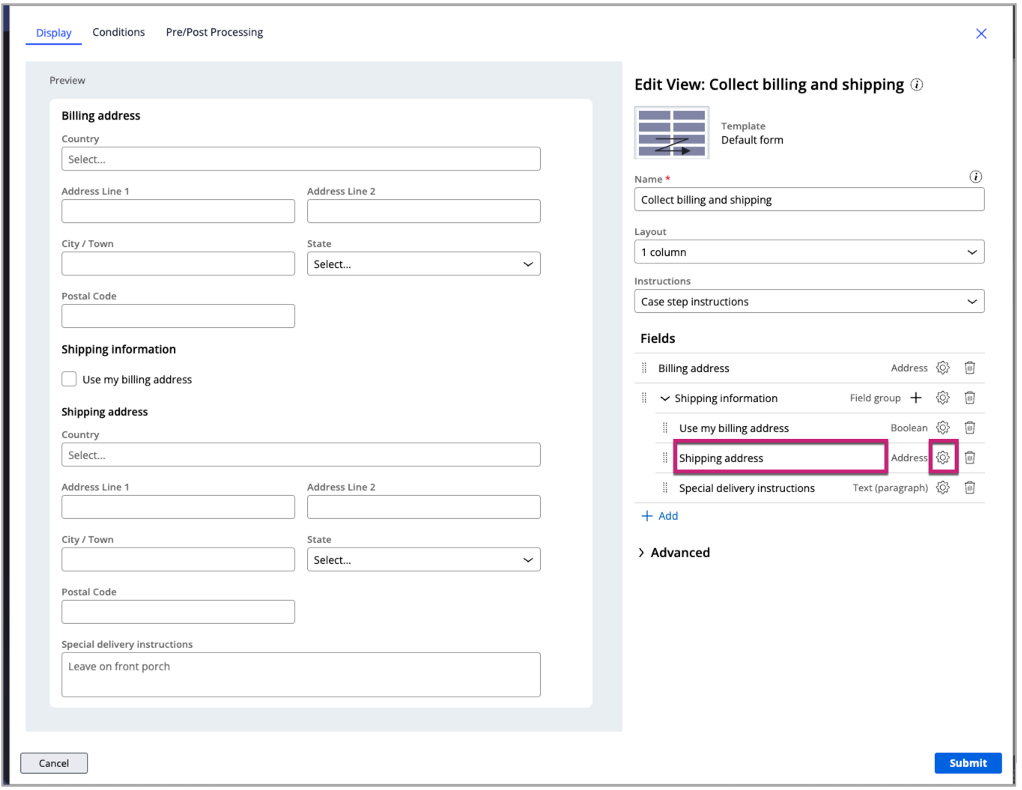
For Edit mode, select “Read-only (Custom Condition)” and click the Gear icon.
In the Condition Builder dialog, simply select “Use billing address” as the Field and select “is ture” as the conditional operator.
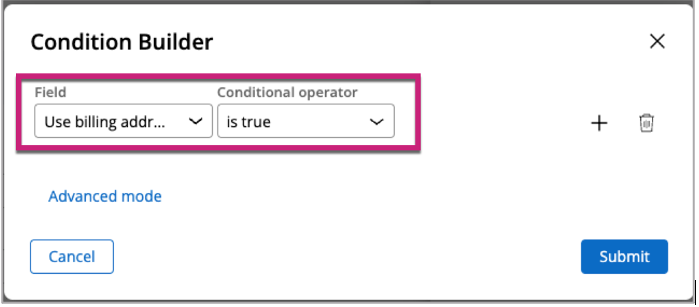
There, the configuration is done. Run it and be proud!
Here it is running. Nice!
The takeaway
Did you try this? How long did it take you? Probably not long. You saved significant development time – you were more productive -- because you did not have to work with low-level UI controls and OnChange handlers, Action Sets, and so on. Rather, in the spirit of Center-out business architecture, you defined the behavior outside of the UI and let Constellation take care of the eventing and refresh. And, you did not have to worry about the responsive nature, heading levels, and setting the right ARIA labels for Accessibility.
Out of the box, it just worked.
That’s not all. Watch pega.com for more information about what’s new in Infinity ’23 and Constellation UI. If you are new to Constellation UI and want to learn more, or if you want to see how customers are leveraging Constellation, check out the resources below.
Recommended resources:
• https://academy.pega.com/mission/pega-constellation-view-based-ui-configuration-low-code-authors/v1?
• https://academy.pega.com/mission/pega-constellation-view-based-ui-designers/v1
• PegaWorld iNspire 2023: Building for the Total User Experience with Pega Constellation https://www.pega.com/insights/resources/pegaworld-inspire-2023-building-total-user-experience-pega-constellation
• PegaWorld iNspire 2023: LeasePlan's Transition to a Fully Digital Business Model https://www.pega.com/insights/resources/pegaworld-inspire-2023-leaseplans-transition-fully-digital-business-model
