Implementing Custom Repository Extension APIs
Disclaimer & Context: Why We Built a Custom Repository
While Pega provides a robust set of out-of-the-box (OOTB) repository types, including Amazon S3, Azure Blob Storage, Google Cloud Storage, and Pega Cloud File Storage, these options are designed to meet general-purpose integration needs. However, enterprise environments often present unique challenges that go beyond the capabilities of these default connectors.
This guide was created to document the rationale, design, and implementation of a custom repository pattern tailored for complex enterprise use cases. It is intended for architects and developers working in environments where:
- Proprietary or legacy ECM systems (e.g., OnBase, IBM FileNet, OpenText) must be integrated with Pega.
- Custom metadata, security, or compliance requirements are not supported by OOTB repositories.
- Performance optimizations such as caching, streaming, or batch processing are critical.
- Business-specific logic must be embedded into file operations (e.g., triggering workflows, syncing metadata).
- Deployment pipelines require integration with non-standard artifact stores.
Additionally, it is important to note that Connect CMIS rules are no longer being actively developed. While CMIS (Content Management Interoperability Services) has historically provided a vendor-neutral way to integrate with ECM systems, its deprecation means that teams relying on CMIS-based integrations must now explore alternative approaches—such as custom repositories—to maintain compatibility and control over document management workflows
This pattern has been successfully applied in real-world implementations, including large-scale financial institutions, and is designed to be reusable, extensible, and compliant with Pega best practices.
Assumptions
This implementation guide is based on a proof-of-concept (PoC) developed in a controlled Pega Lab environment. The following assumptions were made to generalize the solution and ensure it can be adapted across client environments:
1 - Repository Platform
GitHub was used as a demonstration repository for the PoC. In real-world implementations, clients are expected to use enterprise-grade content management systems such as SharePoint, Alfresco, or OpenText. Pega provides prebuilt connectors for some of these platforms (e.g., SharePoint Online Integration).
2 - Temporary File Storage
Files uploaded via the Attachment Utility are temporarily stored in the application server’s file system (e.g., Tomcat). This behavior is subject to the file size limit defined by the DSS setting:
prconfig/initialization/maximumfileuploadsizemb/default, which defaults to 1GB.
3 - API Integration
The custom repository implementation assumes the availability of a RESTful API provided by the external document repository. The methods initializeRepository, listFiles, getFile, and createFile are expected to interact with this API using standard HTTP methods.
4 - Security and Authentication
The PoC assumes that API authentication is handled via static tokens or basic authentication. In production environments, OAuth2 or other secure mechanisms should be used.
5 - Java-Based Customization
Some parts of the implementation (e.g., handling multipart form-data responses) rely on Java code. It is assumed that the development team has basic familiarity with Java constructs such as InputStream and buffer management (e.g., default buffer size of 8192 bytes).
6 - Error Handling and Debugging
The implementation assumes that developers will include appropriate error handling and logging mechanisms. Common pitfalls include incorrect API endpoints, authentication failures, and misconfigured repository rules.
Architecture Overview: Custom Repository Pattern
The custom repository architecture in Pega enables seamless integration with external or proprietary content storage systems that are not supported out-of-the-box. It leverages the Repository APIs, which define a consistent interface for interacting with any repository type.
Component Architecture: Reusing Custom Repository Across Pega Applications
To ensure scalability, maintainability, and reusability, the custom repository implementation follows Pega’s component-based architecture. This approach allows the repository logic to be packaged as a standalone, modular component that can be reused across multiple applications without duplication or tight coupling.
A component in Pega is a self-contained ruleset or module that encapsulates a specific piece of functionality, such as an integration, data model, or UI pattern, and is designed to be reused across applications.
Class Structure
Work-<Case>: are the case types in your application where we interact with attachment files.
Link-Attachment: This class is designed to associate multiple types of attachments, such as emails, correspondence, and other documents, with a Work Item.
Data-WorkAttach-File: This class serves as a data instance for storing information related to attachments.
Embed-Repository-File: Used as an interface for working with Data-Repository which implements the repository APIs.
Embed-Repository-Type-Custom-GitHub: is a class used to implement extension points for integration with the repository layer.
GitHub-Data-Contents: Data model to transform request and response to your repository integration.
GitHub-Int-Contents: Interface for interacting with REST services that connects to the CMS system.
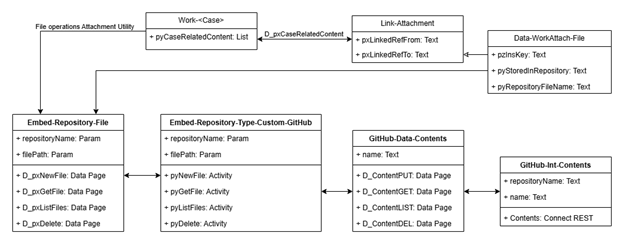
Image 01: Class diagram
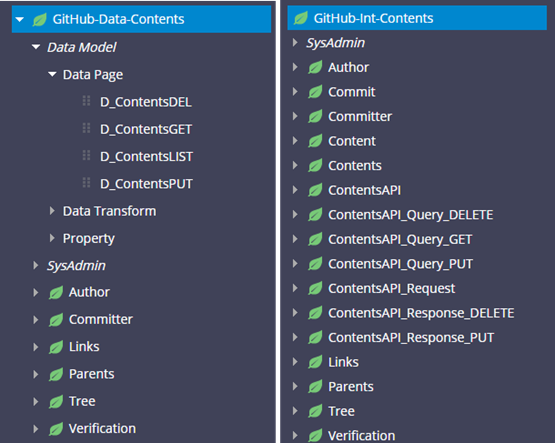
Image 02: Integration classes sample for GitHub integration
Key Components
1 - Custom Repository Class (Embed-Repository-Type-Custom-<Name>)
To implement a custom repository, you must create a class that extends Embed-Repository-Type-Custom-<Name> and override the following standard activities:
- pyNewFolder – Creates a new folder in the repository.
- pyNewFile – Uploads a new file to the repository.
- pyGetFile – Retrieves the content of a file.
- pyListFiles – Lists files and folders in a specific path.
- pyExists – Verifies whether a file or folder exists.
- pyDelete – Deletes a specific file or folder.
- pyIsAuthenticated – Checks if the system or user is authenticated with the repository.
Note: if some of the above methods are not supported by your CMS, it can be suppressed; for example, if your CMS does not support folder creation, or listing multiple files in a folder, in this case it will not compromise the main functionalities pyExists, pyNewFile, pyGetFile and pyDelete for attachment operations.
These rules encapsulate the logic for interacting with the external system, whether via REST/SOAP APIs. They are invoked by Pega’s internal repository APIs, ensuring your custom implementation behaves like a native repository.
2 - Repository Rule
This rule defines the repository instance and links to your custom implementation. It includes:
- Upload an icon that represents your custom repository type to the webwb directory. Upload can be done from Technical >> Binary File >> Create.

Image 03: Creating binary file to upload logo image.
- Create a field value for the new repository type in the Data-Repository class for the pyType field.
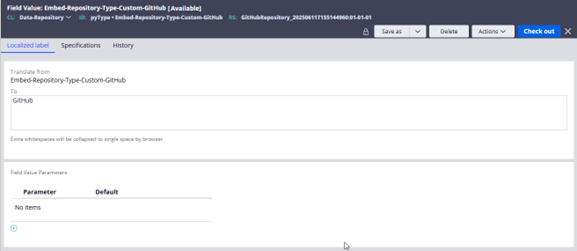
Image 04: Filed Value to display repository name when creating a Repository Rule.
- Update the Code-Pega-List.pyRepoTypes data transform with the repository details, such as icon and name.
- Primary.pxResults(<APPEND>).pyImageUrl - updates image path, for example webwb/GitHub.svg
- Primary.pxResults(<LAST>).pyRepositoryName - updates repository names, for example GitHub
- Primary.pxResults(<LAST>).pyType - updates repository class, for example Embed-Repository-Type-Custom-GitHub

Image 05: Data transform used to set repository details.
- Save-as pyRepoConfiguration section into your repository class Embed-Repository-Type-Custom-<Name> for adding repository configuration such as Host name, Repository Name, Authentication, etc. The idea here is to add the configuration needed to connect to the repository which can be accessed through D_pxRepository data page.
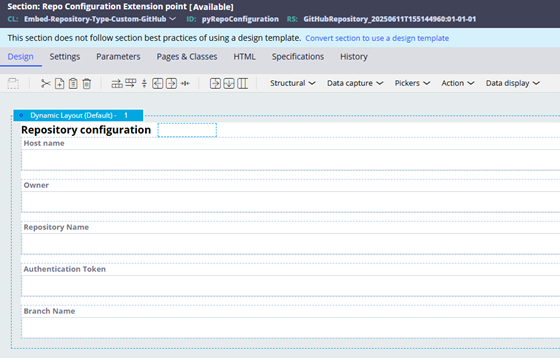
Image 06: Repository section used to configure repository settings.
3 - Integration Layer
The Integration Layer is a critical component of the custom repository pattern. It defines how your Pega application communicates with the external content management system (CMS), document store, or file service. This layer is responsible for securely and reliably exchanging data between Pega and the target system.
Core Mechanism: Connect-REST Rules
Pega uses Connect-REST rules to interact with RESTful APIs exposed by external systems. These rules allow you to:
- Define the endpoint URL and HTTP method (GET, POST, PUT, DELETE, etc.).
- Configure authentication (e.g., OAuth 2.0, Basic Auth).
- Map request and response data using JSON or XML.
- Handle headers, query parameters, and payloads.
- Support attachments and SSL-secured endpoints
Each Connect-REST rule can be invoked from:
- A Data Page (for data retrieval).
- An Activity (for procedural logic).
- A Flow Integrator shape (for process orchestration).
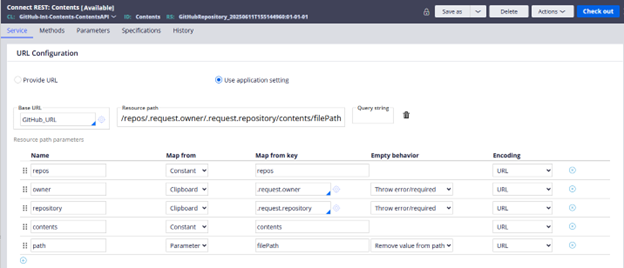
Image 07: Connect REST rule.
Interaction sequence diagram.
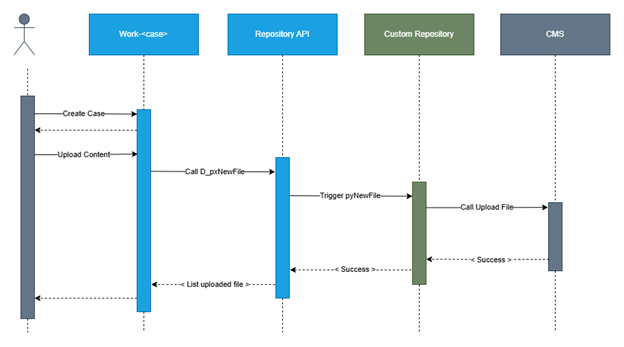
Image 08: Sequence diagram.
Implementation Guidance
When implementing the integration layer for a custom repository, follow these steps:
1 - Understand the External API
Before building anything in Pega, study the API documentation of the external system. Understand:
-
- Authentication flows (e.g., token exchange, scopes).
- Required headers and parameters.
- Supported operations (e.g., upload, download, search).
- Response formats and error handling.
2 - Create Connect-REST Rules
For each repository operation (e.g., pyNewFile, pyGetFile), create a corresponding Connect-REST rule. Use the Methods tab to define mappings for each HTTP method.
3 - Use Authentication Profiles
Define reusable authentication profiles (e.g., OAuth 2.0) and associate them with your connector rules. This ensures secure and centralized credential management.
4 - Map Data with Precision
Use data transforms or JSON data model classes to map request and response payloads. This improves maintainability and debugging.
5 - Handle Errors Gracefully
Implement error handling in your calling activities or data pages. Log errors, retry transient failures, and provide meaningful messages to users or logs.
Important Note
The implementation of this layer will vary significantly depending on the external system’s API. Developers must be familiar with the API’s structure, authentication model, and expected behaviors. This knowledge is essential for correctly configuring the Connect-REST rules and ensuring reliable communication.
An example of a GitHub Contents repository integration class structure, use “Create REST Integration” wizard for creating the integration layer.
Example: Custom Repository for GitHub using Contents API
Use Case
You want to use GitHub as a document repository within Pega—for example, to store configuration files, templates, or documentation—by implementing a custom repository that interacts with GitHub’s REST API.
Architecture Overview (Specific to GitHub)
- Repository Type Class: Embed-Repository-Type-GitHub
- Repository Rule: Data-Repository instance pointing to the GitHub repo
- Integration Layer: Connect-REST rules for GitHub API endpoints
- Authentication: Personal Access Token (PAT) via Repository Rule
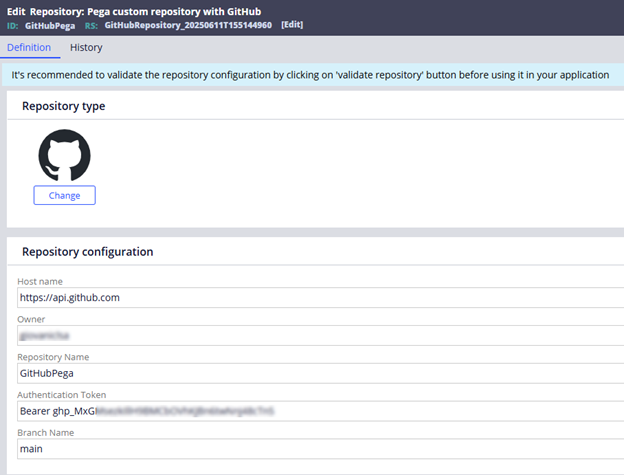
Image 09: Repository Rule configuration sample.
Implementing pyNewFile (Upload a File)
1 - GitHub API Endpoint
PUT /repos/{owner}/{repo}/contents/{path}
2 - Required Headers
- Authorization: Bearer <token>
- Accept: application/vnd.github+json
- Content-Type: application/json
3 - Request Payload
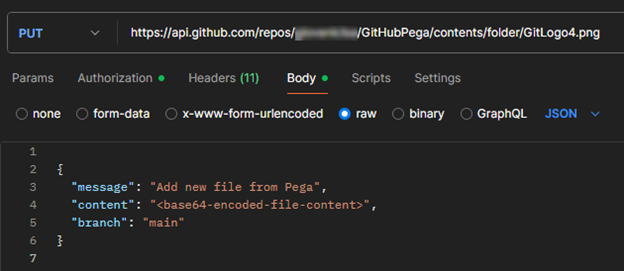
Image 10: Postman, upload payload sample for GitHub.
4 - Data page and request data transform sample implementation
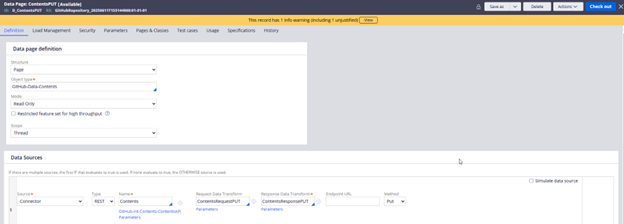
Image 11: Data page to upload file.

Image 12: Data transform showing how to fetch repository details to map in the Request header/payload.

Image 13: Data transform to map the Request for upload file.
5 - Steps in pyNewFile Activity
For GitHub integration we must pass the base64 string, we use a java step to convert the InputStream to base64 for larger attachments files, for smaller attachments Pega directly get the base64 string the attachment utility.
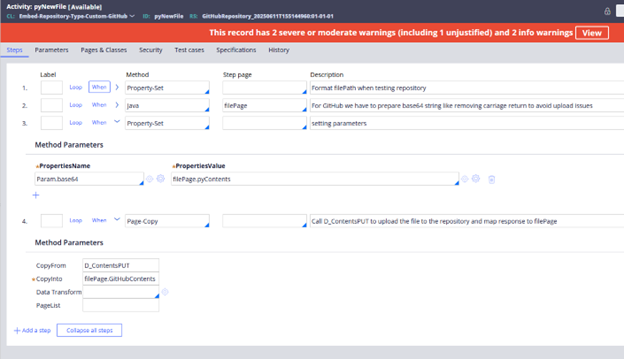
Image 14: Basic steps for pyNewFile implementation.
Java code sample
ClipboardPage stepPage = tools.getStepPage();
boolean success = false;

try {
    String base64String = null;

    // Check if pyContents is already populated
    String pyContents = stepPage.getString("pyContents");
    if (pyContents != null && !pyContents.isEmpty()) {
        base64String = pyContents;
    } else {
        // Try to read pyStream as InputStream and convert to Base64
        Object streamObj = stepPage.getObject("pyStream");
        if (streamObj != null && streamObj instanceof java.io.InputStream) {
            try {
                java.io.InputStream inputStream = (java.io.InputStream) streamObj;
                java.io.ByteArrayOutputStream buffer = new java.io.ByteArrayOutputStream();

                byte[] data = new byte[8192];
                int nRead;
                while ((nRead = inputStream.read(data, 0, data.length)) != -1) {
                    buffer.write(data, 0, nRead);
                }

                buffer.flush();
                byte[] fileBytes = buffer.toByteArray();

                // Encode to Base64
                base64String = java.util.Base64.getEncoder().encodeToString(fileBytes);
            } catch (Exception streamEx) {
                oLog.error("Error reading pyStream or encoding to Base64: ", streamEx);
                stepPage.addMessage("Error reading pyStream or encoding to Base64: " + streamEx.getMessage());
                return false;
            }
        } else {
            stepPage.addMessage("pyStream is empty or not a valid InputStream.");
            return false;
        }
    }

    // Sanitize the Base64 string to remove all whitespace (spaces, tabs, newlines, carriage returns)
    base64String = base64String.replaceAll("\\s+", "");

    // Optional: Validate the Base64 string to catch malformed content early
    try {
        java.util.Base64.getDecoder().decode(base64String);
    } catch (IllegalArgumentException e) {
        throw new RuntimeException("Sanitized Base64 content is invalid", e);
    }

    // Set the sanitized and validated Base64 string to pyContents
    stepPage.putString("pyContents", base64String);
    success = true;

} catch (Exception e) {
    oLog.error("Unexpected error preparing file for upload: ", e);
    stepPage.addMessage("Unexpected error preparing file for upload: " + e.getMessage());
    success = false;
}
Implementing pyGetFile (Lookup a File)
1 - GitHub API Endpoint
GET /repos/{owner}/{repo}/contents/{path}
2 - Required Headers
- Authorization: Bearer <token>
- Accept: application/vnd.github+json
- Content-Type: application/json
3 - Steps in pyGetFile Activity
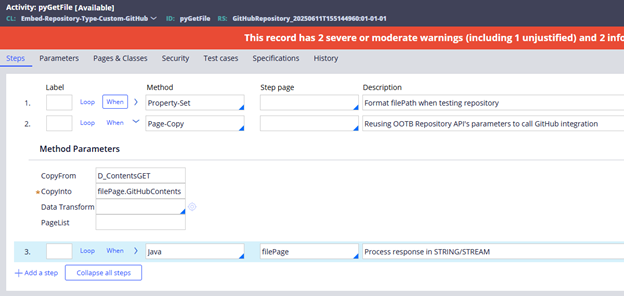
Image 15: Steps for pyGetFile activity.
Java step sample
// Get the current step page and the GitHubContents embedded page
ClipboardPage stepPage = tools.getStepPage();
ClipboardPage gitHubPage = stepPage.getPage("GitHubContents");

// Extract encoding type, download URL, and base64 content from the GitHub response
String encodingType = gitHubPage != null ? gitHubPage.getString("encoding") : null;
String downloadURL = gitHubPage != null ? gitHubPage.getString("download_url") : null;

// Clean base64 content by removing whitespace and line breaks to ensure proper decoding
String base64content = gitHubPage != null ? gitHubPage.getString("content").replaceAll("\\s+", "") : null;

boolean success = false;

// If the content is base64-encoded, handle it based on the desired response type
if ("base64".equalsIgnoreCase(encodingType)) {
    try {
        // If the response type is STREAM, decode base64 and wrap it in a ByteArrayInputStream
        if ("STREAM".equalsIgnoreCase(tools.getParamValue("responseType"))) {
            byte[] decodedBytes = java.util.Base64.getDecoder().decode(base64content);
            stepPage.putObject("pyStream", new java.io.ByteArrayInputStream(decodedBytes));
        } else {
            // Otherwise, return the base64 string directly
            stepPage.putString("pyContents", base64content);
        }
        success = true;
    } catch (Exception e) {
        // Log and fall back to download if decoding fails
        oLog.warn("Base64 decoding failed, will attempt download instead.", e);
    }
}

// If base64 was not successful or not available, attempt to download the file from GitHub
else if (!success && downloadURL != null) {
    int maxRetries = 3;
    int attempt = 0;

    // Retry logic for downloading the file
    while (attempt < maxRetries && !success) {
        attempt++;
        try {
            // Parse and normalize the download URL
            java.net.URL rawUrl = new java.net.URL(downloadURL);
            java.net.URI uri = new java.net.URI(
                rawUrl.getProtocol(),
                rawUrl.getUserInfo(),
                rawUrl.getHost(),
                rawUrl.getPort(),
                rawUrl.getPath(),
                rawUrl.getQuery(),
                rawUrl.getRef()
            );

            // Create and configure the HTTP client and request
            org.apache.http.impl.client.CloseableHttpClient httpClient = org.apache.http.impl.client.HttpClients.createDefault();
            org.apache.http.client.methods.HttpGet request = new org.apache.http.client.methods.HttpGet(uri.toASCIIString());
            request.setHeader("User-Agent", "Mozilla/5.0");

            // Execute the request and check the response status
            org.apache.http.HttpResponse response = httpClient.execute(request);
            int statusCode = response.getStatusLine().getStatusCode();

            if (statusCode == 200) {
                // Read the file bytes from the response
                org.apache.http.HttpEntity entity = response.getEntity();
                byte[] fileBytes = org.apache.http.util.EntityUtils.toByteArray(entity);

                // Return the file as a stream or base64 string depending on responseType
                if ("STREAM".equalsIgnoreCase(tools.getParamValue("responseType"))) {
                    stepPage.putObject("pyStream", new java.io.ByteArrayInputStream(fileBytes));
                } else {
                    stepPage.putString("pyContents", java.util.Base64.getEncoder().encodeToString(fileBytes));
                }
                success = true;
            } else if (attempt >= maxRetries) {
                // Throw an error if all retries fail
                throw new Exception("Server returned HTTP response code: " + statusCode + " for URL");
            } else {
                // Log and retry on intermediate failures
                oLog.warn("Attempt " + attempt + ": Received HTTP " + statusCode + ", retrying...");
            }

            httpClient.close();

        } catch (Exception e) {
            // Log final failure after all retries
            if (attempt >= maxRetries) {
                oLog.error("Error processing file after " + attempt + " attempts: ", e);
                stepPage.addMessage("Error processing file: " + e.getMessage());
            }
        }
    }
}
Implementing pyDelete (Delete a File)
1 - GitHub API Endpoint
DELETE /repos/{owner}/{repo}/contents/{path}
2 - Required Headers
- Authorization: Bearer <token>
- Accept: application/vnd.github+json
- Content-Type: application/json
3 - Steps in pyDelete Activity
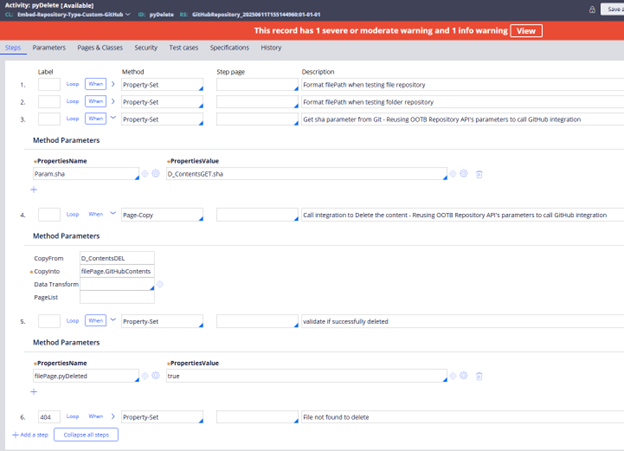
Image 16: Steps for pyDelete implementation.
Implementing pyListFiles (List files in a directory)
1 - GitHub API Endpoint
GET /repos/{owner}/{repo}/contents/{folderPath}
2 - Required Headers
- Authorization: Bearer <token>
- Accept: application/vnd.github+json
- Content-Type: application/json
3 - Steps in pyListFiles Activity
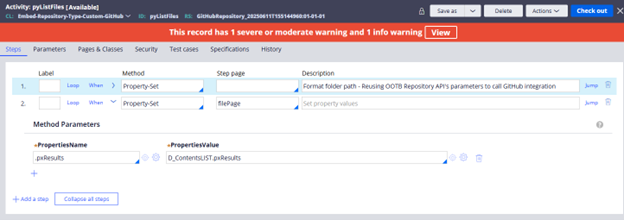
Image 17: Steps for pyListFiles implementation.
Validate repository implementation for troubleshooting.
To implement all functionalities of the Repository Rule, such as the Test Connectivity and Validate Repository buttons, it is necessary to update the logic within the standard activities.
To run the validation test, Pega uses a wrapper data page, D_pxRepositoryTestConnectivity. This process includes steps corresponding to each API endpoint. For example, in step 6, D_pxNewFolderTest is used. All *Test data pages are sourced from the same activity, pzRepositoryOperationTest, with different parameters depending on the operation being tested. The first step sets various parameters, such as Local.preTransform and Local.postTransform, which can be referenced to locate related data transforms (e.g., pzNewFileOpTestSetup, which sets parameters for the activity that create a test file, and pzNewFileOpTestValidation, which checks the response from the integration and sets validation results). This pattern applies to all standard activities. All rules used for testing the repository connection are Final rules. It is necessary to configure the logic within the standard activities appropriately to ensure correct execution when the repository undergoes testing.
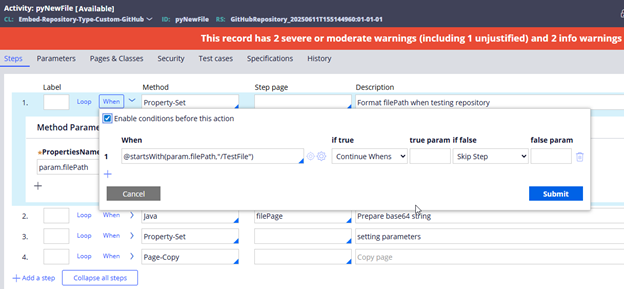
Image 18: Example for pyNewFile when executing a test run from repository rule.
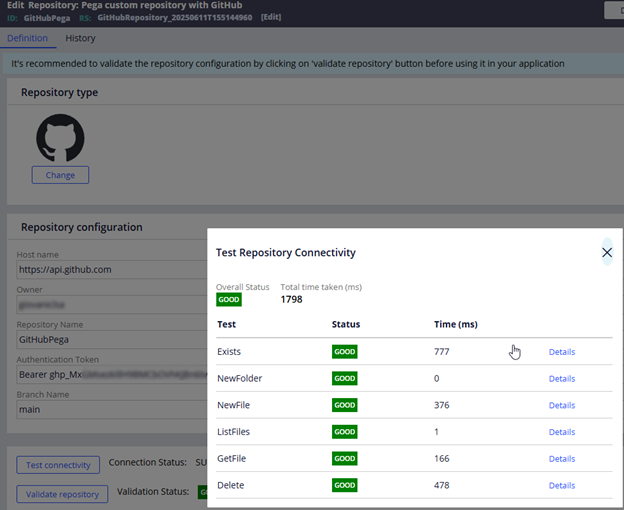
Image 19: When all test scenarios are covered, this screen appears after clicking Validate repository.
References
https://docs.pega.com/bundle/platform/page/platform/data-integration/using-repository-apis.html
https://docs.pega.com/bundle/platform/page/platform/data-integration/repository-apis.html
