Developing a simple Pega Custom Module with JavaScript Plugin for iOS using Module DevKit
In this tutorial we will be creating a custom module called Hello World. This will allow us to call a native iOS view controller from Pega. This tutorial will walk you through the process of setting up Module DevKit for development, and creating a native plugin that can be called from Pega through the JavaScript API.
- Download your Module DevKit distribution package and save it wherever you want to develop your module. This environment will be used to test your module within a locally built version of the Hybrid Container. You can get this from your Pega GCS representative.
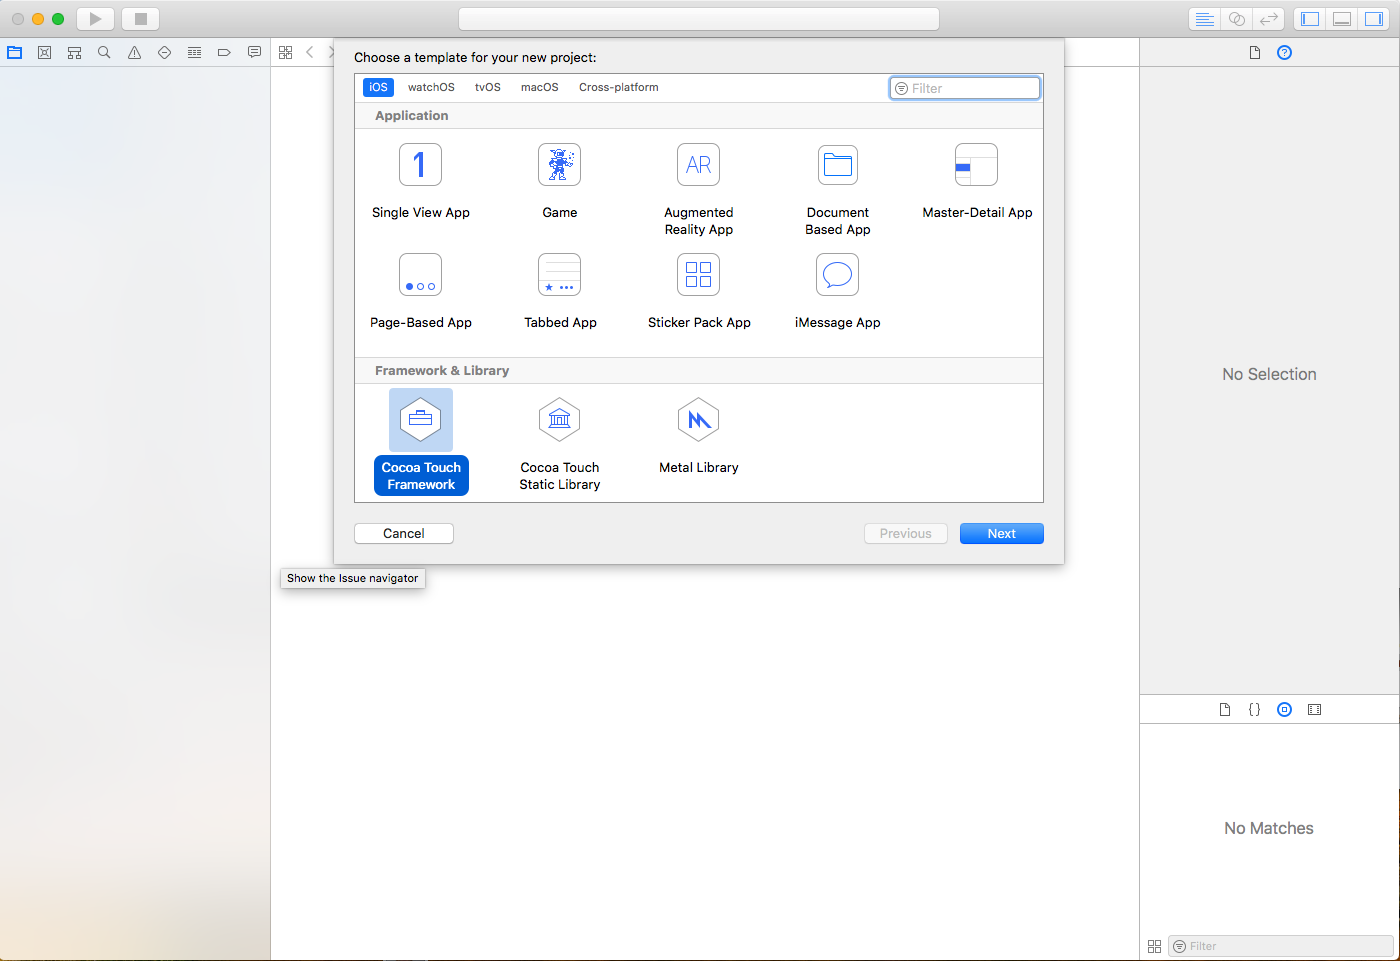
- Create a new Cocoa touch framework in Xcode.

- Save your new framework in the “Modules” folder of the distribution package:

- From the distribution package open HybridContainer/Frameworks and drag PMBase.framework into the linked frameworks and libraries section in the general page of your framework target.

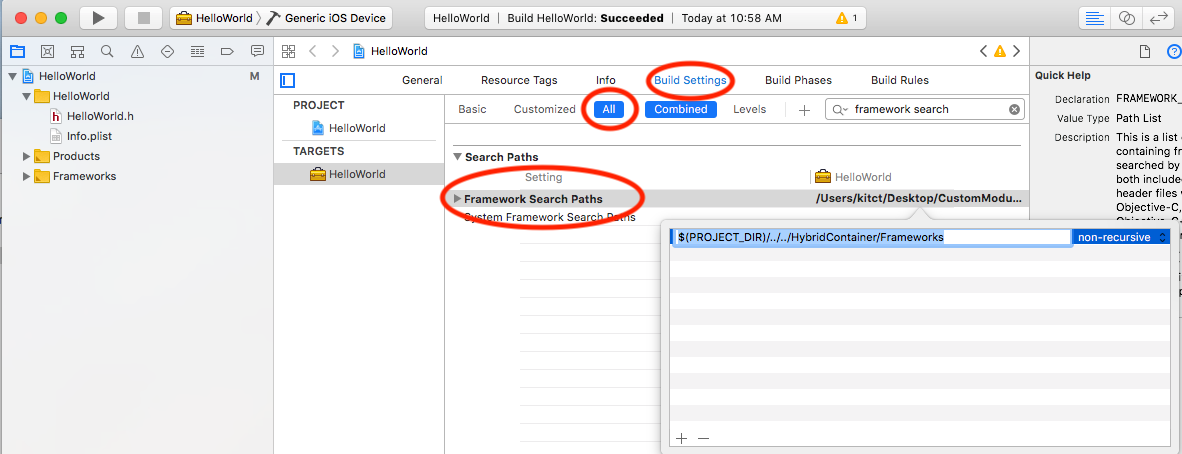
- Under the Build Settings Tab, select “All” and search for Framework Search Paths. Then set the Framework Search Path to: “$(PROJECT_DIR)/../../HybridContainer/Frameworks”

- Close out of this project and quit Xcode and open HybridContainer.xcworkspace contained in the distribution package. It is important to quit Xcode as it can cause problems if the subproject is open at the same time as the project it is contained in.
- From the distribution package folder, navigate to Modules>HelloWorld>HelloWorld.xcodeproj. (yours will be named differently) and drag the file into Xcode under HybridContainer.

- Go to the build phases tab of the Hybrid Container and add the HelloWorld framework to the Target Dependencies section, the Link Binary with Libraries section, and the embed frameworks section.


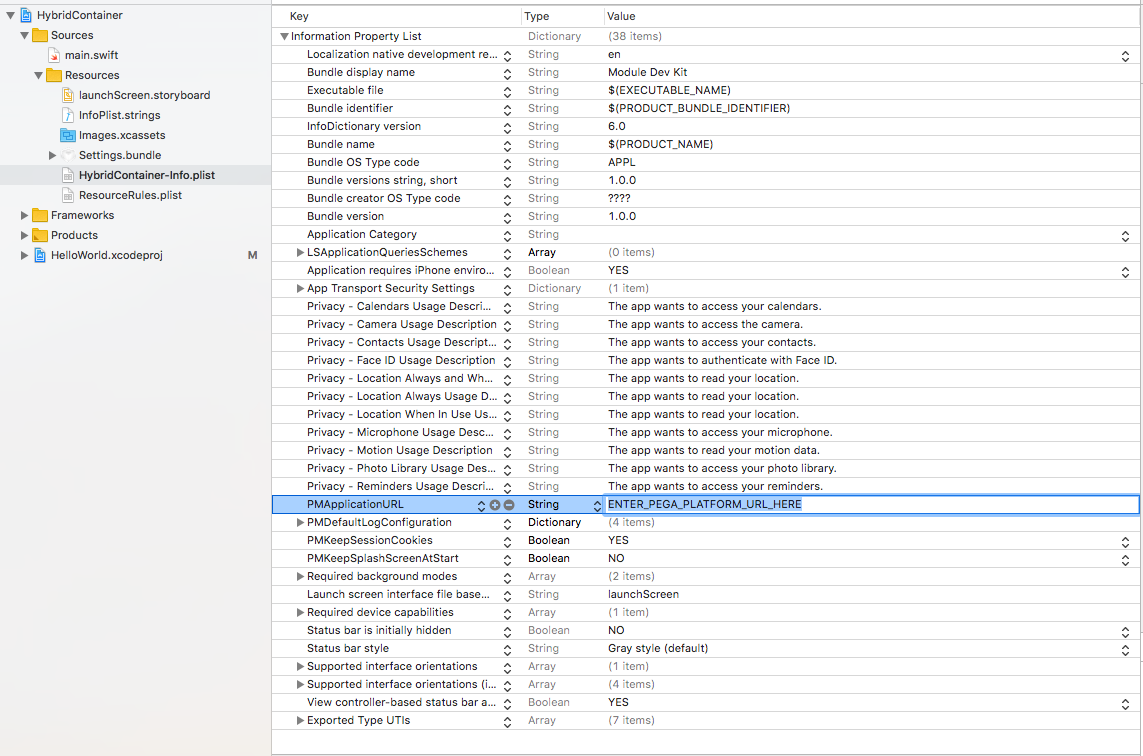
- In the project navigator, go to HybridContainer>Sources>Resources and click on HybridContainer-Info.plist. In this file find the PMApplicationURL key and enter the URL of your Pega System e.g.
http://test.server.com:8243/prweb/
- Now is a good time to build and run your project, make sure everything builds, and make sure you can launch into your Pega application.
The next step in this process is to create a JavaScript plugin to display a native view controller from Pega. In order to do this we will need four files:
HelloWorldPlugin.js – this is the JavaScript side of the plugin that will get called from an action in Pega.
HelloWorldPlugin.swift – This is the native side of the plugin that will be called when our JavaScript plugin invokes the bridge.
ShowHelloWorldOperation.swift – This is a wrapper for our native view controller that will allow us to tell the application to present our view controller.
HelloWorldViewController.swift. – This is the native view controller that we will be presenting.
All of the source code in these files is attached to this post and documented for reference.
In order to display your view controller, you will need two swift classes: one that inherits from PMJavaScriptPlugin, and one that inherits from PMPresentViewControllerOperation. The first is to receive the call from JavaScript, the second is to tell the Hybrid Container to display a view controller. In my example, these classes are called HelloWorldPlugin and ShowHelloWorldOperation. In addition, you will need a JavaScript version of the plugin class that will be called from Pega. Mine is called HelloWorldPlugin.js.
The next step is to call your JavaScript plugin from Pega. You can do this by including a JavaScript file with a call to your plugin on the “Scripts & Styles” page of your harness. You can then add a “run script” action to a button to call your JavaScript.
Packaging the custom Module:
In order to package this custom module, it must be uploaded on the build page of your mobile channel in Pega along with your branding assets. You do this by adding your built framework into the modules-ios folder in the assets.zip file.
- In Xcode, select “Generic iOS Device” as your build target, and build your project.
- In the project navigator, navigate to HybridContainer>HelloWorld.xcodeproj>Products>HelloWorld.framework. Right click on this file, and select show in finder. This file (HelloWorld.framework) is what you will need to upload.
- In your mobile channel on the “Build” page, download the custom branding that has been uploaded for your app. This should be a zip file that contains at least a folder called ios. If it does not already exist, create another folder called modules-ios. Drag your HelloWorld.framework file into this folder.
- Now, you can compress everything into one .zip file that includes your ios folder and modules-ios folder and anything else that was included when you downloaded it. Finally, re-upload the folder, and rebuild your mobile app. The mobile app that is now generated should include your custom module.
Other Notes:
.pyHCBuildVersion can be copied into your ruleset to target a specific version of mobile client. Otherwise the latest version will be used.
