Authored by <Anonymous>
This document describes best practices for defining and configuring case types of your application so that they are configured to take full advantage of the Pega Cosmos design system.
A simple mental model for configuring case types
This design pattern describes the best practices in developing your applications, particularly how to configure case types to take advantage of the Pega Cosmos design system. This specifically describes steps to take and configuration options available when building an application using the React UI. Defining a case type involves defining:
- Its data model
- Its life cycle - which includes stages and steps, any optional actions, processes and automations, and stage entry validations. This also includes the configuration of the UI forms for each step in the life cycle and defining validations on those forms
- Its UI - Views that let you configure essential parts of Cosmos as it relates to case types.
Let's take the example of a Home Mortgage case type. Here are the various things to consider:
- A single case may interact with various personas. For example a Loan Originator, a Loan Officer, the Applicant(s), an Underwriter, an Appraiser etc. Ensure that you are presenting the right information to the right person as they are working the case, through persona-based portals.
- Home mortgage refers to other cases such as an Appraisal case. Similarly Home mortgage has references to other users (operators) such as an underwriter, an appraiser etc. There are best practices on how to set that up.
- Cosmos prescribes how best to display a case - when displayed as an entire page, when displayed in summary form, when displayed as preview from another case, or when displaying it within a list in a landing page. There are configurations available in App Studio that enable a developer to build the right experiences to display a case type. A Home Mortgage case type in its summary should display information about the borrower, the purchase price, the mortgage amount, the appraised value, the name of the underwriter etc. as an example. On the page for a home mortgage, there may be a tab that shows the appraisal details, credit qualification for the borrowers etc.
Before you begin
Introduced for early adopters in Pega Platform 8.6, Cosmos React UI provides a fast, modern, and consistent user experience at run time. Cosmos enforces best practices and consistency across the application stack through a prescribed layout with configuration experience in App Studio. While the concepts in this article can be applied to a pre React-based UI, it is best suited when building a Cosmos React UI Application. To understand whether Cosmos React UI (early adopter) in Pega Platform 8.6 is suitable for your application and to learn how to create a Cosmos React UI application, see this article.
Every Cosmos React UI application includes a default portal. However, think about the various personas in your application, and determine which case types can be created by those personas. You may want to create a tailored experience for each persona by creating portals specific to those personas. Each portal can then have the right type of cases to create, and provide the right landing pages and other experiences. To learn best practices for creating portals click here.
Defining and configuring your case type
Create the case type
Start by providing a name for the case type. It is best for the name to be a noun. Examples are: Home mortgage application, Personal loan application. This ensures consistency, but more importantly it also forms proper phrases and sentences such as Create > Home mortgage application, or List of Home mortgage applications. This is also important because the React-based UI creates semantic URLs. So https://www.foo.com/prweb/ApplicationAlias/HomeMortgageApplications will give you a list of home mortgages. Similarly, https://www.foo.com/prweb/ApplicationAlias/HomeMortgageApplications/H-2… will open a Home mortgage application case identified by the ID H-223.
Define the Workflow for your case type
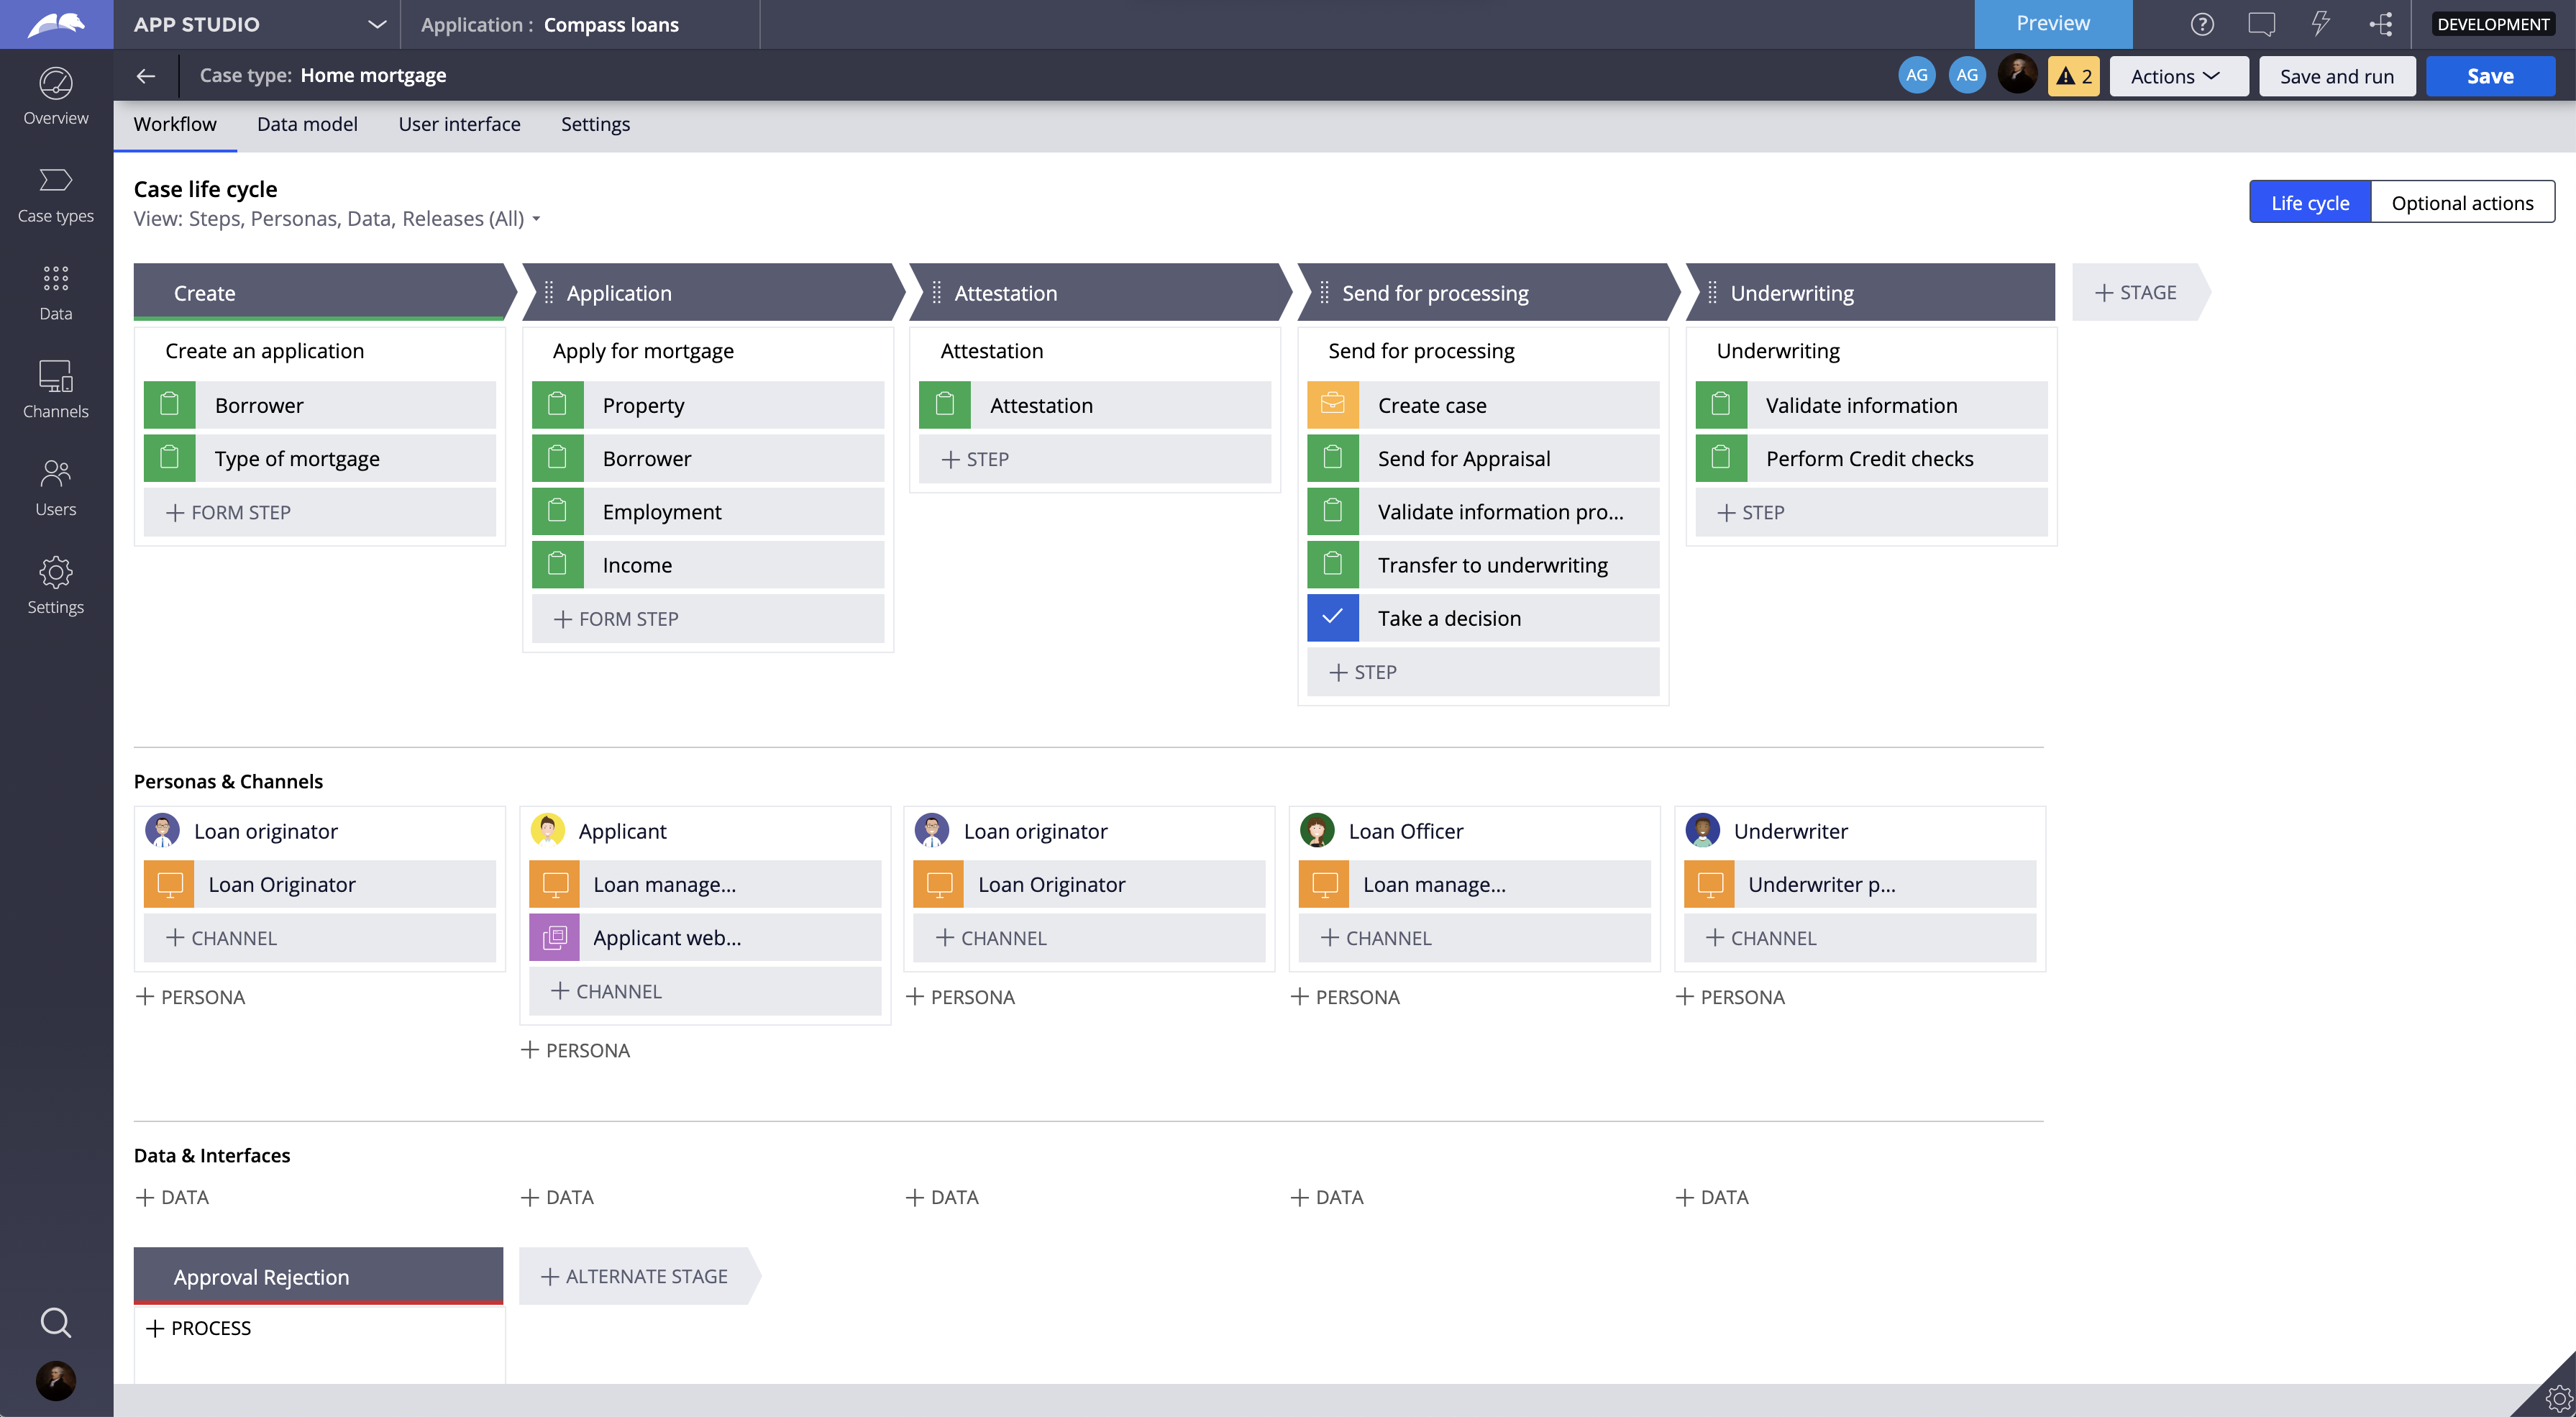
You can define the workflow of your case type from the Workflow tab of the case type. From here, you can define the stages of the workflow, define various steps within each stage, and even define the various personas that may participate within each stage, along with the channels that they use to access that part of the workflow.

You can also define optional actions on the case type. These actions can be defined case-wide or can be stage-specific.
In many cases, steps have a corresponding form to intake case data. That procedure is described later in this document.
Define the data model for your case type
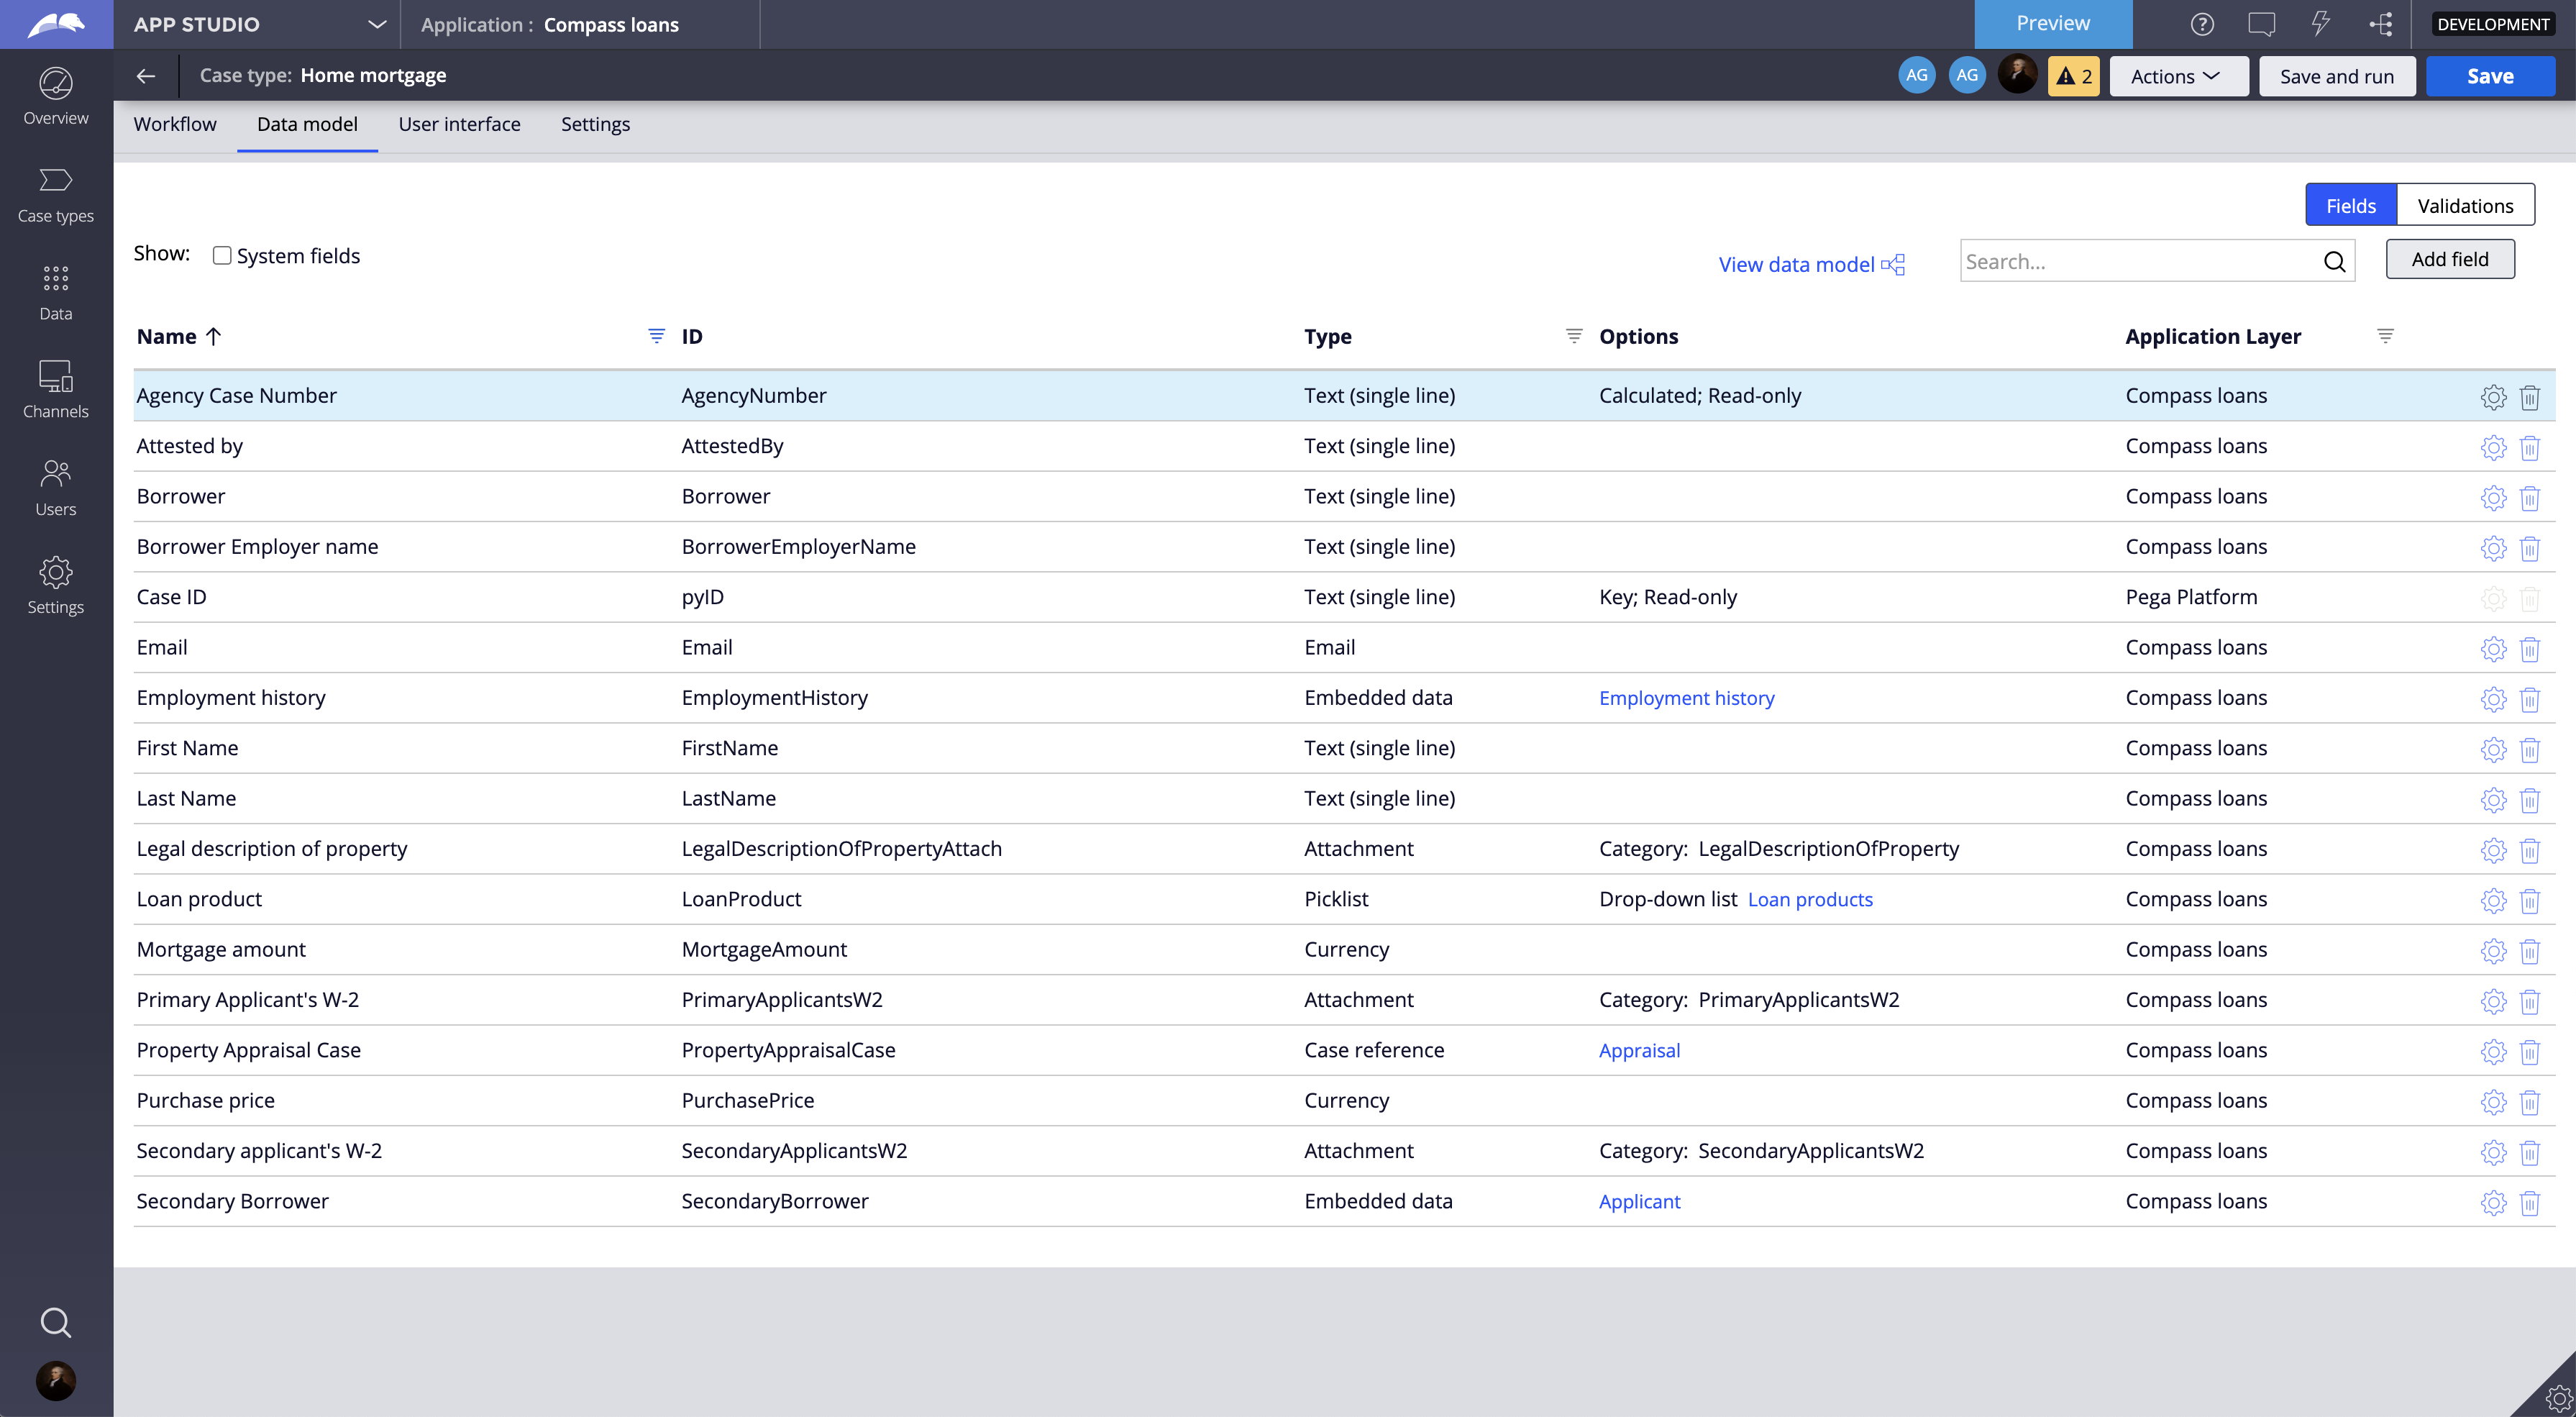
You can define the data model on the Data model tab of the case type.

Broadly speaking, the data model of an application is made up of:
- Single-value fields, e.g. first name, email ID, phone number, etc.
- Embedded structures - The case holds the data embedded within the case.
- Single items such as Primary Address (which is made up of other fields such as Street, State, City, ZIP, Country), or
- Lists such as Borrowers, where each borrower is made up of fields such as First name, Last name, Social security number etc.
- References to other objects - The case holds a foreign key reference to the other object.
- Case reference - A reference to another case or list of cases of a particular type. E.g. a field called Appraisal, which is a case reference to an Appraisal case from a Home mortgage case.
- Data reference - A reference to a data object or a list of objects of a particular type. E.g. a field called Loan product, which is a data reference to a Loan product from a Home mortgage case. A field called Accounts, which is a reference to a list of accounts from a Customer.
- User reference - A reference to a user (operator) in the the system. E.g. a field called Underwriter which is a user reference.
Once you define the life cycle of the case type, you can also configure stage entry validations in the Validations section of the Data model tab.
Configure the user interface for your case type
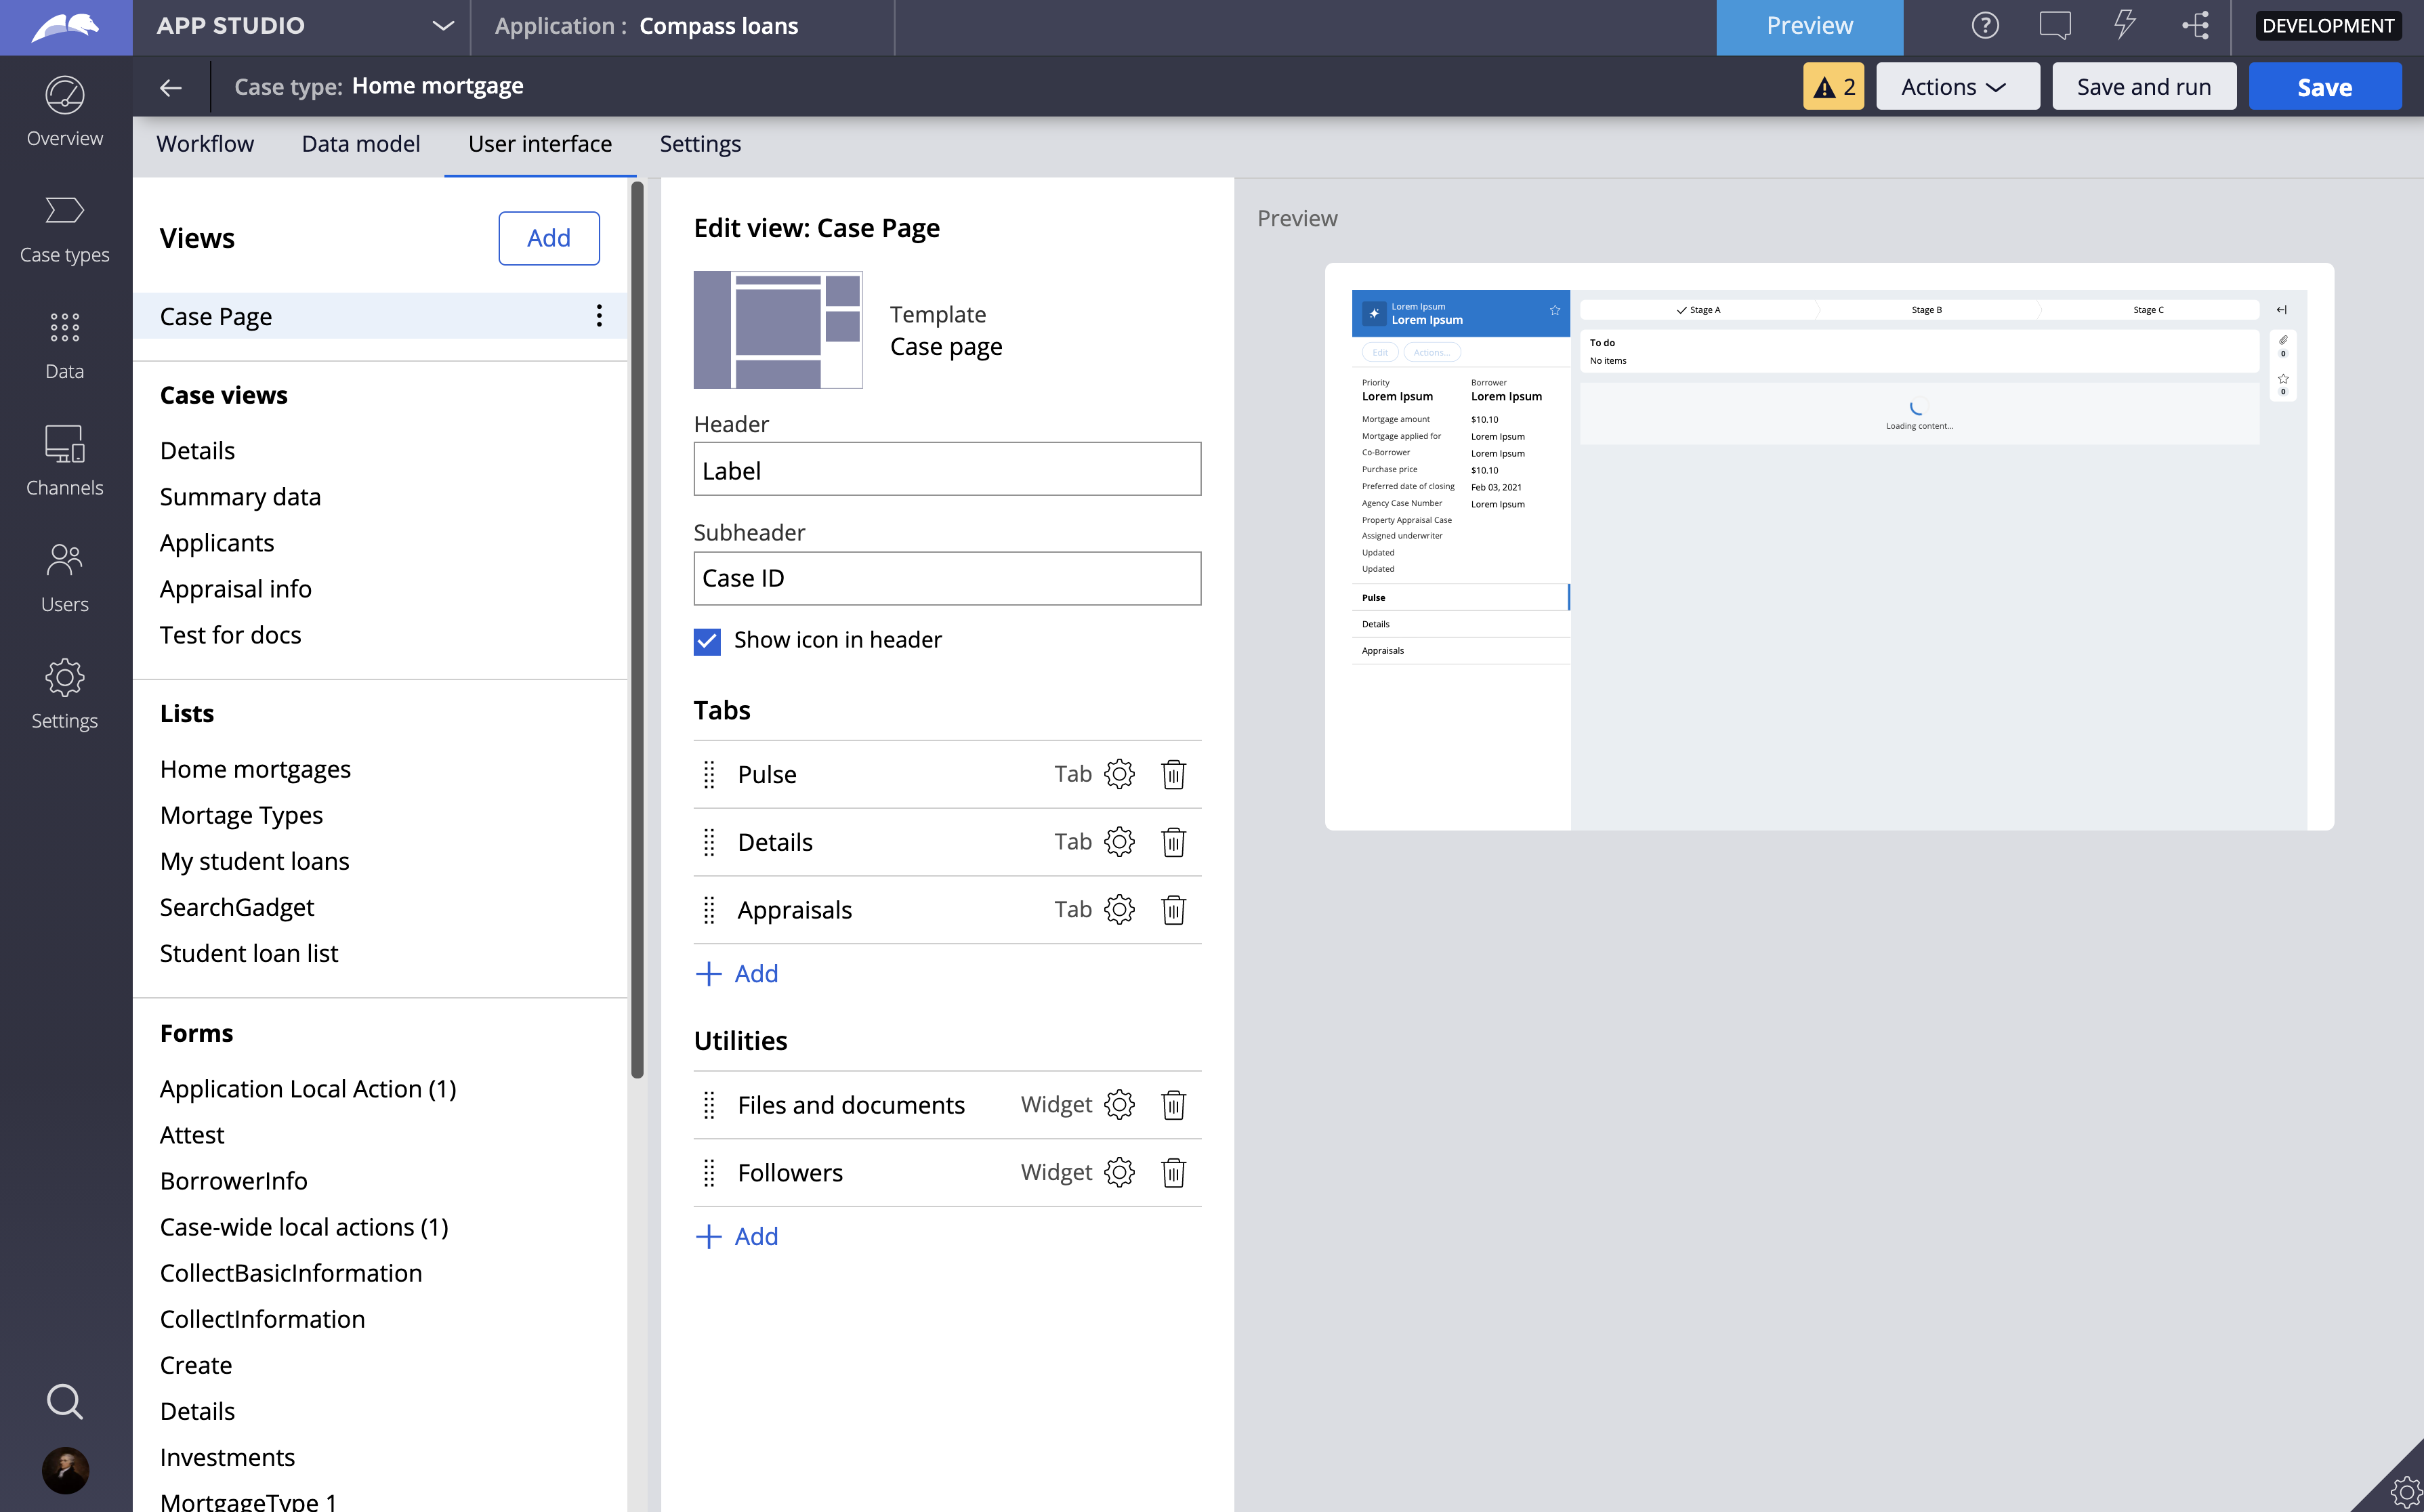
Configuring the user interface for your case type has been streamlined with Pega Platform 8.6. The UI for a case is configured on the User interface tab of a case type. With the React front end, UI metadata is captured in an artifact called Views.
There are four types of views that make up the UI for a case type:
- Case page. This represents an instance of the case - a full page that can be navigated via a URL.
- Case views - Views that display information about a case and are referenced from the case page.
- Lists - Views that display the case instances in a list.
- Forms - Views that enable the end user to gather case information/data.

Configure the following Pega-provided views to provide your users the best experience when working on that case type:
- Case page - When you open a case or an assignment of a case as an end user, you navigate to the case page. You must configure the case page for your case type to include relevant information required to process a case. You can configure the header area of the case page, organize contents into tabs and add or remove utilities from the utilities region.
- Header area - You can choose to configure the header area and provide the text that shows as the heading (defaulted to case label), sub-heading (defaulted to case ID) and choose to display the case icon (defaulted to display).
- Tabs - Add or remove tabs that organize case information. By default, the case page includes two tabs: the Details (see Details below) tab and the Pulse tab. If you choose to add a tab, you can configure the contents of that tab by clicking the gear icon.
- Utilities - Add or remove utilities that may be useful for the case type. Followers and Files and documents are available by default. While Cosmos React UI for 8.6 includes only these two utilities, future releases will offer other utility widgets including Stakeholders and Related cases. A future release will also include the ability to create custom utility widgets.
- Summary data - Shown in the left column of the case page below the header and above the tabs, this view should be configured with only the most critical case data for a user to understand at a glance. For a Home Mortgage case type, critical data might include Mortgage amount and Purchase price. Other critical case data common to all case types might include priority, status, and current stage. Other important but less critical data should be configured in other tabs.
- Details - Empty by default, this displays read-only information about the case. While the Summary view contains the most critical case data that users should understand at a glance, the Details tab can include other important fields and information about the case. The Details view is displayed on the Details tab of the case page.
- Edit - This view is displayed when the Edit action is invoked on the case. Add the fields that are important to be edited from any stage of the case. The fields added here are also those that can be edited from the landing page if editing is enabled on the landing page.
- Create - This view is displayed when creating a new case.
- List - Typically, this is called <Case type>s - This is how instances of this case are displayed in a list. The list is displayed in a table, so it is important to show the right information in that table by adding columns to the table.
