Discussion
Pegasystems Inc.
US
Last activity: 28 Nov 2018 11:12 EST
How to configure a basic/custom modal with validation
Goal
At the end of this post you should have a simple or custom modal which validates the input data and the modal will not close if there are any errors raised by the validation.
A simple modal is one with submit and cancel buttons, minimal styling changes, and leverages pega’s default modal template. A custom modal can be configured using a your own modal template and used when extra actions on submit/cancel are needed and not supported in via the modal post-processing activity or if heavy styling/layout changes to the modal are required.
Overview
A modal dialog is an interaction with the user — a form to be filled in or a statement to be acknowledged — that pops up in its own window on top of the application. Unlike an Overlay, the user cannot continue in the application without processing the form or dismissing the modal dialog. Checkout an example in the UI gallery and compare it with an overlay to see which best fits your needs.
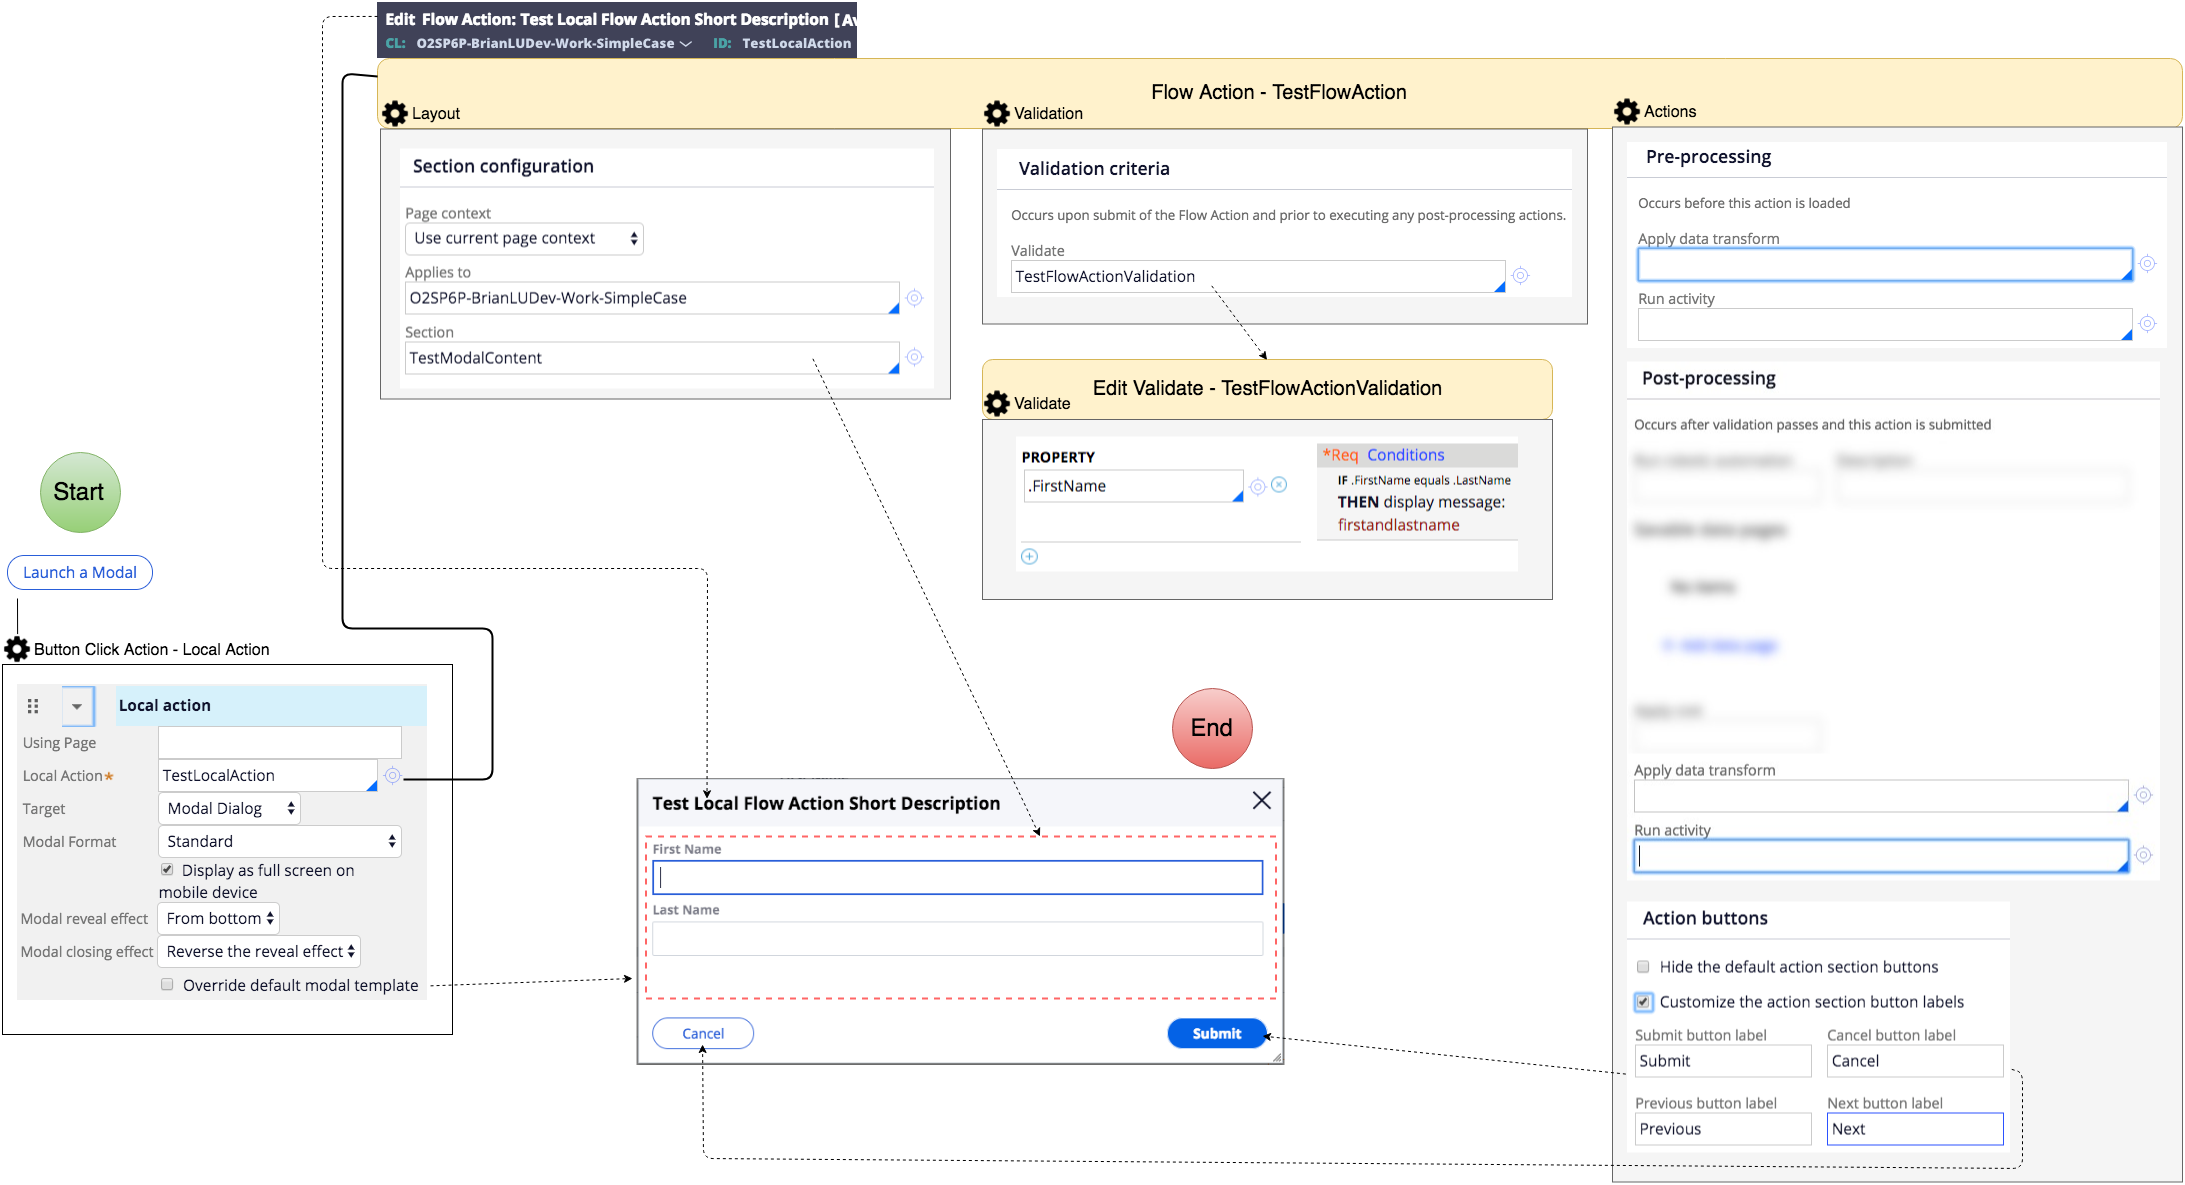
Here is a diagram of how a simple modal dialog is configured to help see the big picture of how things fit together and see extension points for customization and validation (see attachment for a larger photo).

Fig 1.
Configuring a Modal
1) Field Event
First choose which field you will be using to launch the modal and what event will launch it. In Fig 1 there is a button with a click event which will then run the local action to display to modal.
2) Create Flow Action
Create a flow action which will hold all information necessary to show and validate the modal on submit.
3) Create Modal Content Section
Create and configure a section in the layout tab of the local action which will be used as the main content of the modal (see Fig 1, the main area is the red dotted box in the modal). Add this section to the flow action.
4) Setup Pre/Post Processing
If necessary define any data transforms (DT) or activities that need to be run before the modal is launch in the pre-processing and likewise for any processing after the modal is submitted (not closed yet) in the post processing. Note that the post processing DT or activity can act as a validator of the information entered in the modal and discussed laster.
Validation on a Modal
All validation happens on the clicking of submit and if there are any errors on the using page or a page/property error on a descendant of the using page, then modal will not submit and an error will display according to its type.
-Flow Action Validation
This is used for basic validation of user input that isn’t covered in the control or property’s validation and sets an error on the specified property. In Fig 1 the Flow Action’s validate rule (defined on the validation tab) will place an error on the property .FirstName if .FirstName equals .LastName with the message text defined in the message rule firstandlastname.
-Post Processing Validation
In the flow actions post processing activity the “Property-Set-Messages” and “Page-Set-Messages” methods can be used to set an error subsequently stopping the submission of the modal.
UI Customization on a Modal
-Submit & cancel button labels
In the flow action’s action tab there is a section for hiding the buttons and overriding the labels for the: submit, cancel, previous, next default modal template buttons (see Fig 1).
-Modal header text
Change the short description of the flow action rule (see Fig 1)
-Custom modal
** This should only be used when extra actions on submit/cancel are needed and not supported in via the modal post-processing activity or if heavy styling/layout changes to the modal are required!
1) Override modal template
In Fig 1 the button’s property panel has a checkbox to override the default modal template. Check that box and define a section to be used as the model template.
2) Configure the custom modal template
In the section defined as the modal template, define the key fields in your section inside of a dynamic layout. If you're converting an existing modal then simply include the section defined in the flow action. After that, include a button (or any type of field) and define a click event which has an action “close” (see Fig 2). Lastly, include a field which will be used for submitting and add a click event with a “Run Script” action and with a function name of "doModalAction". Then add two parameters with empty names with values of “script:pega.u.d.submitModalDlgParam” and “:event” (see Fig 3)
Fig 2.
Fig 3.
