Configuring Pega Mobile Client to authenticate against Okta
This article describes how to configure a mobile app, based on Pega Mobile Client, to authenticate using OpenID connect protocol, with Pega Platform acting as an identity broker and Okta as identity provider.
While the general approach is described here, this how-to focuses on aspects specific to using Okta as identity provider and Open ID Connect as authentication protocol. It will take you through the steps needed to configure two authentications processes - one between Pega Mobile Client and Pega Platform, and one between Pega Platform and Okta.
The steps have been verified with:
- Okta 2018.40
- Pega Platform 8.1.1
- Pega Mobile Client 7.41.0
Prerequisites
- Access to Developer Console of your development Okta instance, which you can request at developer.okta.com
- Access to Dev Studio of your Pega Platform instance
- Mobile phone for verifying the setup
Part One,
in which we configure Pega Platform to talk to Okta authentication server
in which we configure Pega Platform to talk to Okta authentication server
Step 1: Define application in Okta
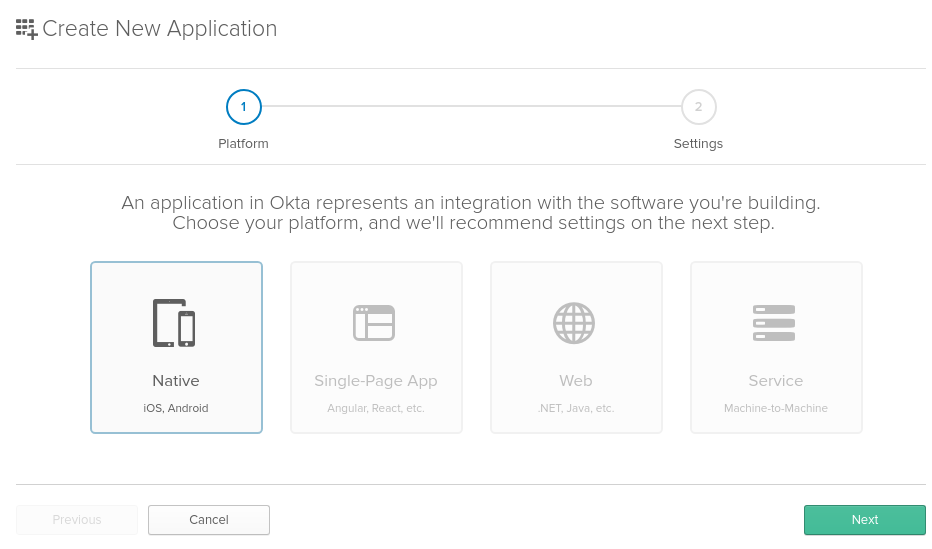
The first step is to configure Okta service for authenticating users via OpenID Connect protocol. In order to do so, login to the Okta Developer Console and create a new application, by clicking Applications > Add Application. Although at this point we are configuring integration between Pega Platform and Okta, the end-users will use a native mobile app, so you need to chose ”Native” as the application type.

Give the application a name (“Pega” in our example) and make sure that grant type is set to “Authorization code”. Leave the default redirect URI, we will change it later. Click "Done" to actually create the application.

Because Pega Platform requires the use of Client Secret, you have modify Client Credentials section of the integration and switch from “Use PKCE” to “Use Client Authentication”. Keep in mind that in case of this integration Client means Pega Platform, not the distributed native app, so using this option is OK. Switching to “Use Client Authentication” will give you access to Client Secret. Note it down, along with Client ID from the same section.

You need one more piece of information, which is the URL to your Okta authentication server. This is listed as “Org URL” on the dashboard of the Okta developer console. In our example it is "https://dev-500306.oktapreview.com"

Metadata describing the OpenID Connect configuration is published by Okta at the URL created by appending "/.well-known/openid-configuration" path to the server URL, which in our example means "https://dev-500306.oktapreview.com/.well-known/openid-configuration"
Make a request for the corresponding URL for your server to make sure the metadata is available. The request should return a non-empty JSON file.
Step 2: Create Authentication Service in Pega Platform
In this step you will create the Pega side of the integration between Pega Platform and Okta. To do so, login to Dev Studio of your Pega instance and click Configure > Org & Security > Authentication > Create Authentication Service. Choose “OpenID Connect” as the type, fill in other fields and click “Create and open”

On the next screen give the service an alias (it’s "Okta" in our example) and click “Import metadata” to import the OpenID Connect configuration from the Okta URL you gathered in the previous step (it's the URL ending with ".well-known/openid-configuration"). This will fill-in the "OpenID Connect provider configuration" section.
 Next configure Client Id and Client Secret based on what you noted in Okta Developer Console in the previous step.
Finally you need to specify the name of OAuth claim that will be used to map users authenticated in Okta to Pega operators. The claim name must be specified in curly braces. The list of valid OAuth claims is specified in OpenID Connect protocol specification, and is available here. As claims are tied to scopes, make sure the scope for the claim you want to use is listed in the "Scope" field.
Remember to save the authentication service. Additionally, ensure that any operator which is expected to authenticate against Okta has “Use external authentication” option enabled.
Step 3: Configure Redirection URL
The next step in configuring the authentication process between Pega Platform and Okta is to configure the URL, to which the end-user will be redirected after successful authentication in Okta. You can find this URL in the "Redirect URI" field of your authentication service. Copy the URL from this field, login to Okta Developer Console, and paste it in place of the default Login redirect URI in your application.
At this point you should have Redirect URI, Client ID and Client Secret set to the same values in Pega authentication service and in Okta application.

Step 4: Verify
It’s time to verify that it all works and Pega Platform can authenticate users against Okta. Make sure you have a user in Okta, which can be mapped to Pega operator in accordance with the mapping you defined in Step 2. With a web browser in incognito mode, go to the URL specified in your authentication service as Login URL. You should be redirected to the Okta login screen, and after authenticating redirected back to Pega Platform, successfully logged in.
Part Two,
in which we configure mobile app to talk to Pega Platform
in which we configure mobile app to talk to Pega Platform
Step 5: Create client registration endpoint in Pega Platform
Log in to Dev Studio and create client registration endpoint to be used by Pega Mobile Client. Click Create > Security > OAuth 2.0 Client Registration, fill-in the fields and click “Create and Open”
On the next screen you need to note down Client Id and Client Secret generated for you by Pega Platform. Just click “View & Download” to have this information conveniently exported to a text file. Notice that in this case Client represents your native app, so obviously the Client ID is different from the Client ID you have in Okta integration, where Client represented Pega Platform.
Because we want to use OpenID Connect protocol, you need to make adjustments to registration endpoint configuration:
- Choose authorization code as the only supported grant type
- Add the Redirect URI. In later steps you will configure your native app to register as a handler for this URI, so the scheme should be unique to your native app
- Enable refresh token
- Enable PKCE, because this is recommended for distributed native apps, and in this configuration your client is a native app

Save your changes
Step 6: Build your mobile app
You should just follow the process described here, there is nothing specific to Okta. The custom.properties file corresponding to the example described in this how-to looks as follows:
container.authentication.servletName = PRMobileOAuth2
container.authentication.type = oauth2
container.authentication.oauth2.grantType = authorization_code
container.authentication.oauth2.scope = openid email profile

container.authentication.oauth2.authorizationEndpoint = https://eng-killerbees09.rpega.com:8080/prweb/PRRestService/oauth2/v1/authorize
container.authentication.oauth2.tokenEndpoint = https://eng-killerbees09.rpega.com:8080/prweb/PRRestService/oauth2/v1/token
container.authentication.oauth2.userInfoEndpoint = https://eng-killerbees09.rpega.com:8080/prweb/PRRestService/oauthclients/v1/userinfo/json
container.authentication.oauth2.tokenRevocationEndpoint = https://eng-killerbees09.rpega.com:8080/prweb/PRRestService/oauth2/v1/revoke

container.authentication.oauth2.clientId = 51965064475465274201
container.authentication.oauth2.clientSecret = D21D0A98CDAA58EE5101C5150480117E
container.authentication.oauth2.redirectUri = com.myorg.myapp://redirect
Step 7: Login to your mobile app
Install your brand new mobile app on a phone to verify the experience your end users will have. After starting the app, it will display the following screen:

Tapping "Log in" will open an external web browser, such as Chrome, and load the Okta login page there:
After successful authentication, you will be brought back to your app which will proceed with loading your Pega application.


